
Do you love the timeless, elegant look of real hardwood floors but hesitate because of life’s inevitable spills, pet messes, and high-traffic wear? You’re not alone. For years, homeowners have faced a tough choice: the authentic beauty of wood or the practical durability of a synthetic alternative. But what if you could have both?
Enter waterproof hybrid hardwood flooring, the revolutionary solution that ends the compromise. This flooring combines a genuine hardwood veneer with a 100% waterproof composite core, giving you the stunning visuals you crave and the bulletproof performance you need. This is the only A-to-Z guide you’ll need to confidently select, perfectly install, and maintain your new floors. We’re here to transform your project anxiety into a flawless finish you’ll be proud of for years to come.
- What is Waterproof Hybrid Hardwood? The Smart Choice Explained
- The Ultimate DIY Installation Masterclass
- Troubleshooting: Solving Common DIY Installation Problems
- Long-Term Care: Keeping Your Hybrid Hardwood Floors Stunning
- Frequently Asked Questions (FAQ)
- Your Flawless Floor Awaits
- References & Authoritative Sources
What is Waterproof Hybrid Hardwood? The Smart Choice Explained
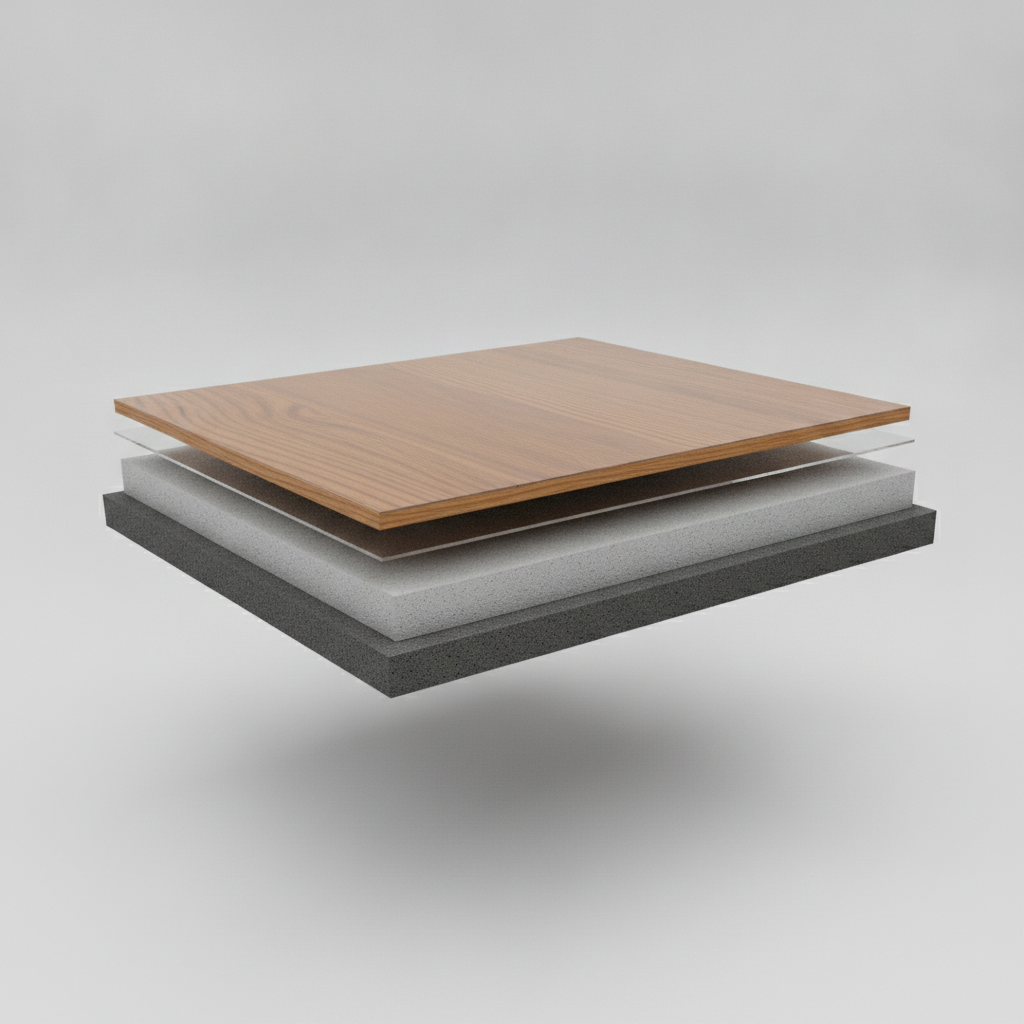
Before you can install it, it’s crucial to understand what makes this durable hardwood alternative such a game-changer. Waterproof hybrid hardwood is an engineered flooring product designed to solve the biggest problems of traditional wood floors. It’s not just a floor; it’s a high-performance system for modern homes.
At its heart, hybrid hardwood features a multi-layer construction. Industry leaders like the Floor Covering Institute define this category by its unique composition, which masterfully blends natural and synthetic materials.[1]
The secret to its performance lies in its core. Unlike traditional hardwood or even some engineered woods that use moisture-sensitive wood products in their core, a hybrid floor uses a stone plastic composite (SPC) or wood plastic composite (WPC) core. This makes the plank itself completely impervious to water from the top down, a claim that traditional wood simply cannot make.
Is Hybrid Hardwood Flooring Real Wood?
Yes, the part you see and touch is 100% real wood. This is one of the most common and important questions homeowners ask. Waterproof hybrid hardwood uses a thin slice of genuine hardwood, called a veneer, as its top layer. This veneer preserves the natural grain, texture, and unique character of species like oak, hickory, or maple.
Veneer thickness can vary, with premium product lines from manufacturers like Shaw or Flooret often featuring veneers of 1.2mm or more. This is thick enough to provide the authentic look and feel of solid wood. The magic is that this beautiful, real wood is bonded to a rigid, waterproof core, protecting it from the subfloor moisture and topical spills that would ruin a solid plank.
Hybrid vs. The World: A Head-to-Head Flooring Comparison
Feeling overwhelmed by the choices? Let’s clear up the confusion. Here’s how waterproof hybrid hardwood stacks up against the other major flooring types.
| Feature | Hybrid Hardwood | Solid Hardwood | Engineered Hardwood | Luxury Vinyl (LVP) | Laminate |
|---|---|---|---|---|---|
| Water Resistance | 5/5 | 1/5 | 2/5 | 5/5 | 3/5 |
| Durability | 4/5 | 3/5 | 3/5 | 5/5 | 4/5 |
| Cost ($/sq ft) | 3/5 | 5/5 | 4/5 | 2/5 | 2/5 |
| DIY-Friendliness | 4/5 | 1/5 | 2/5 | 5/5 | 4/5 |
| Feel Underfoot | 4/5 | 5/5 | 4/5 | 3/5 | 3/5 |
Best For Summaries:
- Solid Hardwood: Best for timeless value, refinishability, and achieving a classic, long-lasting look in dry areas of the home.
- Engineered Hardwood: A good choice for more stable wood flooring over concrete subfloors, but still vulnerable to moisture.
- Luxury Vinyl Plank (LVP): Best for budget-conscious projects needing maximum durability and waterproof performance, where a synthetic image is acceptable.
- Laminate: A durable and affordable hardwood alternative for busy households, with improving water resistance but a synthetic feel.
- Hybrid Hardwood: Best for achieving an authentic, real wood look in any room, including kitchens, basements, and bathrooms, without fear of water damage.
Expert Insight: An interior designer we spoke with noted, “Clients are no longer willing to sacrifice style for durability. Hybrid hardwood is the trend we’re most excited about because it delivers that warm, organic feel of real wood in high-traffic, high-moisture areas like kitchens, which used to be off-limits for premium wood visuals.”
The Ultimate DIY Installation Masterclass
Ready to lay your new floor? This section will guide you through every step. With the right preparation and techniques, you can achieve a result that looks like it was done by a seasoned pro.
- Time Required: 1-2 days for a standard-sized room (150-250 sq ft).
- Skill Level: Beginner to Intermediate.
Certified Installer’s Corner: “The success of any flooring project is 40% preparation. Don’t rush the first phase. A clean, flat, and dry subfloor is the foundation for everything. Skipping this step is the number one mistake I see DIYers make, and it’s the hardest one to fix later.”
Phase 1: Preparation is Everything
Before a single plank is laid, you must prepare your space, your tools, and your flooring. This phase is non-negotiable for a long-lasting, beautiful floor.
Tools & Materials Checklist:
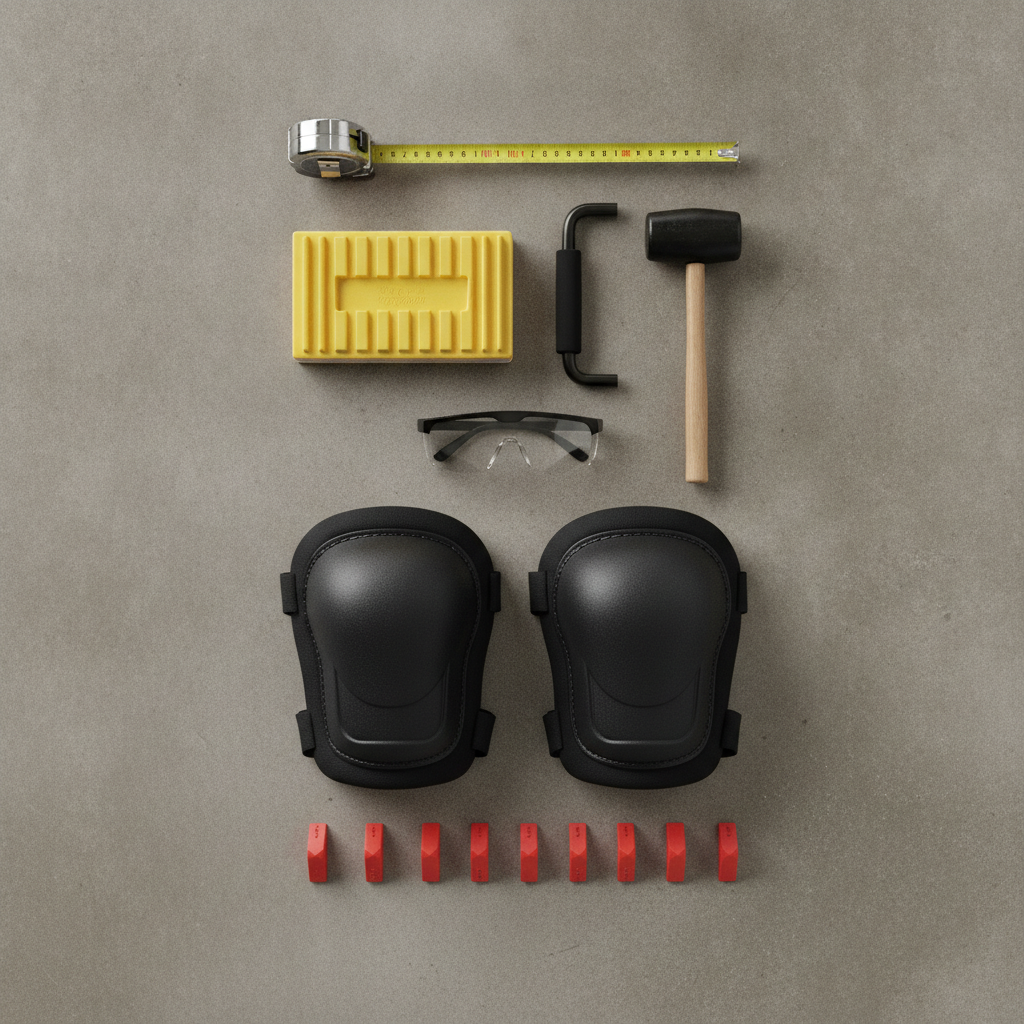
- Measuring & Marking: Tape Measure, Pencil, Combination Square
- Cutting: Miter Saw, Jigsaw, or Table Saw (with a fine-tooth blade), Oscillating Multi-Tool
- Installation: Tapping Block, Pull Bar, Rubber Mallet, Spacers (1/4″)
- Subfloor Prep: 6-foot Level or Straightedge, Floor Scraper, Shop Vacuum, Self-Leveling Compound (if needed)
- Safety: Safety Glasses, Gloves, Knee Pads
First, your flooring must acclimate. This is a critical step. Let the unopened boxes of flooring sit horizontally in the room where they will be installed for at least 48-72 hours. This allows the planks to adjust to the temperature and humidity of your home, preventing expansion or contraction issues after installation. Always follow the specific acclimation time listed in your manufacturer’s installation guide.[2]
Next, prepare your subfloor. It must be clean, flat, and dry.
- Clean: Scrape up any old adhesive, paint, or drywall mud. Sweep and vacuum the entire area thoroughly.
- Flat: The industry standard for a floating floor is a subfloor that is level to within 3/16 of an inch in a 10-foot span. Use a long level or straightedge to find any high or low spots. Grind down high spots and fill low spots with a self-leveling compound.
- Dry: Ensure there are no active moisture issues with your subfloor.
Phase 2: The Step-by-Step Installation Process
With your prep work complete, it’s time for the exciting part. We’ll break down the process into five clear steps.
Pro-Tip: Before you start, open several boxes of flooring and mix the planks. This will ensure a natural-looking distribution of color and grain variation throughout the room, avoiding noticeable “patches” of similar boards.
Step 1: Plan Your Layout & Establish a Starting Line
Decide which direction the planks will run. Generally, it’s best to lay them parallel to the longest wall or running in the same direction as the main light source (windows).
To ensure a balanced look, measure the width of the room and divide it by the width of one plank. If your calculation shows that the last row will be less than one-third of a plank’s width, you should cut your first row narrower. This avoids having a tiny, awkward-looking sliver of a plank at the end of the installation. According to best practices from organizations like the Certified Flooring Installers Association (CFI), this initial planning prevents aesthetic issues later on.[3]
Step 2: Installing the First Row
Your first row must be perfectly straight. Use a chalk line to mark your starting line, accounting for the 1/4-inch expansion gap. Place 1/4-inch spacers between the long edge of the first plank and the starting wall. Lay the first plank in a corner. To connect the next plank in the row, engage the short-end locking mechanism, typically by holding the new plank at a slight angle and lowering it into place. Continue until the first row is complete. You will likely need to cut the last plank to fit.
Step 3: Laying the Main Body of the Floor
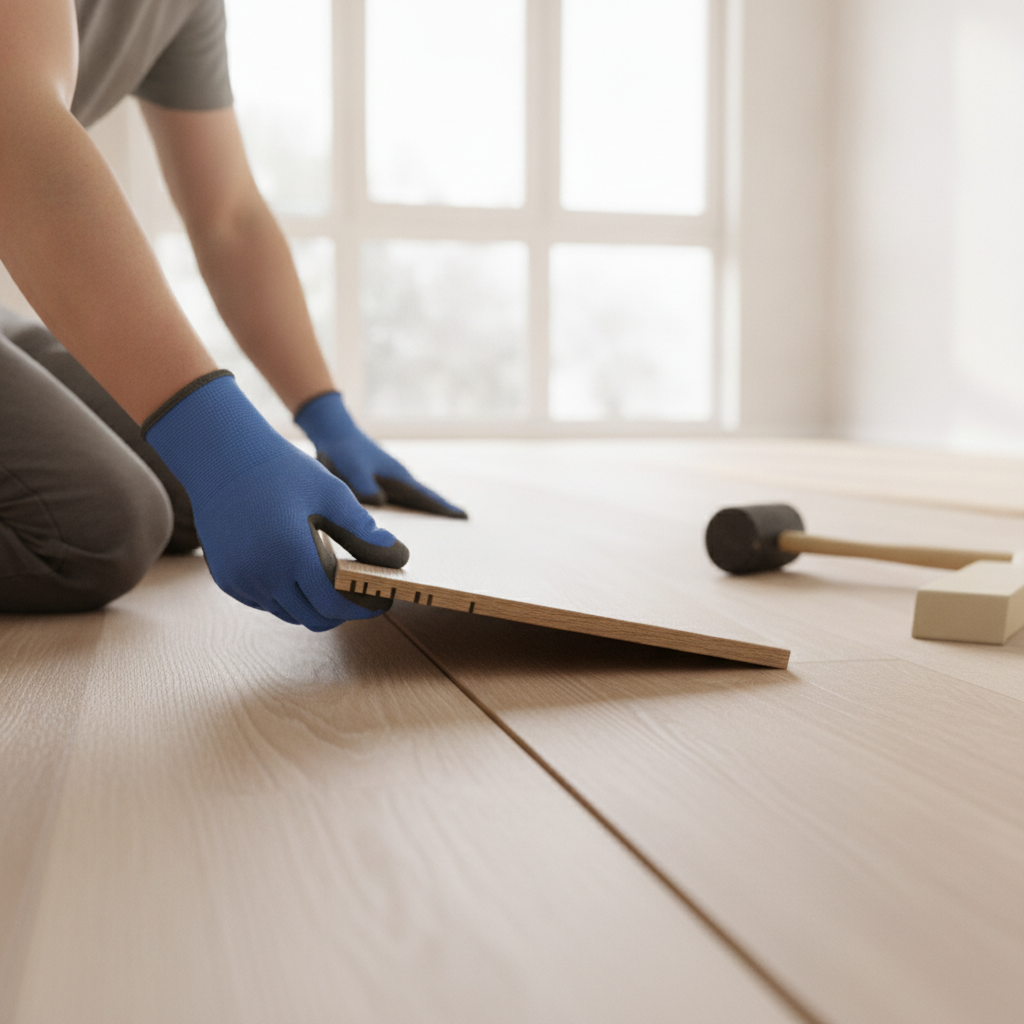
Use the off-cut from the last plank of your first row to start your second row (as long as it’s at least 6-8 inches long). This naturally creates the staggered pattern you need.
To connect a new row, hold the plank at a slight angle (usually 20-30 degrees) and insert its long-side tongue into the groove of the previous row. Lower the plank flat to the floor. You should feel it click into place. Use a tapping block and rubber mallet to gently tap the long edge to ensure a tight fit. Use the tapping block on the short end to lock it into the previous plank in the same row. Never hit the plank directly with the mallet.
Step 4: Making Complex Cuts (Door Jambs & Vents)
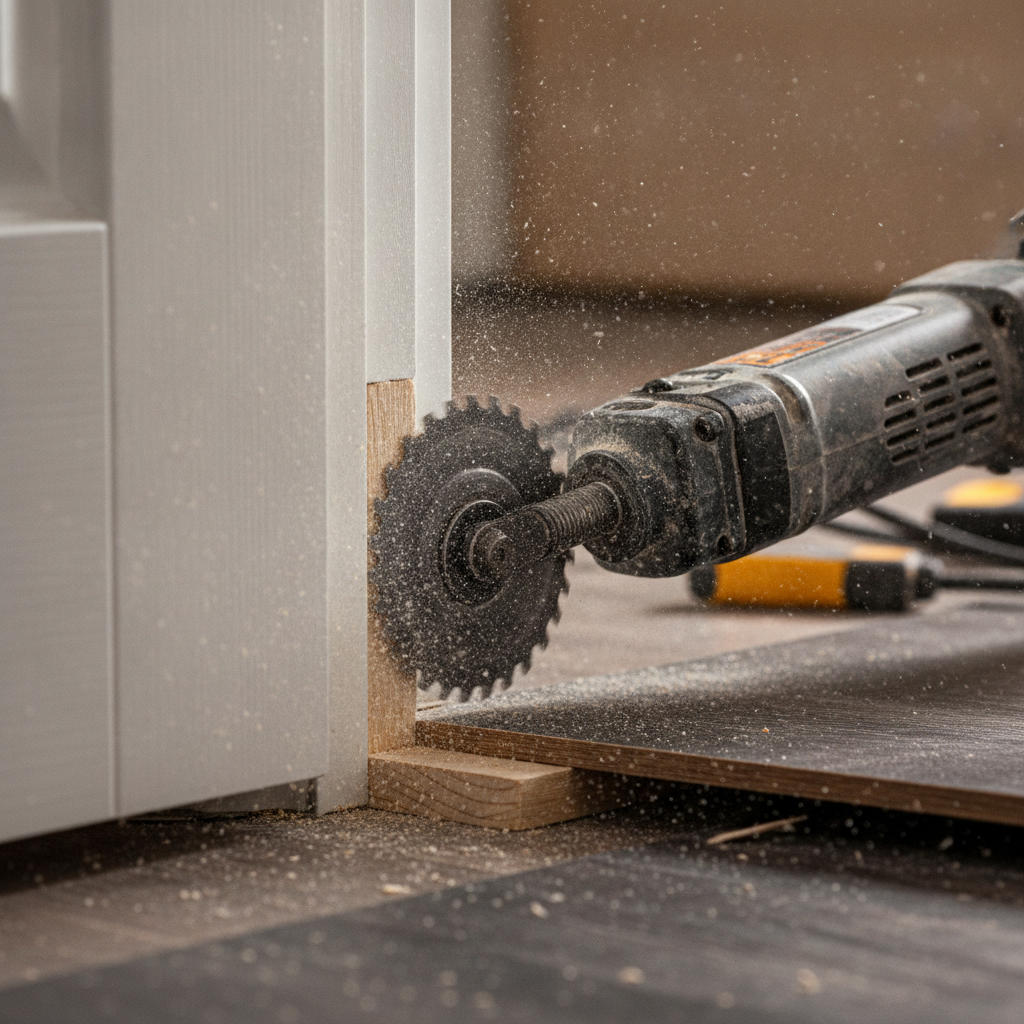
This is where a DIY job can look truly professional. Instead of cutting a notch in the plank to go around a door jamb, undercut the jamb itself. Lay a scrap piece of flooring on the subfloor against the jamb. Rest the blade of an oscillating multi-tool flat on the scrap piece and cut horizontally through the jamb. This technique, often highlighted by experts at This Old House, allows you to slide the flooring underneath the jamb for a seamless, clean finish.[4] For floor vents, measure and mark the opening on the plank and use a jigsaw to cut it out.
Step 5: Installing the Final Row
When you reach the last row, you will almost certainly need to cut the planks lengthwise (a “rip cut”). To get the correct width, lay a full plank directly on top of the last installed row. Then, take another plank, place it against the wall on top of the first plank, and use its edge as a guide to draw a cut line. This will give you the exact width needed, including the 1/4-inch expansion gap. Use a table saw or jigsaw to make the cut. Fit the final row into place using a pull bar to lock the long edge tight.
Phase 3: Finishing Touches for a Professional Look
Your floor is laid, but the job isn’t done. Remove all the spacers from the perimeter of the room. Now, install your baseboards or quarter-round molding to cover the expansion gap. This trim is nailed to the wall, not the floor, allowing the floor to “float” or expand and contract naturally.
Use transition strips to create a smooth and finished look between your new floor and adjacent flooring types.
- T-Molding: Used for transitions between two floors of the same height.
- Reducer: Used when transitioning to a lower floor, like vinyl or concrete.
Pro-Tip from a Carpenter: “For perfect inside corners on your baseboards, cope the joint instead of mitering it. For outside corners, a 45-degree miter is standard. Always use a sharp, fine-tooth blade on your miter saw for the cleanest cuts.”
Troubleshooting: Solving Common DIY Installation Problems
Even with the best guide, you might hit a snag. Here’s how to solve the most common installation challenges.
Problem: Planks Won’t Lock Together Easily
- Cause 1: Debris. The most common culprit is a tiny bit of sawdust, drywall dust, or a wood splinter in the locking groove.
- Solution: Disconnect the plank and use a small brush or vacuum to thoroughly clean the tongue and groove.
- Cause 2: Unlevel Subfloor. If there’s a high or low spot, it can prevent the locking mechanism from engaging properly.
- Solution: You may need to pull up a few rows and address the subfloor issue with a grinder or self-leveling compound.
- Cause 3: Incorrect Angle. You may be holding the plank at too high or too low of an angle.
- Solution: Consult the manufacturer’s instructions for the optimal angle and try again.
Problem: Gaps are Appearing Between Planks
- Cause 1: Improper Tapping. The planks were not fully engaged during installation.
- Solution: For a small gap, you may be able to use a piece of flooring adhesive tape and a heavy weight to pull the planks together. For larger gaps, you may need to use a pull bar to tap the row and tighten it up.
- Cause 2: Expansion Gap Issues. If the floor is pinned against a wall or cabinet (no expansion gap), pressure can build up and cause planks to separate elsewhere.
- Solution: Ensure the floor has a free 1/4-inch gap around the entire perimeter, including around kitchen islands and cabinets. You may need to undercut obstacles or trim planks. The National Institute of Certified Floorcovering Inspectors (NICFI) often identifies insufficient expansion space as a leading cause of flooring failure, including gapping and buckling.[5]
When to Stop and Call a Pro: If you discover significant subfloor damage (rot, major structural issues) or if you’re simply feeling overwhelmed by complex layouts or stairs, it’s always wise to consult a professional. A small investment in expert help can save you from a costly mistake.
Long-Term Care: Keeping Your Hybrid Hardwood Floors Stunning
You’ve installed a beautiful, durable floor. Here’s how to keep it that way.
- Cleaning: Regular sweeping or vacuuming (with the beater bar turned off) is your first line of defense. For deeper cleaning, use a microfiber mop with a pH-neutral cleaner specifically designed for hardwood or hard-surface floors. Leading finish manufacturers like Bona recommend avoiding vinegar, wax, or steam cleaners, which can damage the wood veneer’s finish.[6]
- Scratch Prevention & Repair: Place felt pads on the bottom of all furniture legs. Use doormats at all exterior doors to trap grit and dirt. For minor surface scratches on the wood veneer, there are touch-up and repair kits available. These often include a wax stick or marker that can fill in the scratch and match the color of your floor.
- Water: While the core is waterproof, it’s still best practice to wipe up spills promptly to protect the real wood veneer and prevent water from getting into the seams and under the floor at the perimeter.
Frequently Asked Questions (FAQ)
How much does hybrid hardwood flooring cost?
Material costs typically range from $4 to $9 per square foot. By choosing a DIY floor installation, you can save an additional $2 to $5 per square foot on professional labor costs.
What are the best brands of hybrid hardwood flooring?
Look for reputable brands known for quality flooring, such as Shaw, Flooret, and Cali Bamboo. Always compare warranties, veneer thickness, and core construction when making your choice.
Can you install hybrid hardwood over tile?
Yes, in many cases you can. The existing tile floor must be secure (no loose or cracked tiles), clean, and flat, meeting the 3/16-inch over 10-foot requirement. You will be installing the hybrid floor directly over the tile as a floating floor. Always check your specific manufacturer’s guidelines for approved subfloors.
Your Flawless Floor Awaits
Waterproof hybrid hardwood truly offers the perfect blend of authentic wood beauty and modern, worry-free durability. It’s a floor that can stand up to real life in any room of your home. By following this guide, you are now fully equipped with the knowledge and confidence to move from project planning to a perfectly installed floor.
Ready to transform your home? Choose your favorite hybrid hardwood flooring and start your project this weekend! Share your results in the comments below.
This guide provides general instructions. Always consult and prioritize your specific flooring manufacturer’s installation manual. This article may contain affiliate links for tools and materials.
References & Authoritative Sources
- Floor Covering Institute. (N.D.). Flooring Industry Definitions.
- Manufacturer’s Installation Guide. (N.D.). Official Installation Manual.
- Certified Flooring Installers Association (CFI). (N.D.). Installation Best Practices.
- This Old House. (N.D.). Home Improvement Tutorials and Expert Advice.
- National Institute of Certified Floorcovering Inspectors (NICFI). (N.D.). Resources on Common Installation Errors.
- Bona. (N.D.). Floor Care Products and Recommendations.