
Have you ever dreamed of the timeless beauty of hardwood floors but recoiled at the thought of a spilled glass of water turning your dream into a warped, buckled nightmare? You’re not alone. For years, homeowners have faced a tough choice: the authentic charm of wood or the practical durability of a waterproof alternative. Add in the high cost of professional installation—often running thousands of dollars—and the anxiety of tackling a complex DIY project, and it’s enough to make anyone put their renovation on hold.
What if you could have it all? The stunning look of real hardwood, 100% waterproof protection, and a straightforward installation process designed for the weekend warrior. Enter waterproof hybrid hardwood flooring. This guide is your complete masterclass, designed to eliminate the guesswork and empower you with the skills and confidence to achieve a flawless, professional-looking floor without the professional price tag. Let’s get to work.

- What is Waterproof Hybrid Hardwood? The Best of Both Worlds
- Your DIY Project Planner: Tools, Materials, and Prep Work
- The Complete Step-by-Step Installation Guide
- Common DIY Mistakes and How to Avoid (or Fix) Them
- Frequently Asked Questions (FAQ)
- Your Floor, Your Achievement
- References & Authoritative Sources
What is Waterproof Hybrid Hardwood? The Best of Both Worlds
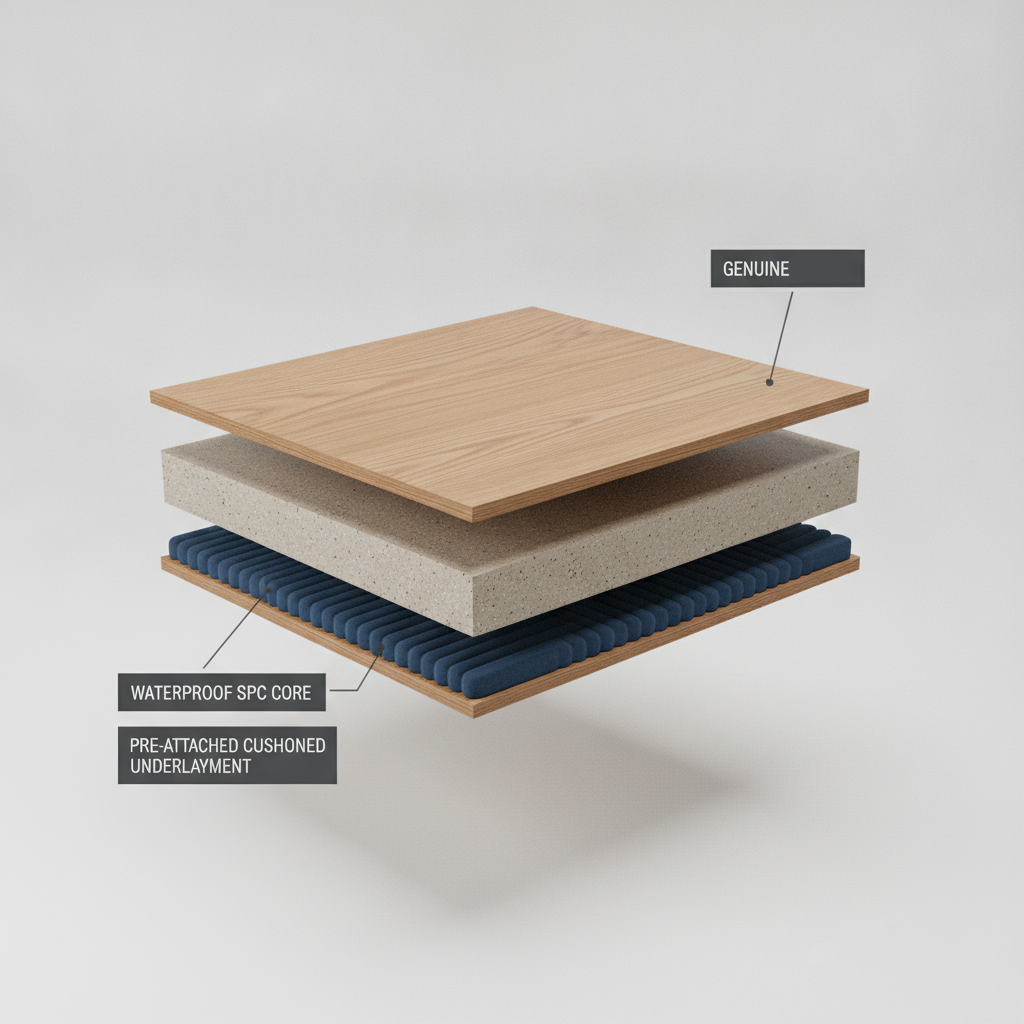
Waterproof hybrid hardwood is a marvel of modern flooring technology, engineered to deliver the aesthetic you love with the performance you need. Unlike traditional solid hardwood, which is a single piece of wood, hybrid hardwood has a sophisticated layered construction.
Imagine a cross-section of a single plank. At the very top, you have a layer of genuine hardwood veneer—thinly sliced oak, hickory, maple, or another species that gives the floor its authentic look and feel. This veneer is bonded to a core that is the secret to its durability. This core is typically an SPC (Stone Polymer Composite) or WPC (Wood Polymer Composite) material. According to flooring authorities like the Floor Covering Institute, it’s this composite core that makes the plank dimensionally stable and, most importantly, 100% waterproof1. Spills can sit for hours or even days without causing the planks to swell, cup, or buckle. Many products also include a pre-attached underlayment on the bottom, which provides cushioning, sound dampening, and a moisture barrier, simplifying the installation process even further.
Hybrid Hardwood vs. Engineered Hardwood vs. LVP: A Clear Comparison
With so many options on the market, it’s easy to get confused. Where does hybrid hardwood fit in? Let’s break down how it stacks up against its closest competitors.
As one flooring materials expert puts it, “Hybrid hardwood is the ultimate problem-solver. It gives homeowners the real wood they touch and see, bonded to a waterproof core that provides peace of mind. It’s the perfect marriage of authenticity and technology.”
| Feature | Waterproof Hybrid Hardwood | Traditional Engineered Hardwood | Luxury Vinyl Plank (LVP) |
|---|---|---|---|
| Water Resistance | 100% Waterproof Core | Water-Resistant (can be damaged by standing water) | 100% Waterproof |
| Durability | Very High (dent-resistant core) | Moderate (prone to dents and water damage) | Very High (scratch and dent resistant) |
| Authentic Wood Feel | Excellent (real wood top layer) | Excellent (real wood top layer) | Good (photographic layer, no real wood texture) |
| DIY-Friendliness | Excellent (click-lock system) | Moderate (can be click-lock, glue, or nail) | Excellent (click-lock system) |
| Cost | $$-$$$ | $$-$$$$ | $-$$ |
A crucial factor for long-term planning is refinishing. While some thicker engineered hardwoods can be sanded and refinished once or twice, most waterproof hybrid hardwood floors cannot be refinished due to the thinness of the wood veneer. This is a key trade-off for its enhanced durability and waterproof capabilities.
Your DIY Project Planner: Tools, Materials, and Prep Work
A successful project is 90% preparation. Walking into a flooring installation without a plan is a recipe for frustration. This section is your comprehensive project planner, designed to get you organized and ready for a smooth, stress-free installation.
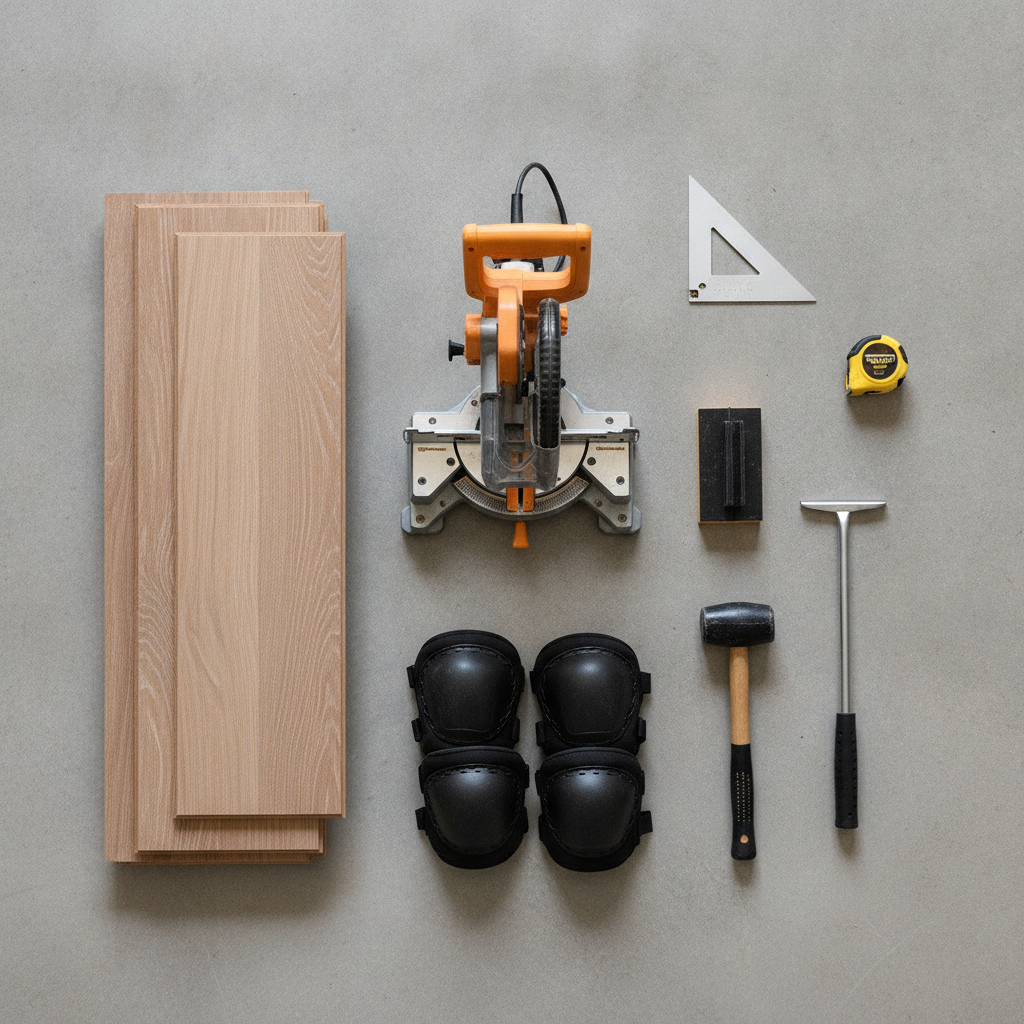
A certified flooring installer we spoke with shared this tip: “For your first project, focus on the essentials. You need a quality miter saw for clean cuts, a tapping block, and a pull bar. Don’t waste money on fancy gadgets. The most important tool is patience and a commitment to preparing your subfloor correctly.”
First Project Shopping & Tool List:
- Essential Tools: Tape Measure, Pencil, Speed Square, Utility Knife, Miter Saw (or Circular Saw with a guide), Tapping Block, Pull Bar, Rubber Mallet, Jamb Saw (or Oscillating Multi-Tool), Safety Glasses, Gloves, Knee Pads.
- Materials: Your Hybrid Hardwood Flooring, 1/4-inch Spacers, Transition Strips/Molding.
Step 1: Measuring Your Room and Ordering Material
Accurate measurements are non-negotiable. Here’s a simple method:
- Measure the Main Area: Measure the length and width of the room and multiply them to get the square footage (e.g., a 10-foot by 12-foot room is 120 sq. ft.).
- Measure Irregular Areas: For closets, nooks, or L-shaped rooms, break them down into smaller rectangles. Measure each one individually and add their square footage together.
- Add for Waste: This is the most important step. You will make mistakes, and cuts will create unusable scraps. The industry standard is to order 10-15% extra material to account for this waste factor. For our 120 sq. ft. room, you would order at least 132 sq. ft. (120 x 1.10).
Step 2: The Most Critical Step – Subfloor Preparation
Professionals agree: the quality of your finished floor is directly tied to the quality of your subfloor. In fact, proper subfloor preparation can account for up to 40% of the success of a DIY flooring project. Your subfloor must be Clean, Flat, and Dry.
- Clean: Scrape up any old adhesive, remove nails or staples, and thoroughly sweep and vacuum the entire area.
- Flat: This is crucial. According to the National Wood Flooring Association (NWFA) installation guidelines, a subfloor should typically be flat to within 3/16 of an inch over a 10-foot span2. Check for high or low spots using a long, straight edge. Sand down high spots and fill low spots with a cement-based floor leveling compound.
- Dry: Ensure the subfloor is completely dry and that any underlying moisture issues (e.g., from a concrete slab) have been addressed.
Can I install hybrid flooring over existing tile?
Yes, in many cases you can. The tile must be secure (no loose or cracked tiles), clean, and meet the flatness requirements mentioned above. Installing over existing flooring can save you a tremendous amount of time and effort in demolition.
Step 3: Acclimating Your Flooring (Don’t Skip This!)
You’ve bought your beautiful new flooring, and you’re eager to get started. But first, you must let it acclimate. Acclimation is the process of letting the flooring material adjust to the normal temperature and humidity conditions of the room where it will be installed. Skipping this step can cause the planks to expand or contract after installation, leading to unsightly gaps or buckling.
Flooring inspectors from organizations like the National Institute of Certified Floorcovering Inspectors (NICFI) often trace failures back to this skipped step3. Bring the unopened boxes of flooring into the room and lay them flat for at least 48-72 hours before you begin. Always check the specific manufacturer’s guide, as their instructions are the ultimate authority for your product and its warranty.
The Complete Step-by-Step Installation Guide
With your room prepped and materials acclimated, it’s time for the rewarding part: laying your new floor. We’ll walk through this process step-by-step, just like a pro would.
Laying the First Row: The Foundation for Success
Your first row dictates the outcome of the entire floor. Take your time and get it right.
- Plan Your Layout: Decide which direction to run your planks. Generally, it’s best to run them parallel to the longest wall or toward the main source of light.
- Set Your Expansion Gap: Hybrid hardwood is a “floating floor,” meaning it isn’t nailed or glued to the subfloor. It needs room to expand and contract with changes in temperature and humidity. Place 1/4-inch spacers along the starting wall to create this necessary expansion gap. This gap will be covered by baseboards or quarter-round molding at the end.
- Install the First Plank: Lay the first plank in a corner with the tongue side facing the wall.
- Complete the Row: Connect the next plank by inserting its tongue into the groove of the first plank at a slight angle and lowering it into place. Continue this until you reach the end of the wall. You will need to cut the last plank to fit, leaving a 1/4-inch gap.
As any installer will tell you, “The straightness of your entire floor depends on getting this first row perfect.”
Installing Subsequent Rows and Staggering Seams
The key to a strong and visually appealing floor is staggering the end-seams of your planks. You never want seams from adjacent rows to line up.
- Start the Second Row: Use the piece you cut from the end of the first row to start your second row (as long as it’s at least 8-12 inches long). This creates a natural stagger and reduces waste.
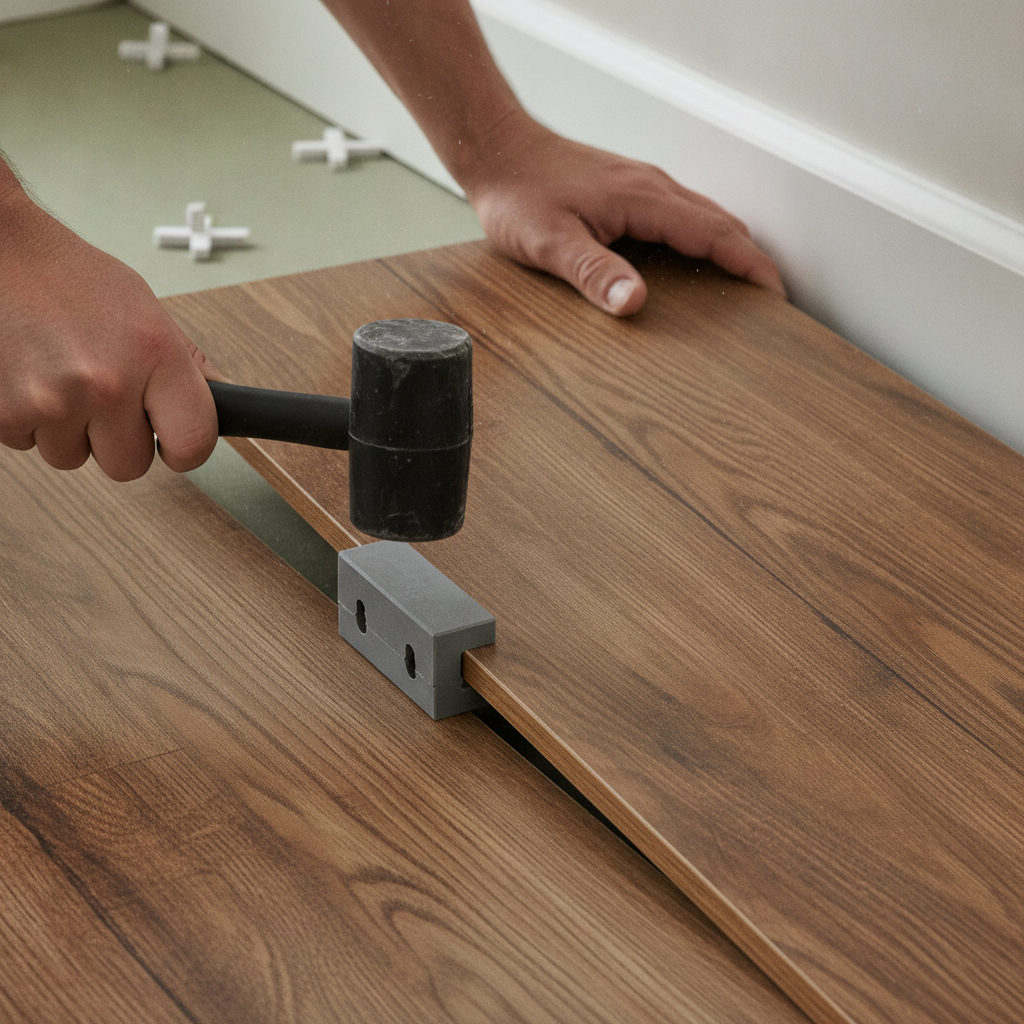
- Engage the Planks: Insert the long tongue edge of the new plank into the groove of the plank in the first row. Lower it down, making sure the end-seam is tight against the previous plank in its row.
- Lock it In: Use your tapping block and rubber mallet to gently tap the long edge and ensure a tight fit. There should be no visible gap.
- Stagger Consistently: As a best practice recommended by the Certified Flooring Installers Association (CFI), ensure the end-seams in any row are at least 8-12 inches away from the seams in the row next to it4. Avoid creating “H” patterns where seams line up every other row.
Mastering Cuts: Doorways, Vents, and Obstacles
Cutting around obstacles is what separates an amateur job from a professional one.
- Doorways: The cleanest way to handle a doorway is to undercut the casing (the trim around the door). Use a jamb saw or an oscillating multi-tool with a flush-cut blade. Lay a scrap piece of flooring on the subfloor next to the casing to act as a height guide for your saw. This allows you to slide the new plank directly under the casing for a seamless, built-in look.
- Vents and Complex Shapes: For floor vents or other obstacles, lay the plank in position and carefully trace the shape you need to cut out. For very complex shapes, like around a stone fireplace, create a template first using cardboard. Trace the shape onto the template, cut it out, test the fit, and then transfer the outline to your flooring plank.
Installing the Final Row and Finishing Touches
You’re almost there! The final row requires a bit of finesse.
- Measure for the Final Row: The last row will likely need to be cut lengthwise (ripped). Place a full plank directly on top of the last installed row. Then, place another plank on top of that one, but with its edge flush against the wall (remembering your 1/4-inch spacer). Trace a line on the plank underneath. This line is your cut line for the final row.
- Cut and Install: Rip the planks for the final row to the required width using a circular saw or table saw.
- Use the Pull Bar: With the limited space, you won’t be able to use a tapping block. This is where the pull bar comes in. Hook it over the edge of the cut plank and tap it with your mallet to pull the plank tight and lock it into place.
- Finish the Job: Remove all your spacers. Install your baseboards or quarter-round molding to cover the expansion gaps. Install transition strips in doorways that lead to other flooring types (like carpet or tile).
As one interior designer notes, “Trim is like the frame on a beautiful painting. Don’t skimp on it. Properly installed baseboards and transitions are the finishing touches that elevate the entire project from good to great.”
Common DIY Mistakes and How to Avoid (or Fix) Them
Even with the best guide, mistakes can happen. Here are the top 5 pitfalls for DIYers and how to handle them.
- Ignoring Subfloor Prep: The Mistake: Laying flooring over an uneven or dirty subfloor. The Result: Bouncy spots, clicking noises, and seams that eventually break. The Fix: Don’t start until your subfloor is perfectly clean and flat.
- Forgetting the Expansion Gap: The Mistake: Installing planks tight against the walls. The Result: The floor buckles or “tents” in the middle as it expands. The Fix: Always use 1/4-inch spacers on all sides.
- Not Staggering Seams Properly: The Mistake: Aligning seams too closely or creating “H” patterns. The Result: A structurally weak and visually unappealing floor. The Fix: Follow the 8-12 inch rule for staggering.
- Forcing Planks Together: The Mistake: Banging planks aggressively with a mallet without a tapping block. The Result: Damaged tongue-and-groove locking mechanisms. The Fix: Use gentle but firm taps on a tapping block to coax planks into place.
- Skipping Acclimation: The Mistake: Installing the floor right out of the box. The Result: Gapping or buckling weeks or months later. The Fix: Be patient and acclimate for at least 48 hours.
How to Uninstall a Plank: Made a mistake mid-installation? Don’t panic. For most click-lock systems, you can carefully lift the entire row you’re working on at an angle to disengage it from the previous row. Then, you can separate the planks in that row and replace the problem piece.
An Ask the Pro Sidebar: We asked a master installer from the NICFI about the most costly error he sees. His answer was immediate: “Ignoring a minor subfloor issue. People think a small dip won’t matter, but over time, foot traffic will cause the locking system to fail in that spot. What would have been a $50 fix with leveling compound becomes a multi-thousand dollar floor replacement.”
Frequently Asked Questions (FAQ)
How much does hybrid hardwood flooring cost?
Material costs for waterproof hybrid hardwood typically range from $4 to $12 per square foot, depending on the brand, wood species, and veneer thickness. The real savings come from the installation. With professional labor costs ranging from $3 to $10 per square foot, a DIY installation on a 500 sq. ft. project could save you anywhere from $1,500 to $5,0005.
Do I need an underlayment for waterproof hybrid flooring?
Most waterproof hybrid hardwood products come with a high-quality underlayment pre-attached to the back of each plank. This saves a step and ensures compatibility. However, you should always read the manufacturer’s specific installation instructions. Some may require an additional vapor barrier, especially when installing over a concrete subfloor. Following their guidelines is critical for your warranty.
Is waterproof hardwood durable enough for pets and kids?
Absolutely. This is where hybrid hardwood truly shines. The waterproof core prevents damage from spills, pet accidents, or wet boots. The top layer is a factory-applied finish that is often infused with aluminum oxide, making it highly resistant to scratches and scuffs. Pay attention to the “wear layer” thickness, measured in mils. A 12-mil wear layer is good for residential use, while a 20-mil or higher wear layer offers excellent protection for busy households with large pets and active kids.
Your Floor, Your Achievement
You now have the knowledge and the step-by-step plan to transform your home with a beautiful, durable, and waterproof floor. Waterproof hybrid hardwood offers the perfect combination of classic style, modern performance, and DIY-friendliness. By following this guide, you can avoid the common pitfalls and achieve a result that looks truly professional. The money you save is a fantastic bonus, but the pride you’ll feel every time you walk across the floor you installed yourself is priceless.
Ready to start your transformation? Browse our curated selection of top-rated waterproof hybrid hardwood floors and find the perfect style for your home today.
Disclaimer: This guide provides general instructions. Always consult and follow the specific installation instructions provided by your flooring manufacturer to ensure warranty compliance. Prioritize safety by using appropriate personal protective equipment (PPE) like gloves and safety glasses.
References & Authoritative Sources
- Floor Covering Institute. (n.d.). Composite Flooring Construction Standards.
- National Wood Flooring Association. (n.d.). Installation Guidelines and Specifications. NWFA Publications.
- National Institute of Certified Floorcovering Inspectors. (n.d.). Common Causes of Flooring Failure. Technical Bulletins.
- Certified Flooring Installers Association. (n.d.). CFI Installation Standards Manual.
- HomeAdvisor. (2026). True Cost Guide: Flooring Installation. Data aggregated from completed user projects.
