
There’s a unique satisfaction that comes from transforming a room with your own two hands, and nothing makes a bigger impact than a new floor. Installing your own Bravewood waterproof hybrid hardwood flooring not only saves you a significant amount of money on labor costs but also gives you a profound sense of accomplishment. However, the prospect can be intimidating. You’re holding expensive, beautiful planks and are haunted by the fear of making a costly, irreversible mistake. What if the subfloor isn’t right? What if the seams don’t lock perfectly?
This is not just another set of instructions. This is the Definitive DIYer’s Playbook for a Flawless Hybrid Hardwood Floor—a complete project success system designed to transform you from a nervous novice into a confident installer. We go beyond the basics, providing you with a realistic difficulty scorecard, a visual guide to avoiding and fixing common mistakes, and an annotated walkthrough of the official process. By the end of this guide, you’ll have everything you need to achieve a professional-grade result that you can be proud of for years to come.
We’ll walk you through four critical phases:
- Planning & Preparation: Gathering the right tools and mastering your subfloor.
- The Installation: A step-by-step visual guide from the first plank to the last.
- Troubleshooting: Identifying and fixing the most common DIY pitfalls.
- Finishing: Adding the final touches for a polished, durable floor.
Let’s get started.
- First, What Exactly is Bravewood Hybrid Hardwood?
- Is This a DIY Project for You? A Realistic Difficulty Scorecard
- Phase 1: Your Complete Tool & Materials Checklist
- Phase 2: Mastering Subfloor Preparation (The Most Critical Step)
- Phase 3: Your Step-by-Step Bravewood Installation Walkthrough
- Troubleshooting: How to Avoid & Fix the Top 5 Installation Mistakes
- Phase 4: Finishing Touches & Long-Term Care
- Your Flawless Floor Awaits
- References & Authoritative Sources
First, What Exactly is Bravewood Hybrid Hardwood?
Before you begin, it’s essential to understand the material you’re working with. Bravewood isn’t traditional hardwood, nor is it simple vinyl plank. It’s a cutting-edge hybrid that combines the best of both worlds.
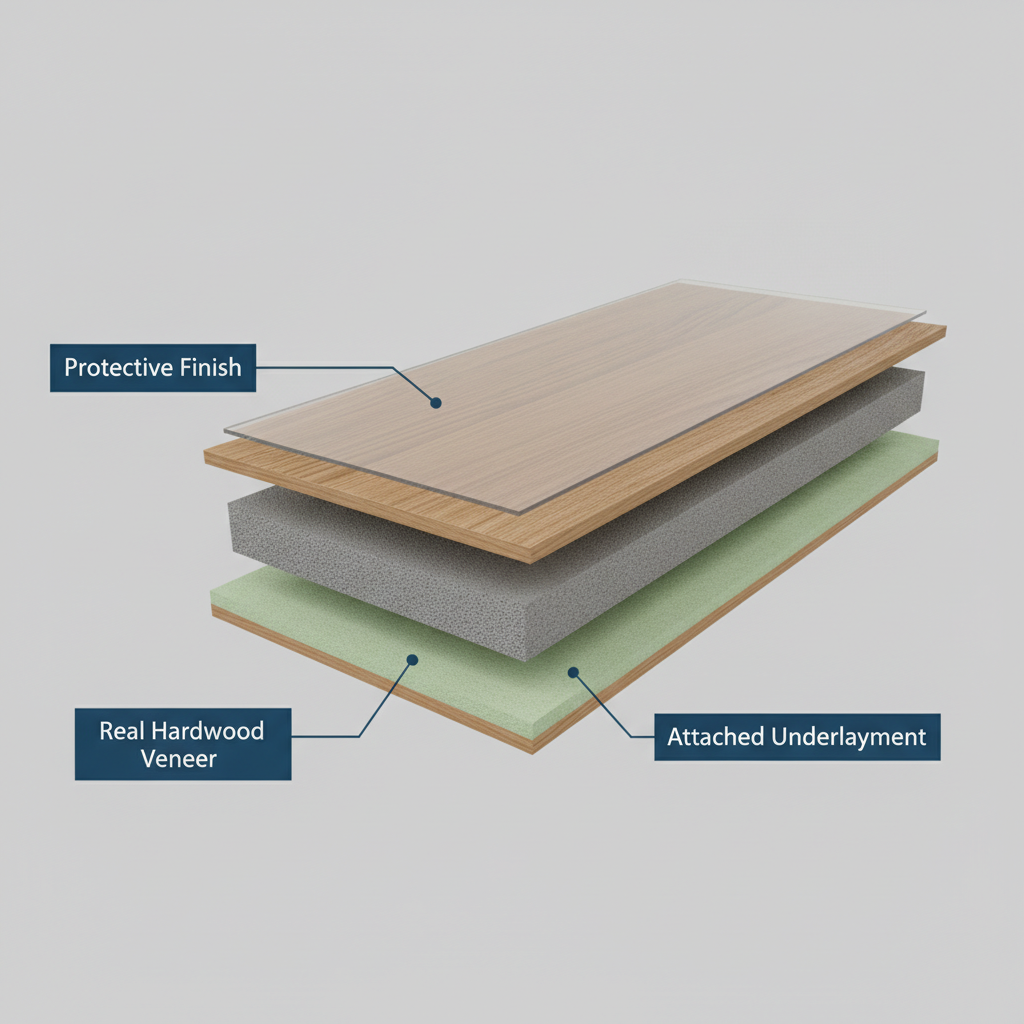
The unique construction of a Bravewood plank, as detailed by the manufacturer, consists of a top layer of genuine hardwood veneer bonded to a rigid, 100% waterproof composite core. This design gives you the authentic look and feel of real wood while providing the durability and moisture resistance of luxury vinyl. This makes it an excellent choice for any room in the house, including kitchens, bathrooms, and basements where traditional wood is often not recommended.
Here is a simple cross-section diagram illustrating its layers:
- Protective Finish: A durable top coat that resists scratches and wear.
- Real Hardwood Veneer: A thin layer of authentic wood that provides the unique grain and beauty.
- Rigid Composite Core: The 100% waterproof core that provides stability and prevents warping.
- Attached Underlayment (Optional): Many styles come with a pre-attached pad for sound reduction and comfort.
To help you understand where Bravewood fits in the market, here’s how it stacks up against other popular flooring options:
| Feature | Bravewood Hybrid Hardwood | Traditional Engineered Hardwood | SPC Vinyl Plank |
|---|---|---|---|
| Waterproofing | 100% Waterproof Core | Water-Resistant (can be damaged by standing water) | 100% Waterproof |
| Durability | High (dent & scratch resistant) | Moderate (can dent & scratch) | Very High (highly resistant to dents & scratches) |
| Feel Underfoot | Solid, warm feel of real wood | The classic feel of real wood | Harder, sometimes colder feel |
| DIY-Friendliness | High (click-lock system) | Moderate (can be click-lock, glue, or nail) | Very High (easy to cut and install) |
Is This a DIY Project for You? A Realistic Difficulty Scorecard
Honesty is the best policy, especially when it comes to home improvement projects. While Bravewood’s click-lock system is designed to be DIY-friendly, some steps require more patience and skill than others. Use our scorecard to realistically assess if this project is a good fit for you.
Bravewood DIY Difficulty Scorecard (Rated for a Beginner)
- Subfloor Preparation (4/5): This is the most critical and often the most difficult part. Getting the subfloor perfectly clean, flat, and dry is non-negotiable and can be labor-intensive.
- Plank Cutting (3/5): Straight cuts are easy with the right saw. Complex cuts around door jambs or vents require precision and patience.
- Locking Mechanism (2/5): Once you get the hang of the angle-and-lock technique, laying planks in an open field is fast and satisfying.
- Finishing Touches (2/5): Installing baseboards and transition strips is straightforward but requires attention to detail for a clean look.
Who Should NOT DIY This?
Consider hiring a professional if:
- Your subfloor has major issues, like significant sloping, water damage, or large cracks in the concrete.
- You are deeply uncomfortable or inexperienced with power saws (like a miter saw or jigsaw).
- The layout is extremely complex, with many odd angles, curved walls, or obstacles.
- You are on a very tight deadline. Rushing is the #1 enemy of a quality flooring installation.
As one first-time installer on Reddit’s /r/HomeImprovement forum noted, “The first three rows took me half the day. The rest of the room took the other half. It’s all about getting that foundation perfect and then finding your rhythm”.
Phase 1: Your Complete Tool & Materials Checklist
Walking into a project fully prepared is half the battle. Nothing is more frustrating than having to stop mid-installation for a trip to the hardware store. Here is a comprehensive list of what you’ll need.
Our “Good, Better, Best” guide helps you choose tools based on your budget and the scale of your project.
| Task | Good (Budget-Friendly) | Better (Easier & Faster) | Best (Professional Grade) |
|---|---|---|---|
| Cutting Planks | Hand Saw & Speed Square | Jigsaw (for complex cuts) & Miter Saw (for straight cuts) | Flooring Shear & Miter Saw |
| Installation | Basic Tapping Block & Pull Bar | Flooring Installation Kit (block, bar, spacers) | Professional-Grade Tapping Block & Mallet |
| Measuring | Tape Measure & Pencil | Laser Tape Measure | Laser Tape Measure & Contour Gauge |
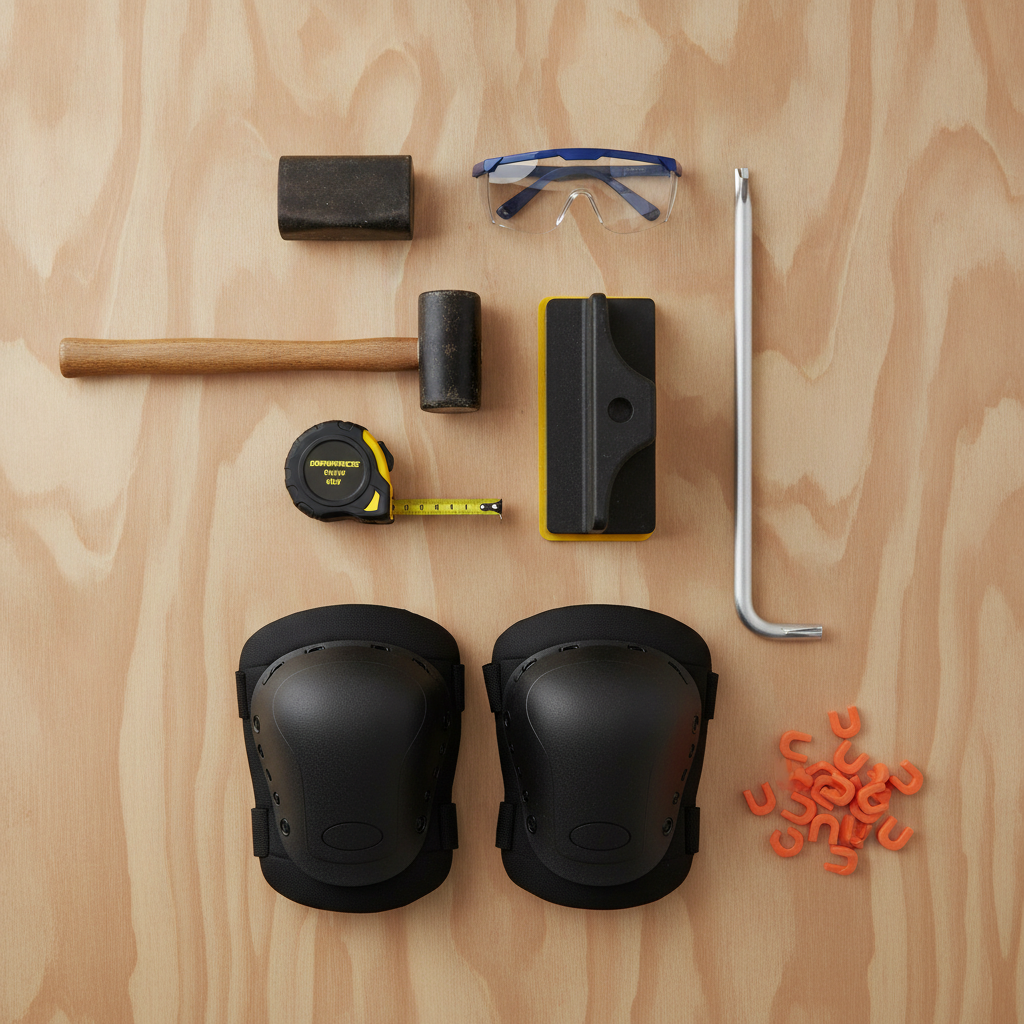
Essential Tools & Materials
Tools:
- Tape Measure
- Pencil
- Utility Knife (for trimming underlayment)
- Safety Goggles
- Gloves
- Knee Pads
- Spacers (1/4 inch)
- Tapping Block (A pull bar is crucial for tightening the last plank in a row)
- Pull Bar
- Soft-faced Mallet or Hammer
- Saw (Jigsaw, Miter Saw, or Hand Saw)
- 6-foot Level or Straightedge (for checking subfloor flatness)
Materials:
- Bravewood Flooring (calculate your room’s square footage and add 10% for waste/cuts)
- Underlayment (if not attached to planks)
- 6-mil Vapor Barrier (for concrete subfloors)
- Transition Strips & Moldings
- Silicone Sealant (for perimeters in bathrooms/kitchens)
Phase 2: Mastering Subfloor Preparation (The Most Critical Step)
Ask any professional installer, and they’ll tell you the same thing: a beautiful floor is built on a great foundation. Nearly all major flooring failures—buckling, bouncing, and gapping—can be traced back to a poorly prepared subfloor. Do not skip or rush this phase.
The industry standard for subfloor flatness, as published by the National Wood Flooring Association (NWFA), is that it must be flat to within 3/16 of an inch in a 10-foot radius. To check this, lay a long straightedge or level on the floor in various spots. Slide a 3/16-inch spacer or shim underneath; if it fits easily in any low spots, you need to level the area.
Pro Tip: A flooring professional on The Floor Pro Community forums once said, “The time you ‘save’ by not prepping the subfloor will be spent tenfold later, fixing a floor that failed. Scrape it, sweep it, vacuum it, level it. Make it perfect. Your floor depends on it”.
Visually, you can find high and low spots by placing your straightedge on the floor and shining a light from one side. The light will reveal any gaps. Mark high spots to be sanded down and low spots to be filled. For low spots on concrete, a self-leveling compound is the best solution.
For Concrete Subfloors: Checking for Moisture
Concrete is porous and can transmit moisture from the ground, which can get trapped under your waterproof flooring and lead to mold and mildew. Therefore, moisture testing is mandatory for all concrete subfloors, especially those below ground level (basements).
While professional testing methods exist, a common DIY approach is the Calcium Chloride Test. This measures the moisture vapor emission rate (MVER). Always check the Bravewood installation guide for the specific MVER limit, but a general industry standard is that it should not exceed 3-5 lbs per 1000 sq ft per 24 hours. If your concrete is new, you must wait at least 60 days for it to cure before installing flooring.
If moisture is a concern, you must use a 6-mil polyethylene vapor barrier over the concrete before laying your underlayment and flooring. Many modern underlayments come with a built-in moisture barrier, which is an excellent all-in-one solution.
For Wood Subfloors: Securing and Sanding
Wood subfloors (like plywood or OSB) have their own set of challenges.
- Eliminate Squeaks: Walk the entire floor, marking any squeaky spots with a pencil. Drive 1.5-inch deck screws through the subfloor and into the floor joists below to eliminate movement.
- Level the Surface: Check for high spots, particularly at the seams between plywood sheets. Use a belt sander or hand sander to sand these areas down until they are flush.
- Fill Gaps: Fill any significant gaps or gouges with a wood patching compound.
- Clean Thoroughly: Scrape away any old adhesive, drywall mud, or paint. Sweep and then vacuum the entire surface to ensure it is free of all dust and debris.
Phase 3: Your Step-by-Step Bravewood Installation Walkthrough
With your subfloor perfected, it’s time for the main event. This guide serves as an annotated visual companion to the official manufacturer’s requirements. For warranty compliance, always have the official Bravewood Installation PDF on hand.
First, you must acclimate the flooring. Bring the unopened boxes of Bravewood into the installation room and let them sit for a minimum of 48-72 hours. This allows the planks to stabilize to the room’s specific temperature and humidity, which is crucial for preventing future expansion and contraction issues.
Step 1: Planning Your Layout & First Row
A little planning prevents a lot of headaches.
- Measure the Room: Measure the width of the room and divide it by the width of a single plank. This tells you how wide your last row will be. If it’s less than one-third of a plank’s width, you should rip-cut (cut lengthwise) your first row to be narrower. This ensures your first and last rows are a similar, balanced width.
- Stagger Your Seams: To ensure structural integrity and a natural look, the end joints of your planks should be staggered by at least 6-8 inches from row to row.
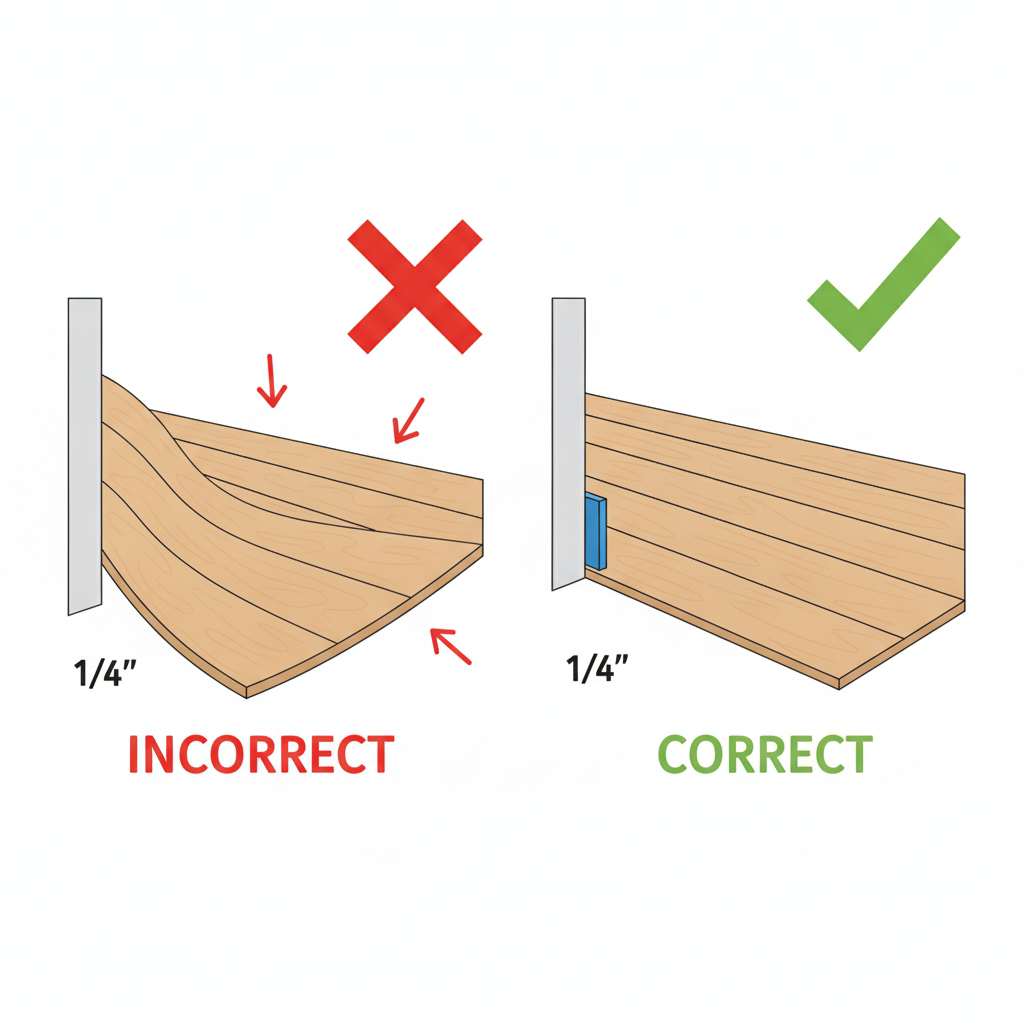
- Establish the First Row: The first row is your foundation; it must be perfectly straight. Snap a chalk line to guide you. Place 1/4-inch expansion spacers against the starting wall. This 1/4-inch expansion gap is the single most important rule to prevent your floor from buckling later as it expands and contracts with seasonal changes. This gap must be maintained around the entire perimeter of the room and any fixed objects like kitchen islands or pipes.
Step 2: Mastering the Click-Lock System
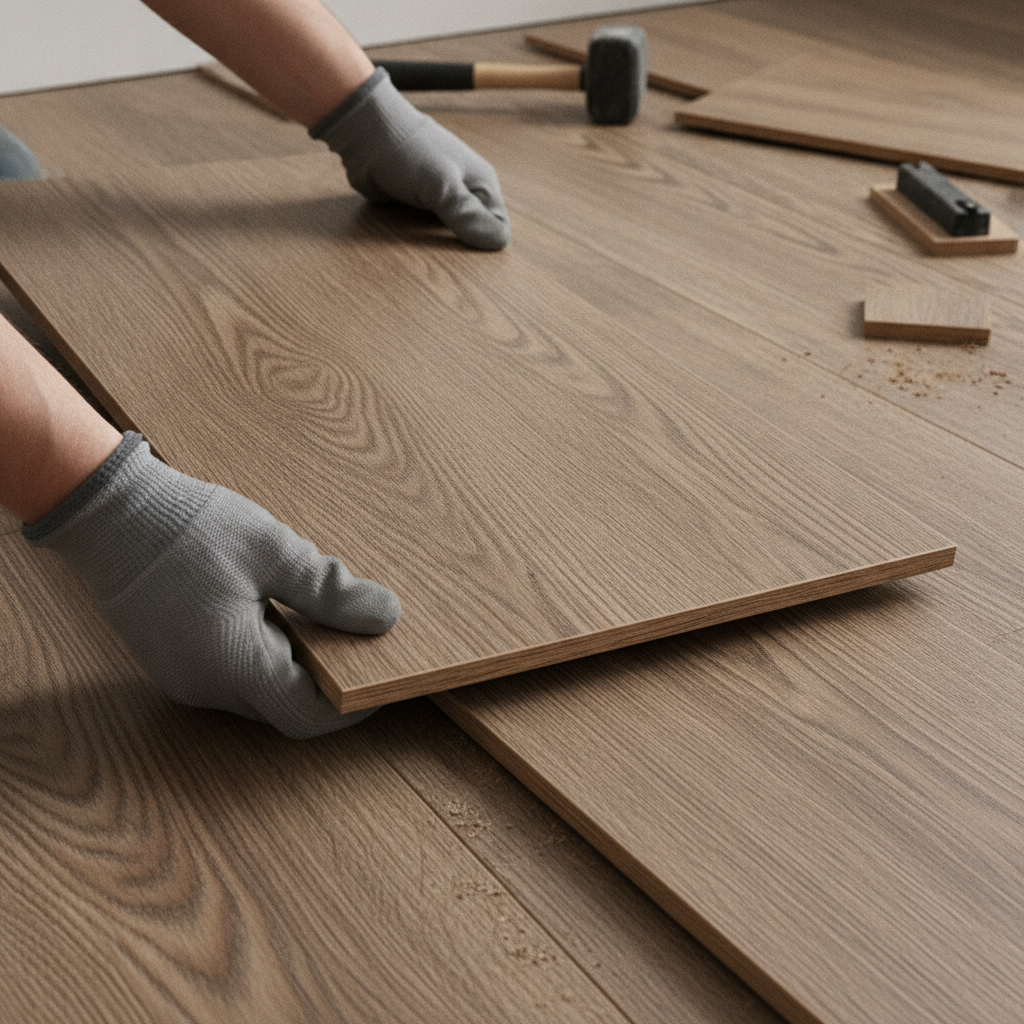
Bravewood uses a simple angle-and-lock system.
- Engage the Long Side: Hold your new plank at a 20-30 degree angle and insert its long-side tongue into the groove of the already-laid plank.
- Lower to Lock: Smoothly lower the plank until it lays flat on the floor. It should click into place. You can use a tapping block and mallet to gently tap along the long edge to ensure the seam is perfectly tight.
- Engage the End Joint: For the next plank in the row, engage the long side first, then slide it up to the end of the previous plank. Use the tapping block on the end of the new plank to tap it into the previous one, locking the end joint.
Do This, Not That:
- DO: Use a tapping block to distribute the force of the mallet evenly.
- NOT: Hit the plank directly with a hammer or mallet, as this will damage the delicate tongue and groove.
- DO: Ensure there are absolutely no gaps between planks. A tiny gap now will become a large, unsightly one later.
- NOT: Force planks together. If they aren’t locking, disengage and check for debris in the groove or a damaged edge.
Step 3: Cutting Planks for Obstacles and Final Rows
This is where you’ll feel like a true craftsman.
- Undercutting Door Jambs: Don’t try to cut a complex shape in your plank to fit around a door jamb. Instead, lay a scrap piece of flooring and underlayment next to the jamb and use a handsaw or oscillating multi-tool to cut the bottom of the jamb off. The new plank will then slide cleanly underneath for a seamless, professional finish.
- L-Shaped and Circular Cuts: For things like floor vents, corners, or pipes, a jigsaw is your best friend. Measure and trace your cut line on the plank, then carefully follow it with the jigsaw.
- The Final Row: Measure the distance from the last installed row to the wall (remember to subtract your 1/4-inch expansion gap). Mark this measurement on your final row of planks and use a jigsaw or table saw to rip-cut them to the correct width. Use a pull bar to hook onto the edge and tap it tight to lock it into place.
Troubleshooting: How to Avoid & Fix the Top 5 Installation Mistakes
Even with careful planning, issues can arise. Here’s how to handle the most common DIY mistakes.
Mistake #1: Forgetting the Expansion Gap
- Symptom: The floor is lifting up in the middle or pushing against the walls (buckling or peaking).
- Cause: The flooring has no room to expand with changes in temperature and humidity.
- Cure/Prevention: The only fix is to remove the baseboards and cut the required 1/4-inch gap around the perimeter using a multi-tool. Always use spacers during installation to prevent this.
Mistake #2: Uneven Subfloor
- Symptom: The floor feels bouncy or makes a hollow sound in certain spots; seams may start to separate over time.
- Cause: High or low spots in the subfloor are creating voids under the flooring.
- Cure/Prevention: This is difficult to fix after the fact. Prevention is key. Master your subfloor prep before laying a single plank.
Mistake #3: Not Staggering Seams
- Symptom: Visible “H” patterns appear on the floor, and the floor lacks structural strength.
- Cause: The end joints of planks in adjacent rows are too close together.
- Cure/Prevention: Always ensure end joints are staggered by at least 6-8 inches. Plan your cuts to use the leftover piece from one row to start the next (if it’s long enough).
Mistake #4: Damaging Planks During Installation
- Symptom: Chipped edges, or planks that refuse to lock together.
- Cause: Hitting the plank directly with a hammer, or forcing a lock when debris is in the groove.
- Cure/Prevention: Always use a tapping block. If a plank is damaged, it’s best to replace it. You can carefully disengage a row by lifting it at an angle to unlock it.
Mistake #5: Poor Layout Planning
- Symptom: You end up with a tiny, difficult-to-cut sliver of a plank for your last row.
- Cause: Failure to measure the room and plan the first row’s width.
- Cure/Prevention: Do the math before you start! As a flooring pro from thefloorpro.com advises, “The most common DIY mistake I see is a bad layout. They start with a full plank against one wall and end up with a half-inch strip on the other. It looks awful and compromises the floor”.
Phase 4: Finishing Touches & Long-Term Care
The floor is laid, but you’re not done yet. The finishing touches are what separate an amateur job from a professional one.
- Install Transitions: Use the appropriate transition strips where the Bravewood flooring meets another flooring type (like carpet or tile), at doorways, or for sliding glass doors. T-molding bridges gaps between floors of the same height, while a reducer transitions to a lower floor.
- Reinstall Baseboards: Nail your baseboards and/or quarter-round molding to the wall, not the floor. This hides the expansion gap while allowing the floor to move freely underneath.
- Seal the Perimeter: In full bathrooms or other wet areas, apply a bead of 100% silicone sealant in the expansion gap before installing the baseboards. This creates a truly waterproof perimeter.
- Care and Maintenance: Protect your investment. According to Bravewood’s care guidelines, you should use only pH-neutral cleaners, attach felt pads to the bottom of all furniture legs, and use walk-off mats at entrances to trap dirt and grit.
Your Flawless Floor Awaits
Congratulations! By following these phases—meticulous prep, using the right tools, and applying patient technique—you have successfully navigated the challenges of a DIY flooring installation. You’ve not only saved money but have added tangible value and beauty to your home with your own skill and effort. Stand back and admire your new, durable, and beautiful Bravewood floor. You earned it.
Feeling confident? Share a photo of your finished Bravewood flooring project in the comments below to inspire other DIYers!
This article provides DIY guidance. Always follow manufacturer instructions and adhere to all safety precautions when using tools. Consult a professional if you are unsure about any step. We are not responsible for any damage or injury resulting from following this guide.
References & Authoritative Sources
- Bravewood Flooring. (n.d.). Installation Guide & Care Information. Retrieved from bravewoodflooring.com.
- National Wood Flooring Association (NWFA). (n.d.). Subfloor Guidelines. Retrieved from nwfa.org.
- The Floor Pro Community. (n.d.). Professional Installer Forums. Source of collective experience and professional advice from flooring installers. Retrieved from thefloorpro.com.
- Reddit. (n.d.). /r/HomeImprovement Forum. Source of firsthand user experiences and testimonials on DIY projects. Retrieved from reddit.com/r/HomeImprovement.
