
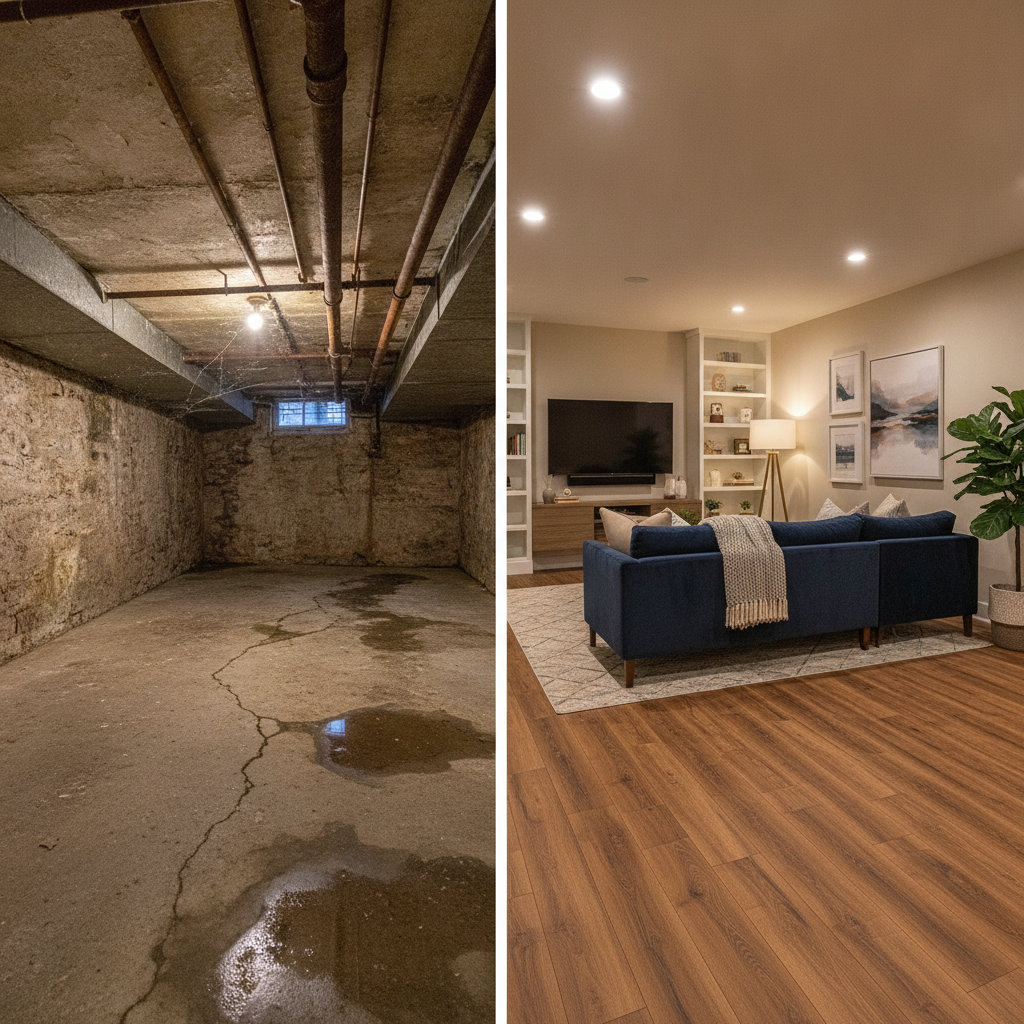
That damp, musty smell. The cold, uninviting concrete. For too many homeowners, the basement is a source of anxiety, a space fraught with the risk of moisture and wasted potential. You dream of a cozy family room, a functional home gym, or a vibrant playroom, but the fear of a flooring failure—of your investment being ruined by water damage and mold—is paralyzing. You’re lost in a sea of confusing terms: waterproof, water-resistant, LVP, SPC, hybrid hardwood.
This isn’t just another article listing flooring products. This is your complete system guide. We will walk you through the entire process, from diagnosing the root cause of your moisture problem to preparing your subfloor like a professional, and finally, to choosing the perfect waterproof flooring system that guarantees a beautiful, durable, and worry-free result. We will demystify the technology, compare the top options head-to-head, and give you the confidence to transform your basement from a liability into your favorite room in the house.
- Why Your Basement Floor is a Unique Challenge: Understanding Moisture
- The Foundation of Success: Preparing Your Concrete Subfloor
- Basement Flooring Decision Matrix: Comparing Your Top Options
- The ‘Real Wood’ Dilemma: Hybrid Hardwood vs. LVP Deep Dive
- How to Install Hybrid Hardwood in a Basement: A Step-by-Step Guide
- Frequently Asked Questions (FAQ)
- Conclusion: Your Floor is a System, Not Just a Product
- Authoritative Sources & References
Why Your Basement Floor is a Unique Challenge: Understanding Moisture
Before you can choose a floor, you must understand your enemy: moisture. Because it is “below grade” (partly or fully underground), a basement is uniquely susceptible to water intrusion from sources other floors in your home never face. Failing to address this is the number one cause of flooring failure. According to experts at the Building Science Corporation, effective below-grade water management is critical for the health and durability of a home.[2] There are three primary ways moisture attacks your basement:
- Liquid Leaks: The most obvious source, this includes water from foundation cracks, poorly sealed windows, or plumbing failures. This is an active water problem that must be fixed before any flooring project begins.
- Vapor Diffusion (Wicking): Concrete is like a hard sponge. It can absorb moisture from the damp soil around it and slowly release it as vapor into your basement. This process, driven by hydrostatic pressure, is a constant, invisible threat that can trap moisture under your new floor.
- Condensation: When warm, humid air inside your basement comes into contact with the cool surface of the concrete floor and foundation walls, it can condense into liquid water—just like a cold glass of iced tea on a summer day.
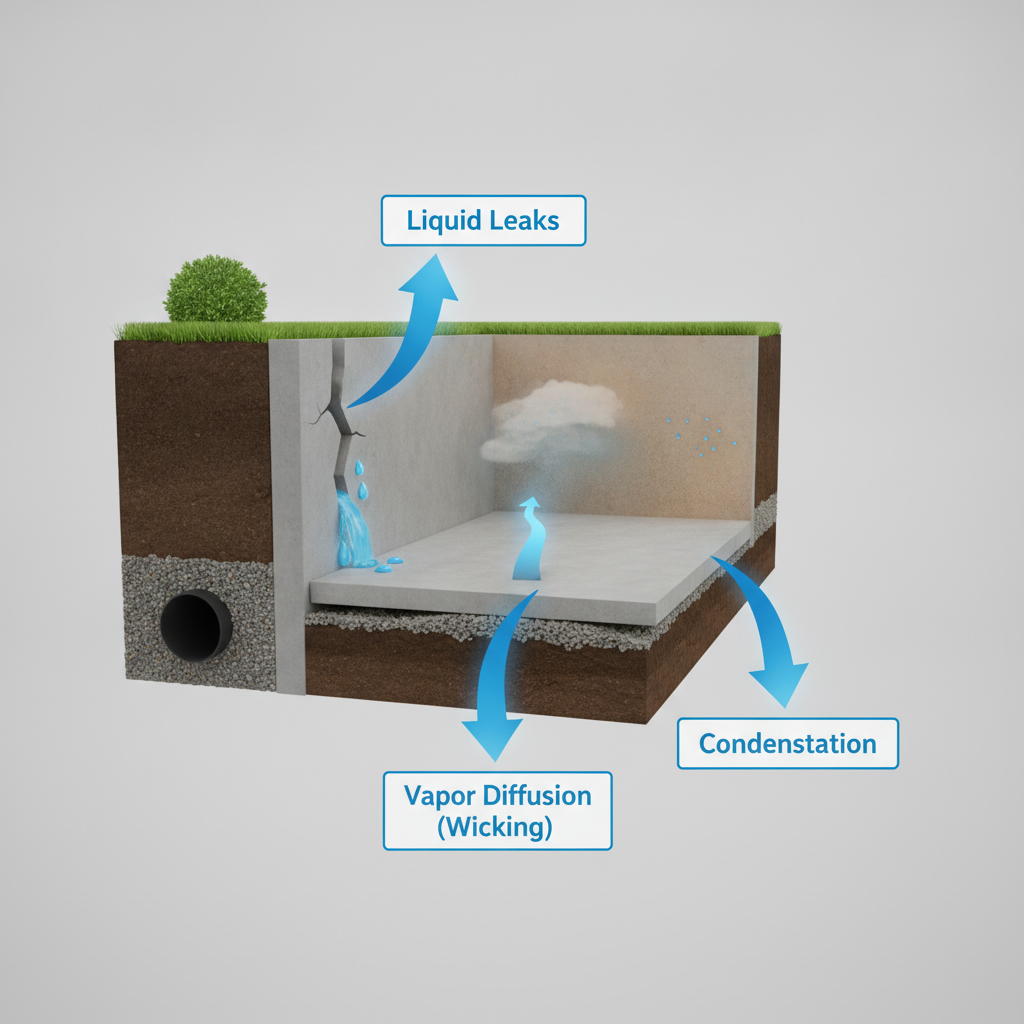
These moisture sources create an environment where flooring can warp, adhesives can fail, and most dangerously, mold can thrive. The U.S. Environmental Protection Agency (EPA) recommends keeping indoor humidity between 30% and 50% to prevent mold growth, a difficult task in a basement without proper moisture control.[1]
How to Diagnose Your Moisture Problem: The Simple Plastic Sheet Test
Not sure where your dampness is coming from? You can perform a simple diagnostic test recommended by home inspection professionals. Following procedures similar to those used by the American Society of Home Inspectors (ASHI), this test helps determine if moisture is wicking up through the slab or condensing from the air.[3]
Here’s how to do it:
- Cut a Square: Cut an 18×18 inch square of clear plastic sheeting (a heavy-duty trash bag will work).
- Tape it Down: Securely tape the plastic square to a clean, dry section of your concrete floor using duct tape on all four sides. Ensure it’s completely sealed.
- Wait: Leave the plastic in place for at least 24-48 hours.
- Interpret the Results:
- Droplets on the UNDERSIDE of the plastic: This indicates moisture is wicking up through the concrete slab. You have a vapor diffusion problem that requires a robust vapor barrier.
- Droplets on the TOP of the plastic: This means the moisture is condensing from the air in your basement. Your primary issue is high humidity, which can be addressed with a dehumidifier and improved ventilation.
- No moisture: Your slab may be dry, but this test should be performed during different seasons to be certain.
The Foundation of Success: Preparing Your Concrete Subfloor
Let’s be clear: there is no such thing as a waterproof floor that can fix a wet basement. Your flooring is only as good as the foundation it’s built on. Proper subfloor preparation is the most critical, non-negotiable step in your entire project. Industry standards, such as ASTM F710 for preparing concrete floors, exist for a reason—they prevent failures.[4]
Before you even think about laying a plank, your concrete subfloor must be:
- Clean: Free of all dirt, dust, paint, sealers, and adhesives.
- Flat: Most flooring manufacturers require the floor to be flat within 3/16 of an inch over a 10-foot span. High spots must be ground down, and low spots filled with a cement-based leveling compound.
- Dry: This is the most crucial element. The concrete must be tested to ensure it meets the moisture limits set by the flooring manufacturer and industry bodies like the National Wood Flooring Association (NWFA).[5]
Moisture Testing: From DIY to Pro-Level Accuracy
While the plastic sheet test is a good indicator, for warranty compliance, a quantitative test is often required. The two professional standards are:
- Calcium Chloride Test (ASTM F1869): This involves sealing a small dish of pre-weighed calcium chloride crystals under a plastic dome on the concrete for about 72 hours. The weight gain of the crystals reveals the moisture vapor emission rate (MVER).
- In-Situ Relative Humidity (RH) Probe Test (ASTM F2170): Considered the most accurate method, this involves drilling a small hole in the concrete and inserting a sensor to measure the relative humidity within the slab itself.[6]
While DIY kits exist, for a large investment, it’s wise to hire a certified professional. Organizations like the National Institute of Certified Floorcovering Inspectors (NICFI) certify technicians who can perform these tests and provide official documentation for your warranty.[7]
Vapor Barriers vs. Subfloor Systems: What’s Right for You?
Once your slab is clean and flat, you must address vapor. You have two main options:
1. Sheet Vapor Barrier: This is typically a 6-mil (0.006 inches thick) polyethylene plastic sheet rolled out over the entire concrete surface. Seams are overlapped and taped to create a continuous barrier that blocks moisture vapor from reaching the flooring.
2. Interlocking Subfloor Systems: These are panels (typically 2×2 feet) that have a plastic, dimpled base and a wood sheathing (OSB) top. They lock together to create a raised “floating” subfloor.
Here’s how they compare:
| Feature | 6-mil Poly Vapor Barrier | Interlocking Subfloor System (e.g., DRIcore) |
|---|---|---|
| Primary Function | Blocks moisture vapor | Blocks moisture vapor AND creates an air gap |
| Comfort | No added warmth or cushioning | Makes the floor feel significantly warmer and softer |
| Insulation | None | Adds a small amount of insulation (R-value of ~1.7) |
| Cost | Low (approx. $0.15 – $0.30/sq. ft.) | Higher (approx. $1.75 – $2.50/sq. ft.) |
| Best For | Perfectly level floors, tight budgets | Uneven floors, maximizing comfort and warmth |
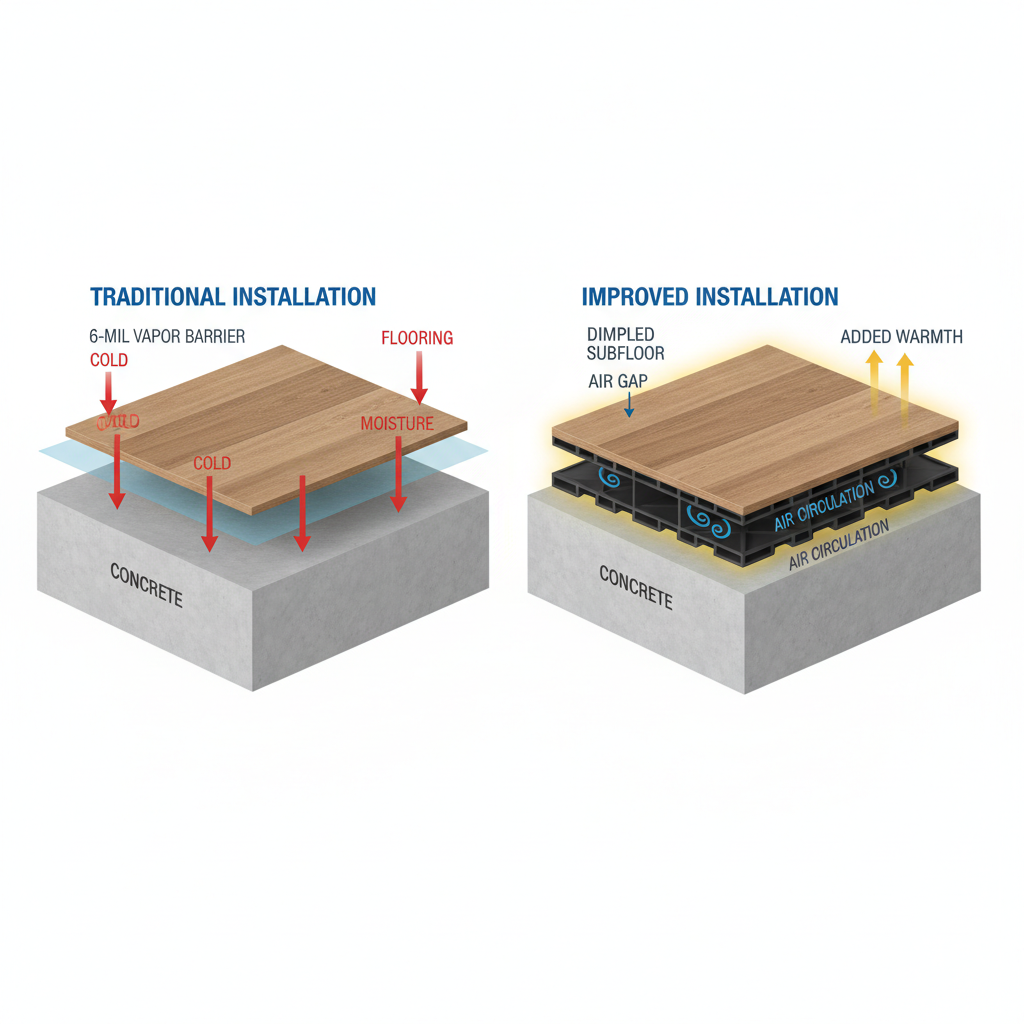
The U.S. Department of Energy highlights the benefits of insulating basement floors for energy efficiency and comfort, making subfloor systems an excellent part of a total basement solution.[8]
Basement Flooring Decision Matrix: Comparing Your Top Options
With your subfloor handled, it’s time for the main event. We’ve created this decision matrix to give you a quick, expert overview of the best waterproof basement flooring options. Ratings are on a scale of 1 (Poor) to 5 (Excellent).
| Flooring Type | Waterproof Rating | Durability | Cost/Sq. Ft. | DIY-Friendly | Comfort |
|---|---|---|---|---|---|
| Hybrid Hardwood (SPC Core) | 5 | 4 | $5 – $10 | 4 | 4 |
| Luxury Vinyl Plank (LVP) | 5 | 5 | $2.50 – $7 | 5 | 3 |
| Porcelain/Ceramic Tile | 5 | 5 | $4 – $15+ | 2 | 1 |
| Epoxy Coating | 5 | 4 | $3 – $12 | 2 | 1 |
| Polished Concrete | 4 | 5 | $3 – $8 | 1 | 1 |
Option 1: Hybrid / Waterproof Engineered Hardwood
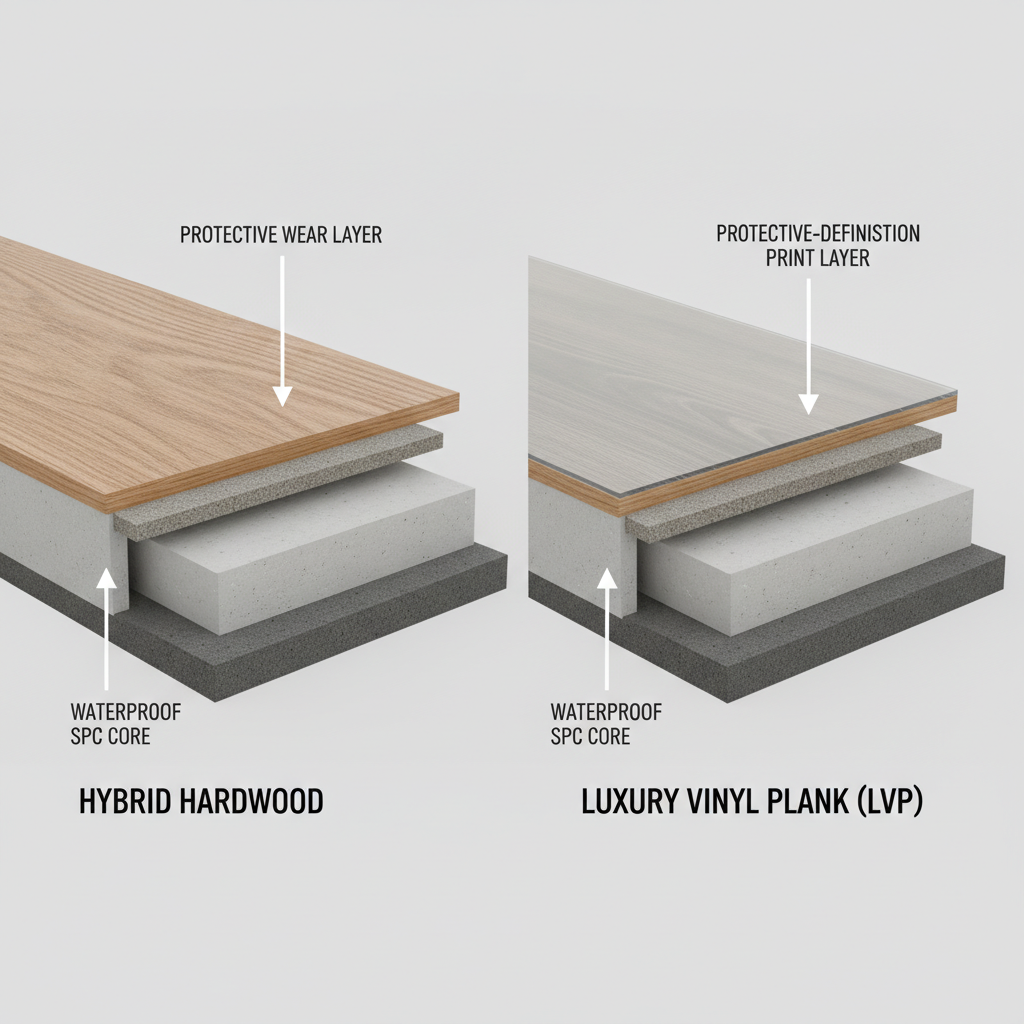
For those who refuse to compromise on the authentic look and feel of real wood, this is your answer. Hybrid hardwood, also known as waterproof engineered hardwood, is a modern marvel. A high-quality cross-section view would reveal its secret: a thin veneer of genuine hardwood (like oak or hickory) bonded to a 100% waterproof core.
The core material is key. While older engineered wood used moisture-resistant high-density fiberboard (HDF), the newest generation uses a stone-polymer composite (SPC) core, making the entire plank inert and impervious to water from top to bottom. It’s the perfect marriage of natural beauty and technological resilience.
Option 2: Luxury Vinyl Plank (LVP/LVT)
LVP is the undisputed champion of basement flooring for a reason. It is 100% synthetic and waterproof, incredibly durable, and comes in a staggering array of realistic wood and stone looks. The best LVP products for basements feature an SPC core, which provides extreme rigidity and dent resistance.
According to the Resilient Floor Covering Institute (RFCI), resilient flooring like LVP is known for its durability and ease of maintenance.[9] When shopping, pay close attention to the wear layer thickness. This top clear coating protects the printed image from scratches and scuffs. For a basement with moderate to heavy foot traffic, look for a wear layer of at least 20 mil.
Option 3: Porcelain & Ceramic Tile
When it comes to being absolutely, unequivocally waterproof, nothing beats tile. Made from fired clay, porcelain and ceramic tiles are completely impervious to water. Installed correctly over a properly prepared subfloor with the right membranes and mortars, a tile floor can easily survive a minor flood. The Tile Council of North America (TCNA) sets the industry standards for these robust, waterproof installations.[10]
The trade-offs? Tile is cold and hard underfoot, and the installation is labor-intensive and not beginner-friendly. However, with a potential lifespan of 50+ years, its durability is unmatched.
Option 4: Epoxy & Polished Concrete
For a modern, industrial, or minimalist aesthetic, finishing the concrete slab itself is a fantastic option. Epoxy coatings are applied as a liquid that cures into a hard, seamless, and non-porous plastic surface. Polished concrete involves grinding the slab with progressively finer diamond pads to achieve a smooth, high-gloss finish.
Both options are completely waterproof and incredibly easy to clean. As noted by resources like The Concrete Network, the success of these finishes depends entirely on meticulous surface preparation to ensure proper adhesion and a flawless look.[11]
The ‘Real Wood’ Dilemma: Hybrid Hardwood vs. LVP Deep Dive
For many, the final decision comes down to the two best wood-look options. Both are excellent, but they cater to different priorities.
| Feature | Hybrid Hardwood (SPC Core) | Luxury Vinyl Plank (LVP) |
|---|---|---|
| Realism | Unbeatable. It’s real wood on top. The grain, texture, and variation are authentic because they are natural. | Excellent. High-definition printing and “embossed in register” (EIR) technology create incredibly convincing visuals and textures. |
| Feel Underfoot | Warmer and slightly softer than LVP, feels more like a traditional hardwood floor. | Can feel harder and colder, though a quality underlayment helps. Noticeably a synthetic feel. |
| Scratch Resistance | Good. The aluminum oxide finish is tough, but the real wood veneer can still be deeply scratched or dented by heavy impacts. | Excellent. The 20+ mil wear layer is exceptionally resistant to scratches from pets, furniture, and daily life. |
| Refinishing | No. The wood veneer is too thin to be sanded and refinished like solid hardwood. Deep scratches are permanent. | No. Cannot be refinished. Damaged planks must be replaced. |
| Cost | Premium. Generally more expensive due to the real wood component. | Value. Offers incredible performance and realism for a lower price point. |
A side-by-side comparison in person is always best. You’ll notice the subtle, unique grain patterns in each plank of hybrid hardwood, a characteristic even the best LVP cannot perfectly replicate. However, the sheer toughness of a high-quality LVP wear layer is a major advantage for busy families with pets and kids.
Decoding Your Warranty: What ‘Waterproof’ Really Means
This is a critical, often misunderstood point. When a manufacturer labels a floor as “100% waterproof,” they are referring to the flooring plank itself. It means the plank will not swell, warp, or degrade when exposed to topical water (spills, mopping, pet accidents).
However, this warranty almost never covers:
- Damage from flooding (hydrostatic pressure, sewer backup).
- Moisture damage to the subfloor, walls, or structure.
- Problems caused by excessive moisture vapor emissions from the concrete slab if you didn’t follow their specific installation requirements (including vapor barriers).
Always read the manufacturer’s warranty documents before you buy. It reinforces why proper subfloor preparation isn’t just a good idea—it’s essential for protecting your investment.
How to Install Hybrid Hardwood in a Basement: A Step-by-Step Guide
Disclaimer: This is a general guide. The ultimate authority is always the specific installation manual provided by your flooring’s manufacturer. Failure to follow it can void your warranty.
Ready to take on the project yourself? This guide covers the common steps for installing a floating, click-lock hybrid hardwood floor.
Tools & Materials Checklist:
- Flooring planks
- Vapor barrier (if required)
- Tape measure
- Pencil
- Utility knife
- Spacers (for expansion gap)
- Tapping block and pull bar
- Rubber mallet
- Jigsaw or miter saw
Step 1: Acclimation and Final Subfloor Check
Do not skip this step. You must let the flooring planks acclimate to the temperature and humidity of your basement. Stack the unopened boxes in the room for at least 48-72 hours. This prevents the planks from expanding or contracting unexpectedly after installation. Do one last check to ensure your subfloor is clean, flat, and dry.
Step 2: Rolling Out the Underlayment & Vapor Barrier
If your flooring has a pre-attached underlayment pad, you may still need a separate 6-mil poly vapor barrier over the concrete. Check your manual. Roll out the plastic sheeting, overlapping the seams by at least 8 inches and taping them with a moisture-resistant tape. Run the barrier a few inches up the walls; you’ll trim it later.
Step 3: Laying the First Rows and Mastering the Click-Lock System
Your first row is the most important. Place spacers along the starting wall to create the required expansion gap (typically 1/4 to 1/2 inch). This gap is crucial; it allows the entire floor to expand and contract with seasonal changes. Lay the first plank in a corner. Click the next plank into its short end. Continue to the end of the row.
Pro Tip: Ensure this first row is perfectly straight. If it’s even slightly off, the error will magnify across the entire floor.
Step 4: Cutting Planks and Navigating Obstacles
You will need to cut the last plank of each row and the first plank of the next. Stagger your seams by at least 6-8 inches for a stronger, more professional-looking installation. For tricky cuts around pipes or door jambs, create a cardboard template first. A jigsaw is invaluable for these custom cuts.
Pro Tip: A common mistake is forcing planks together. If they don’t lock easily, check for debris in the locking mechanism or ensure the plank is at the correct angle. Never hammer directly on the plank edge; always use a tapping block.
Frequently Asked Questions (FAQ)
What is the absolute best flooring for a wet basement?
For a basement that experiences active water leaks or flooding, your only truly safe options are inorganic materials that cannot be damaged by water: porcelain/ceramic tile or a professionally installed epoxy coating. Even with these, the source of the water must be fixed first. As the Institute of Inspection, Cleaning and Restoration Certification (IICRC) would attest, managing the source of water is the first step in any restoration or prevention plan.[12] For a basement that is simply damp or humid, SPC-core LVP and waterproof hybrid hardwood are excellent choices when installed with a proper vapor barrier.
What’s the difference between ‘waterproof’ and ‘water-resistant’?
Think of it like a raincoat versus a windbreaker. Waterproof means the material itself is impervious to water penetration. A vinyl plank is a solid piece of plastic; water will never pass through it. Water-resistant means the product is treated to repel water for a limited time. A water-resistant laminate floor might survive a small spill if wiped up quickly, but if water seeps into its fiberboard core, it will swell and be permanently damaged. For a below-grade basement, always choose a product labeled “100% waterproof.”
Can I use carpet in a basement?
It is highly discouraged. Organic materials in traditional carpet and padding are a food source for mold when moisture is present. The Centers for Disease Control and Prevention (CDC) explicitly warns that mold can grow on damp carpets and cause health issues.[13] If you absolutely must have carpet, the only acceptable option is modular carpet tiles made from 100% synthetic fibers (like polypropylene) with a waterproof backing. This allows you to remove, clean, and replace individual tiles if they become wet.
How can I make my basement floor feel warmer?
The cold feel comes directly from the concrete slab, which stays at the ground temperature (around 55°F). The most effective solution is to create a thermal break. An insulated subfloor system (like DRIcore) is the best way to do this, as it creates an air gap and adds insulation. Other options include choosing a flooring with a built-in cork underlayment, which has natural insulating properties, or simply adding large, thick area rugs over your finished hard-surface floor. As recommended by the U.S. Department of Energy, sub-slab insulation is a key component of an energy-efficient and comfortable basement.[8]
Conclusion: Your Floor is a System, Not Just a Product
A successful, long-lasting basement floor is about more than just picking a pretty color. It’s about building a complete system designed to manage the unique challenges of a below-grade environment. By following the critical steps—diagnosing your moisture, meticulously preparing your subfloor, and selecting the right waterproof material for your needs—you are not just installing a floor; you are making a smart, durable investment in your home. You are empowered to move past the fear of moisture and confidently transform your basement into the beautiful, functional space you’ve always envisioned.
Ready to start your project? Download our free ‘Basement Subfloor Prep Checklist’ to ensure you don’t miss a single critical step before laying your beautiful new floor.
This guide provides general information and best practices. Always consult your specific flooring manufacturer’s installation guidelines and warranty. For significant moisture issues or complex installations, consult a certified professional.
Authoritative Sources & References
- U.S. Environmental Protection Agency (EPA). (N.D.). A Brief Guide to Mold, Moisture, and Your Home. Retrieved from EPA.gov.
- Building Science Corporation. (N.D.). Building Science Information Resources. Retrieved from buildingscience.com.
- American Society of Home Inspectors (ASHI). (N.D.). Standards of Practice. Retrieved from ashi.org.
- ASTM International. (N.D.). ASTM F710 – 19 Standard Practice for Preparing Concrete Floors to Receive Resilient Flooring. Retrieved from astm.org.
- National Wood Flooring Association (NWFA). (N.D.). Installation Guidelines. Retrieved from nwfa.org.
- ASTM International. (N.D.). ASTM F1869 / ASTM F2170 Standards for Concrete Moisture Testing. Retrieved from astm.org.
- National Institute of Certified Floorcovering Inspectors (NICFI). (N.D.). Certification Information. Retrieved from nicfi.org.
- U.S. Department of Energy. (N.D.). Building America Solution Center: Slab-on-Grade Foundation Insulation. Retrieved from energy.gov.
- Resilient Floor Covering Institute (RFCI). (N.D.). Resources on Resilient Flooring. Retrieved from rfci.com.
- Tile Council of North America (TCNA). (N.D.). TCNA Handbook for Ceramic, Glass, and Stone Tile Installation. Retrieved from tcnatile.com.
- The Concrete Network. (N.D.). Information on Concrete Floors and Coatings. Retrieved from concretenetwork.com.
- Institute of Inspection, Cleaning and Restoration Certification (IICRC). (N.D.). IICRC S500 Standard for Professional Water Damage Restoration. Retrieved from iicrc.org.
- Centers for Disease Control and Prevention (CDC). (N.D.). Mold: Basic Facts. Retrieved from cdc.gov.
