
There’s a unique satisfaction that comes from stepping back and admiring a project you’ve completed with your own two hands. A brand-new floor can completely transform a room, and doing it yourself saves money while giving you an incredible sense of accomplishment. But let’s be honest—the fear of making a costly, irreversible mistake can be paralyzing. One wrong cut, one skipped step, and the dream of a perfect floor can turn into a nightmare of buckling planks and voided warranties.
This isn’t just another installation manual. This is your DIY masterclass. We’re going beyond the basic instructions to give you the pro tips, mistake-proofing techniques, and warranty-saving secrets you need for a flawless, 100% waterproof installation. We will guide you through understanding the unique technology of Bravewood hybrid hardwood, meticulously preparing for your project, executing each step with confidence, and applying the finishing touches that separate amateur work from a professional-quality result.
Get ready to transform your space and become the hero of your home renovation story.
- First, What Exactly is Bravewood Hybrid Hardwood?
- Before You Begin: The Ultimate Pre-Installation Checklist
- The Step-by-Step Bravewood Installation Guide
- Mastering the Waterproof Seal: Protecting Your Warranty & Investment
- Troubleshooting: Avoiding the Most Common DIY Installation Mistakes
- Frequently Asked Questions (FAQ)
- Your Flawless Floor Awaits
- References
First, What Exactly is Bravewood Hybrid Hardwood?
Before you lay the first plank, it’s crucial to understand the material you’re working with. Bravewood isn’t traditional solid hardwood, nor is it simple laminate or vinyl. It’s a next-generation hybrid hardwood flooring, engineered to give you the best of both worlds: the authentic beauty of real wood and the rugged durability of modern composites. This unique construction is the key to its waterproof performance and DIY-friendly design.
Understanding this technology will not only build your confidence but also help you appreciate why certain installation steps, like acclimation and expansion gaps, are non-negotiable. The quality and safety of these materials are often held to high industry benchmarks, such as the installation standards set by the National Wood Flooring Association (NWFA) [1] and indoor air quality certifications like FloorScore® [2], which ensure the product is safe for your home.
The Core Technology: How is it Made and is it Real Hardwood?
Yes, Bravewood is real hardwood—on the surface. The magic lies in its layered construction. Here’s a breakdown:
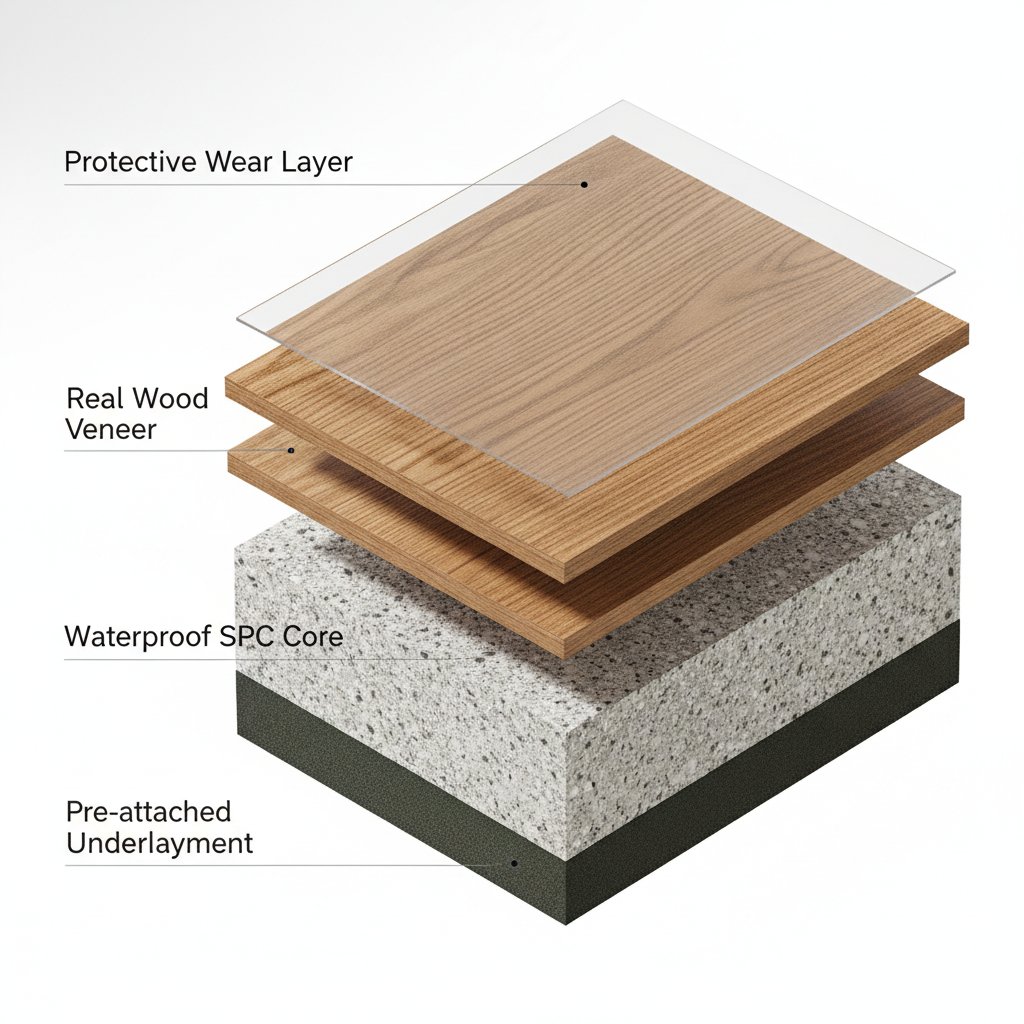
- Real Wood Veneer: The top layer is a slice of genuine hardwood (like oak or hickory). This is what you see and feel, providing the unique grain, texture, and natural beauty that can’t be replicated by printed patterns.
- Protective Wear Layer: A transparent, highly durable coating is applied over the wood veneer to protect it from scratches, stains, and fading.
- Stone-Polymer Composite (SPC) Core: This is the revolutionary heart of the plank. The wood veneer is bonded to an ultra-dense core made from a mixture of limestone powder and stabilizers. This SPC core is what makes the plank 100% waterproof, incredibly rigid, and stable. Unlike traditional wood that swells and warps with moisture, the SPC core remains unaffected, making it ideal for kitchens, bathrooms, and basements. From a material science perspective, its density prevents significant expansion and contraction during temperature and humidity swings.
- Pre-attached Underlayment: Most Bravewood products come with a built-in pad on the bottom. This provides sound insulation, adds comfort underfoot, and saves you the step of installing a separate underlayment.
So, while you can’t sand and refinish it like solid hardwood, you get an authentic wood surface on a virtually indestructible, waterproof core.
Pros and Cons of Bravewood Flooring
Making an informed decision is key. Here’s a balanced look at the benefits and potential drawbacks of choosing Bravewood hybrid hardwood.
| Pros | Cons |
|---|---|
| 100% Waterproof: The SPC core is impervious to water. | Cannot Be Refinished: The wood veneer is too thin to be sanded. |
| Authentic Wood Beauty: Features a genuine hardwood top layer. | Higher Cost than LVP: Generally more expensive than luxury vinyl. |
| Extreme Durability: Highly resistant to dents, scratches, & stains. | Visible Pattern Repeats: In smaller rooms, plank patterns may repeat. |
| DIY-Friendly Installation: The click-lock system is easy to use. | Requires a Very Flat Subfloor: Imperfections can telegraph through. |
| Easy Maintenance: Simple to clean with no special treatments needed. |
As one certified flooring installer puts it, “Hybrid hardwoods like Bravewood are my go-to recommendation for homeowners who want the timeless look of wood in their kitchens and basements. They get the aesthetic they love without the constant worry about spills and moisture damage.”
Before You Begin: The Ultimate Pre-Installation Checklist
A professional result is 90% preparation. Rushing this stage is the single biggest mistake a DIYer can make. This checklist will ensure you have everything you need before the first box is even opened, preventing frustrating mid-project trips to the hardware store and ensuring your installation is built on a solid foundation.
For the most precise requirements, always have the official Bravewood installation instructions for your specific product on hand [3], as details can vary slightly between collections.
Essential Tools & Materials
Gather everything on this list before you start. Having the right tools makes the job faster, easier, and safer.
Essential Tools:

- Tape Measure
- Pencil
- Utility Knife
- Safety Glasses & Gloves
- Spacers (1/4″ or as specified by manufacturer)
- Tapping Block
- Pull Bar
- Rubber Mallet
- Jigsaw (for complex cuts)
- Miter Saw or Circular Saw (for straight cuts)
- Pro Tool: Oscillating Multi-Tool or Jamb Saw (for undercutting doorjambs)
Essential Materials:
- Bravewood Flooring (plus 10% extra for cuts and mistakes)
- 100% Silicone Sealant (for perimeter sealing)
- Caulking Gun
- Transition Strips (T-molding, reducers, etc.)
- Optional: 6-mil Poly Film Vapor Barrier (required for concrete subfloors)
Pro Tip: While you can use a jigsaw for all your cuts, a miter saw will give you cleaner, faster, and more accurate cuts for a professional look. It’s a worthwhile investment or rental for any flooring project.
Critical Step: Subfloor Preparation
Your new floor is only as good as the subfloor beneath it. It must be clean, flat, and dry. According to the official Bravewood installation manual, you can install over many existing hard surfaces, but preparation is key [3].
- Clean: Scrape up any old adhesive, remove nails or staples, and thoroughly sweep and vacuum the entire area. Any debris left behind can cause crunching sounds or prevent the planks from locking properly.
- Flat: This is the most critical requirement. The subfloor must be flat to within 3/16 of an inch over a 10-foot span. Check for high and low spots using a long, straight edge.
- High Spots: Sand down high spots on a plywood subfloor or grind them down on concrete.
- Low Spots: Use a cement-based patching or self-leveling compound to fill any dips or low areas.
- Dry: Moisture is the enemy of any floor installation. For concrete subfloors, you must perform a moisture test. Industry standards from organizations like the IICRC detail specific methods for this [4]. The easiest DIY method is the plastic sheet test: tape a 2’x2′ plastic sheet to the concrete and wait 72 hours. If condensation forms under the sheet, the moisture level is too high and you must use a 6-mil vapor barrier.
Can I install Bravewood over my existing tile floor?
Yes, in most cases. As long as the tile is clean, flat, well-adhered (no loose or cracked tiles), and you have filled in the grout lines with a leveling compound to create a smooth surface, you can install directly over it.
The Science of Acclimation: Why You Can’t Skip This Step
You’ve brought the boxes home—now leave them alone. You must let the flooring acclimate to your home’s normal living conditions for at least 48 hours before installation. This step is crucial. Bravewood planks, like any flooring material, need time to adjust to the temperature and humidity of the room where they will be installed.
According to research from institutions like the U.S. Forest Service’s Forest Products Laboratory, composite materials expand and contract with environmental changes [5]. Skipping acclimation means you might be installing planks that are slightly contracted (in a cold, dry environment) or expanded (in a warm, humid one). After installation, as they adjust, this can lead to unsightly gaps opening up between boards or, worse, pressure build-up that causes the entire floor to buckle.
How to Acclimate Correctly:
- Place the unopened boxes in the installation room.
- Stack them flat, leaving air gaps between boxes for circulation. Do not stack them in one solid pile on the floor.
- Maintain the room at a normal living temperature (e.g., 65-80°F).
The Step-by-Step Bravewood Installation Guide
With your preparation complete, it’s time for the main event. This visual-first guide will walk you through each stage of the process. We’ll focus on the techniques that ensure a tight, professional-looking floor, and we’ll point out common mistakes to avoid along the way. For added detail, you can use these tips to supplement the official Bravewood installation guide [3].
Step 1: Planning Your Layout & Starting the First Row
A little planning goes a long way. The direction you lay your planks has a huge impact on the final look. Generally, you should lay planks parallel to the longest wall or, in a narrow room, parallel to the direction of incoming light to make the space feel larger.
Before you start, measure the width of the room and divide it by the width of a single plank. This tells you how wide your last row will be. If it’s less than 1/3 of a plank’s width, you should cut your first row narrower to make the first and last rows a more balanced size.
Starting the First Row:
- Undercut your doorjambs so the flooring can slide underneath for a clean, seamless look.
- Place 1/4″ spacers against the starting wall. This maintains the critical expansion gap.
- Lay the first plank in a corner, with the tongue side facing the wall.
- Connect the second plank by inserting its short-end tongue into the groove of the first plank at an angle and lowering it into place. Continue this across the wall.
- Cut the last plank of the row to fit, leaving a 1/4″ expansion gap.
Pro Tip: According to the Certified Floorcovering Installers Association (CFI), the most important row is the first one [6]. Snap a chalk line to ensure it is perfectly straight, as any deviation will be magnified across the entire floor.
Step 2: Installing the Main Body of the Floor
With the first row as your foundation, the rest of the floor will go in quickly. The key is staggering the seams correctly for both structural integrity and visual appeal.
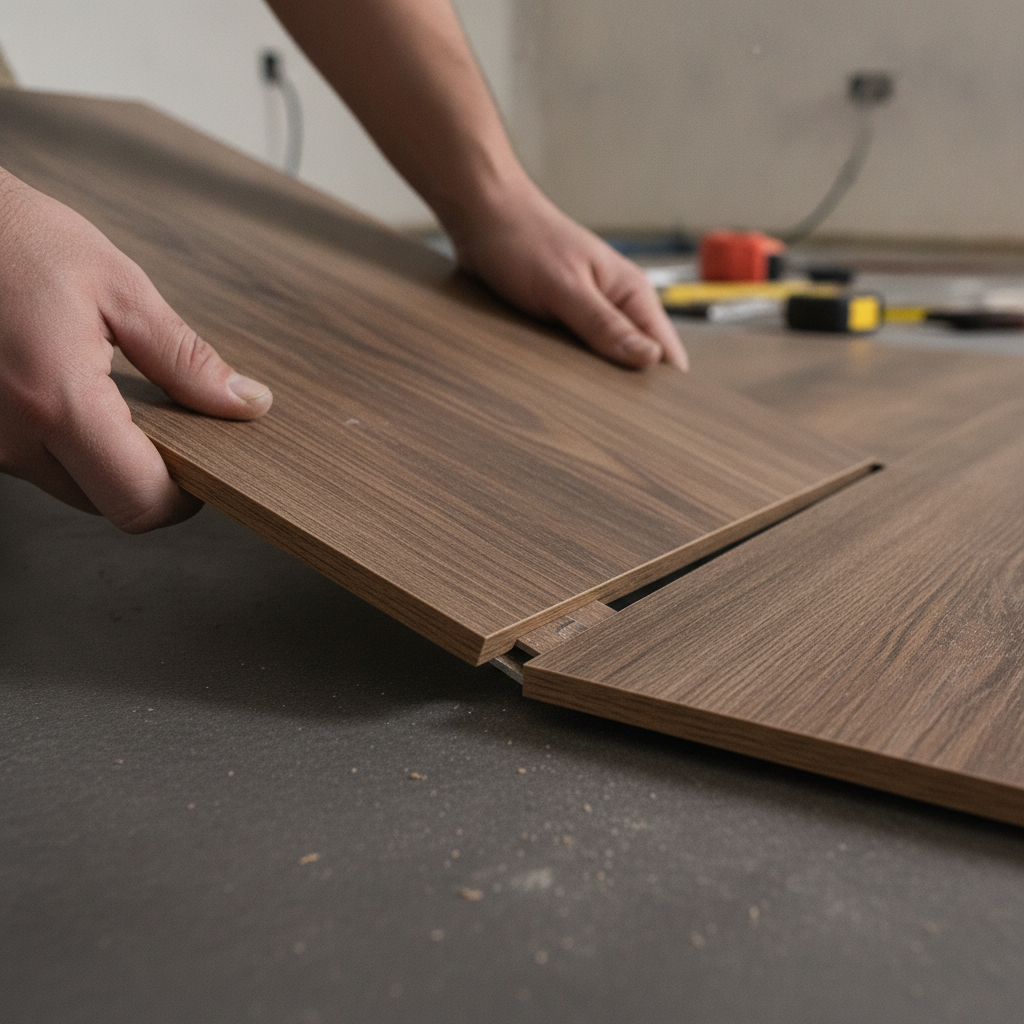
- Start the second row with the piece you cut off from the end of the first row (if it’s at least 6-8 inches long). This creates a natural stagger.
- Ensure the end-seams of your planks are at least 6-8 inches apart from the seams in the adjacent rows.
- Connect the long side of the new plank by inserting its tongue into the groove of the previous row at a low angle.
- Slide the plank until the short ends meet, then gently tap the long seam with a tapping block and mallet to ensure it’s tight before lowering the short end to lock it.
- Continue this process, mixing planks from several different boxes as you go to ensure a good blend of color and grain patterns.
Common Mistake: Avoid “H-patterns” (where seams line up every other row) or “stair-step” patterns. A truly random stagger looks more natural and professional.
Step 3: Making Difficult Cuts (Doorjambs and Obstacles)
Cutting around obstacles is what intimidates most DIYers, but it’s simple with the right technique. As experts at This Old House demonstrate, the key is a clean, professional finish [7].
For doorjambs, the best method is to undercut them. Place a scrap piece of flooring on the subfloor next to the jamb and use an oscillating multi-tool or a handsaw held flat against it to cut the bottom of the jamb away. This allows your flooring plank to slide neatly underneath, hiding the cut edge.
For pipes or vents, use a jigsaw to carefully cut the required shape out of the plank. Remember to measure twice and cut once!
Step 4: Finishing the Last Row and Transitions
Fitting the last row often requires cutting the planks lengthwise (ripping).
- Lay a full plank directly on top of the last installed row.
- Place another full plank on top of that one, but with its edge pushed up against the wall (remember to use a spacer).
- Trace a line on the middle plank along the edge of the top plank. This line is your cut line.
- Cut the plank along this line.
- Use a pull bar and mallet to carefully pull the final row into place, ensuring the joint is tight.
Finally, install the appropriate transition strips (e.g., a T-molding for doorways to rooms with similar height flooring, or a reducer for transitions to lower floors like vinyl or carpet) to cover the expansion gaps and create a clean finish.
Mastering the Waterproof Seal: Protecting Your Warranty & Investment
Bravewood planks are 100% waterproof, but a waterproof floor system depends on a correct installation. This section is about protecting your warranty. Failing to properly seal the perimeter is one of the main reasons manufacturers deny warranty claims. The goal is to create a “bowl” effect, where any spills on the floor are contained on top and cannot get underneath. The principles for sealing perimeters in wet areas are a best-practice standard, similar to those found in the TCNA Handbook for tile installations [8].
The All-Important Expansion Gap: What It Is and Why You Need It
You’ve been using 1/4″ spacers throughout your installation. This space, the expansion gap, is the single most important factor in preventing floor failure. It gives the entire floor system room to “breathe”—to expand and contract slightly with seasonal changes in temperature and humidity.
What happens if you don’t leave an expansion gap?
When the floor expands, it will have nowhere to go. The pressure will build until the planks push against each other and lift off the subfloor, creating a large “tent” or buckle in your beautiful new floor. This is not a product defect; it’s an installation error. Always follow the manufacturer’s required gap size, which is detailed in the Bravewood manual [3].
Sealing the Perimeter for a 100% Waterproof System
To complete your waterproof system, especially in kitchens, bathrooms, and entryways, you must seal the expansion gap.
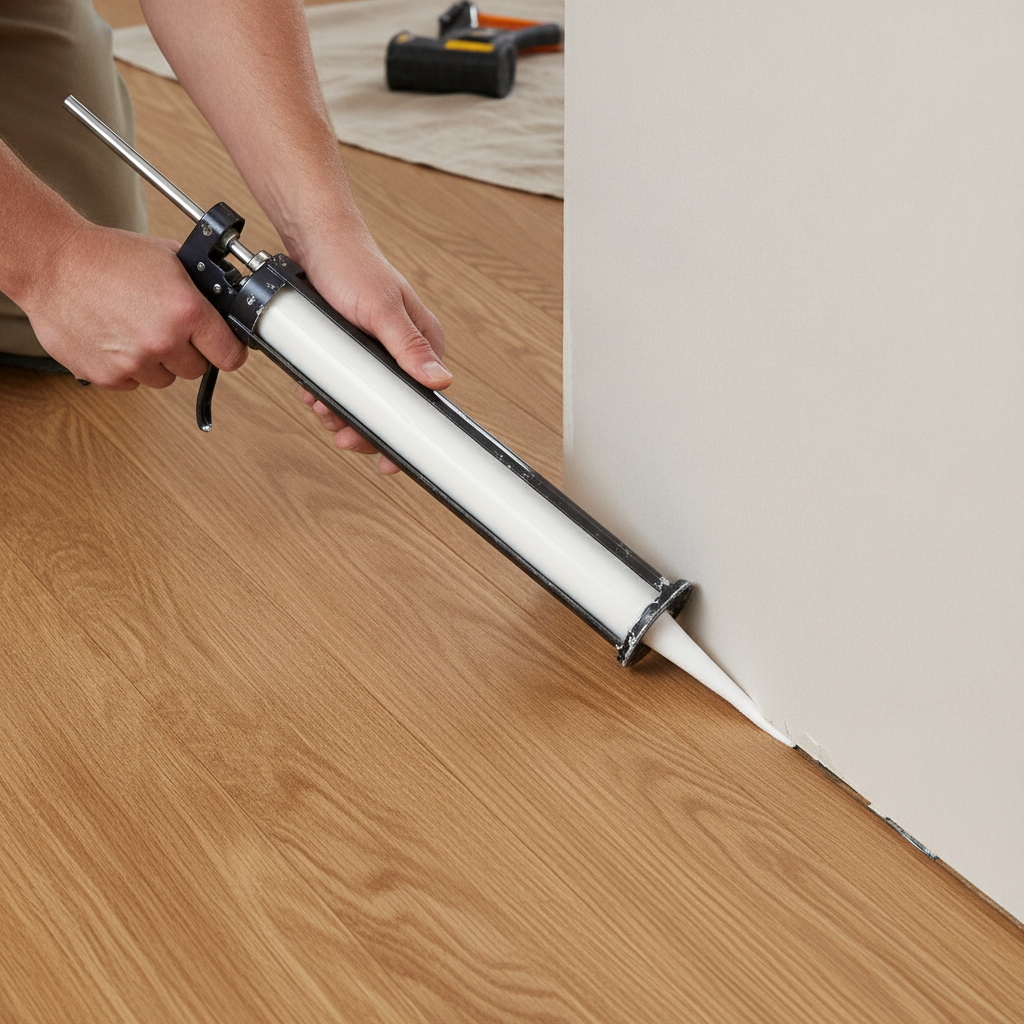
- After the floor is fully installed, remove all the spacers.
- Apply a continuous bead of 100% silicone sealant into the expansion gap around the entire perimeter of the room.
- Install your baseboards or quarter-round molding. The molding should be nailed to the wall, not the floor, allowing the floor to move freely underneath it. The molding will hide the silicone-filled gap.
- Apply a final bead of sealant where the molding meets the floor for an extra layer of protection in wet areas.
This simple step ensures that water from a spill can’t seep past the edges of your floor and get trapped underneath, protecting your subfloor and your investment.
Troubleshooting: Avoiding the Most Common DIY Installation Mistakes
We’ve all heard the horror stories. To ensure your project is a success story instead, let’s look at the most common installation mistakes and how to avoid them. Think of these as the cardinal sins of flooring installation—and following the “rulebook” of professional standards like the NWFA Installation Guidelines is your path to redemption [1].
Mistake #1: Ignoring Subfloor Prep
- The Problem: An uneven, dirty, or wet subfloor.
- The Consequence: Clicking or popping sounds when you walk, bouncy or soft spots, and joints that can fail or break over time because they don’t have proper support.
- The Fix: Take the time to make your subfloor clean, flat, and dry. It’s the foundation of your entire project.
Mistake #2: Skipping Acclimation
- The Problem: Installing planks straight from the store without letting them adjust to your home’s environment.
- The Consequence: As the planks acclimate after installation, they can shrink, creating ugly gaps between boards, or expand, causing buckling. As explained by the science from the Forest Products Laboratory, this is a predictable material reaction [5].
- The Fix: Acclimate the flooring in the installation room for at least 48 hours, with boxes stacked correctly to allow for air circulation.
Mistake #3: Forgetting the Expansion Gap
- The Problem: Installing the flooring tight against walls, cabinets, or other fixed objects.
- The Consequence: Buckling. When the weather gets warmer or more humid, the floor expands. With nowhere to go, it pushes upwards, creating a “tent” in the middle of your room.
- The Fix: Always use the manufacturer-specified spacers (typically 1/4″) around the entire perimeter and any fixed objects like kitchen islands.
Mistake #4: Poor Layout Planning
- The Problem: Starting the first row without planning the layout, especially the staggering of seams and the width of the final row.
- The Consequence: An unprofessional-looking result. You might end up with an unsightly, paper-thin sliver of a plank as your last row, or ugly H-patterns in your seams. An experienced installer will tell you, “The aesthetics are just as important as the mechanics. A well-planned layout is the signature of true craftsmanship.”
- The Fix: Measure your room and plan your first and last rows before you begin. Stagger your end joints randomly by at least 6-8 inches.
Frequently Asked Questions (FAQ)
Does Bravewood flooring require an underlayment?
Most Bravewood hybrid hardwood products come with a pre-attached underlayment pad. This means you do not need to install a separate one. However, the one critical exception is when installing over a concrete subfloor. In this case, you must put down a 6-mil poly film vapor barrier first to protect the planks from moisture wicking up from the concrete. Always check the official manufacturer guidelines for your specific product as this is the ultimate source of truth [3].
How do you care for and clean Bravewood waterproof hardwood floors?
Maintenance is simple. Regularly sweep or vacuum using a hard floor setting (never a beater bar). For deeper cleaning, use a damp mop with a pH-neutral cleaner designed for hard surface floors. Never use wax, oil soaps, harsh abrasive cleaners, or steam mops, as these can damage the protective finish. For specific product recommendations, consult the Bravewood care and maintenance guide [3].
Can you refinish hybrid hardwood floors like Bravewood?
No, you cannot refinish hybrid hardwood. The top layer is a thin veneer of real wood. The sanding process required for refinishing is aggressive and would sand straight through this veneer, exposing and destroying the SPC core underneath. The trade-off for its waterproof durability is that any deep gouges or scratches cannot be sanded out.
Your Flawless Floor Awaits
You now have the knowledge to tackle this project with confidence. By combining meticulous preparation, a careful step-by-step process, and an understanding of the critical waterproofing details, you can achieve a durable, beautiful, and professional-quality result. You’ve learned not just the “how” but the “why” behind each step, empowering you to avoid common pitfalls and protect your investment for the long term.
You’ve got the knowledge, now it’s time to create a floor you’ll be proud of for years to come. Leave a comment below with your project plans or any questions you have – we’re here to help!
Disclaimer: This article provides DIY guidance. Always prioritize safety by wearing appropriate personal protective equipment (PPE) and using tools as directed. For the most accurate and warranty-compliant instructions, consult the official Bravewood installation manual for your specific product. If you are unsure about any step, consider consulting a professional flooring installer.
References
- National Wood Flooring Association. (n.d.). Installation Guidelines. NWFA. Retrieved from https://www.nwfa.org/technical-guidelines/
- UL Solutions. (n.d.). FloorScore® Certification. Retrieved from https://www.ul.com/services/floorscore-certification
- Bravewood Flooring Manufacturer. (n.d.). Official Installation Manual.
- Institute of Inspection, Cleaning and Restoration Certification. (n.d.). IICRC S500 Standard for Professional Water Damage Restoration. IICRC. Retrieved from https://www.iicrc.org/page/IICRCS500
- Forest Products Laboratory, U.S. Forest Service. (n.d.). Wood Handbook–Wood as an Engineering Material. Retrieved from https://www.fpl.fs.fed.us/products/publications/specific_pub.php?posting_id=18006
- Certified Floorcovering Installers Association. (n.d.). CFI Installation Standards. Retrieved from https://cfiinstallers.org/
- This Old House. (n.d.). Flooring Installation How-To Guides. Retrieved from https://www.thisoldhouse.com/flooring
- Tile Council of North America. (n.d.). TCNA Handbook for Ceramic, Glass, and Stone Tile Installation. TCNA. Retrieved from https://www.tcnatile.com/products-and-services/publications.html
