
There’s a moment every homeowner dreads: noticing the edge of a floorboard in the bathroom starting to lift. It’s the first sign of a battle against moisture that many traditional flooring materials, especially classic hardwood, are destined to lose. For years, the dream of having the warm, elegant look of wood in the bathroom was just that—a dream, quickly soured by the reality of warped planks, discoloration, and the constant fear of water damage.
But what if you could have the authentic beauty of hardwood without the risk? What if your floor could be the one part of your bathroom you never have to worry about again?
This is not just another list of flooring options. This is your definitive, data-driven guide to achieving a truly ‘bulletproof’ bathroom floor. We will dive deep into the world of waterproof hybrid hardwood, a revolutionary material designed to solve this exact dilemma. We’ll explore the science behind its construction, compare it head-to-head with other popular choices, and provide a meticulous installation guide that focuses on the critical details others ignore. By the end, you’ll have a complete system for selecting, installing, and maintaining a floor that defeats water damage for good.
- The Bathroom Flooring Dilemma: Why Traditional Hardwood Warps and Fails
- What Is Hybrid Hardwood Flooring? A Modern Solution Explained
- The Critical Question: Can You Really Use Hybrid Hardwood in a Full Bathroom?
- Data-Driven Comparison: Hybrid Hardwood vs. Other Wood-Look Options
- The Bulletproof Installation Guide: Ensuring a Waterproof Finish
- Frequently Asked Questions (FAQ)
- Your Floor, Your Fortress
- References & Authoritative Sources
The Bathroom Flooring Dilemma: Why Traditional Hardwood Warps and Fails
Before we can appreciate the solution, we must understand the problem. Solid hardwood flooring is a natural, porous material. Think of it like a dense sponge; when exposed to moisture, its wood fibers absorb water and swell. When the air dries, the fibers shrink. This constant cycle of expansion and contraction is the root cause of nearly every form of hardwood water damage in a bathroom.
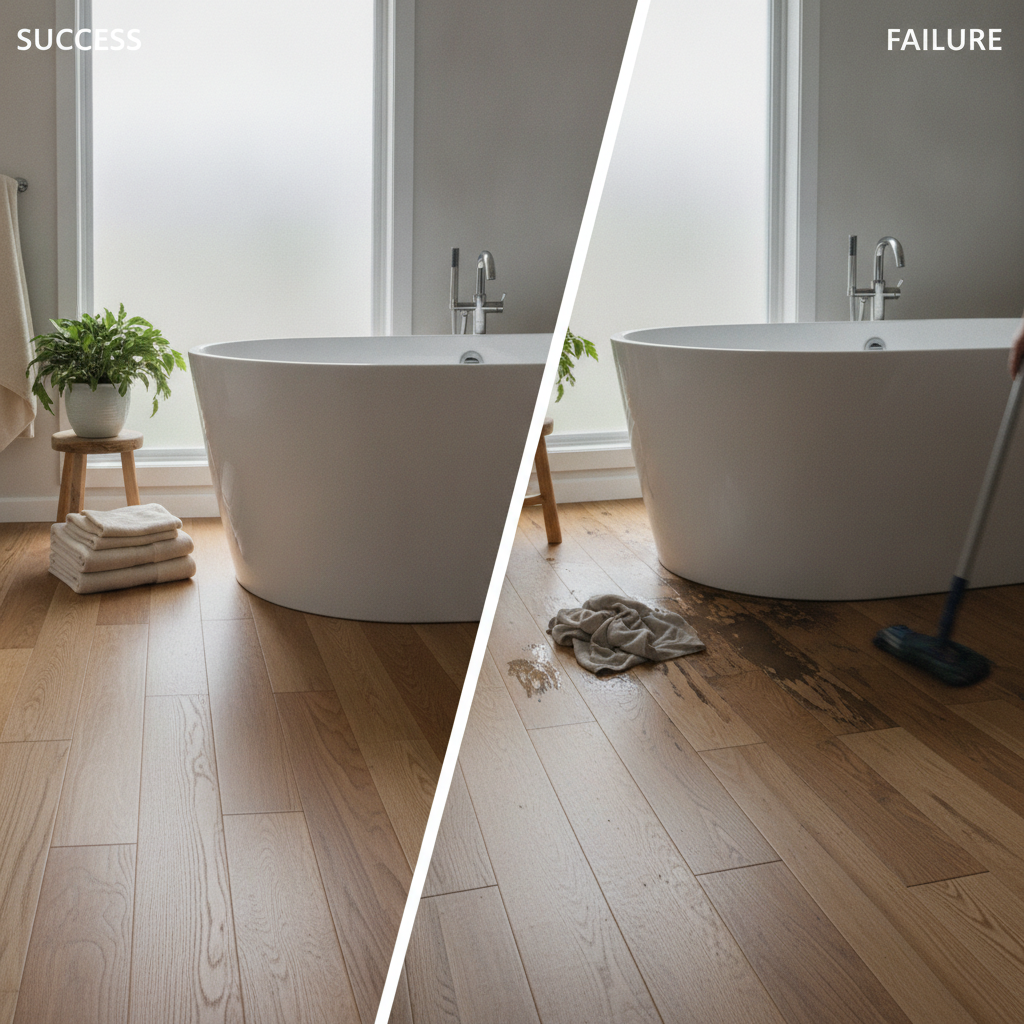
This leads to a host of visible failures that signal a floor in distress. Homeowners might notice:
- Cupping: The edges of a plank are higher than its center, creating a concave shape.
- Crowning: The center of the plank is bowed upward, higher than its edges.
- Buckling: The floorboards lift dramatically from the subfloor.
- Discoloration: Dark stains appear as water penetrates the wood and its finish.
Worse yet, where there is persistent moisture, there is a risk of mold. According to guidance from the Environmental Protection Agency (EPA), mold can begin to grow on damp surfaces within just 24 to 48 hours [1]. This isn’t just an aesthetic issue; it’s a potential health hazard lurking beneath your feet. Experts at the Building Science Corporation emphasize that moisture can travel in both liquid and vapor form, meaning even high humidity from a steamy shower can contribute to long-term damage [2].
Understanding the Enemy: Humidity, Splashes, and Leaks
Moisture attacks bathroom floors from three primary angles, each contributing to the eventual failure of unsuitable materials.
- Chronic Humidity: The steam from daily hot showers creates a high-humidity environment. This water vapor is absorbed by porous materials, causing slow, consistent swelling. The Home Ventilating Institute (HVI) recommends running a properly sized bathroom exhaust fan for at least 20 minutes after a shower to effectively clear this moisture from the air [3].
- Splashes and Spills: Water from tubs, showers, and sinks is an unavoidable reality. While a single splash may seem harmless, repeated exposure allows water to find its way into the seams between planks, where it can be absorbed by the unprotected core and subfloor.
- Catastrophic Leaks: This is the most destructive source. According to home inspection authorities like InterNACHI, a slow, undetected leak from a toilet’s wax ring is one of the most common and damaging causes of localized floor warping and subfloor rot in bathrooms [4].
What Is Hybrid Hardwood Flooring? A Modern Solution Explained
Faced with the inherent weakness of solid wood in wet areas, engineers developed a smarter solution: hybrid hardwood flooring. This innovative product combines the best of both worlds: the undeniable beauty of real wood on top and a 100% waterproof, dimensionally stable core below.
Imagine a cross-section of a hybrid hardwood plank. It’s constructed in several layers, each with a specific job:
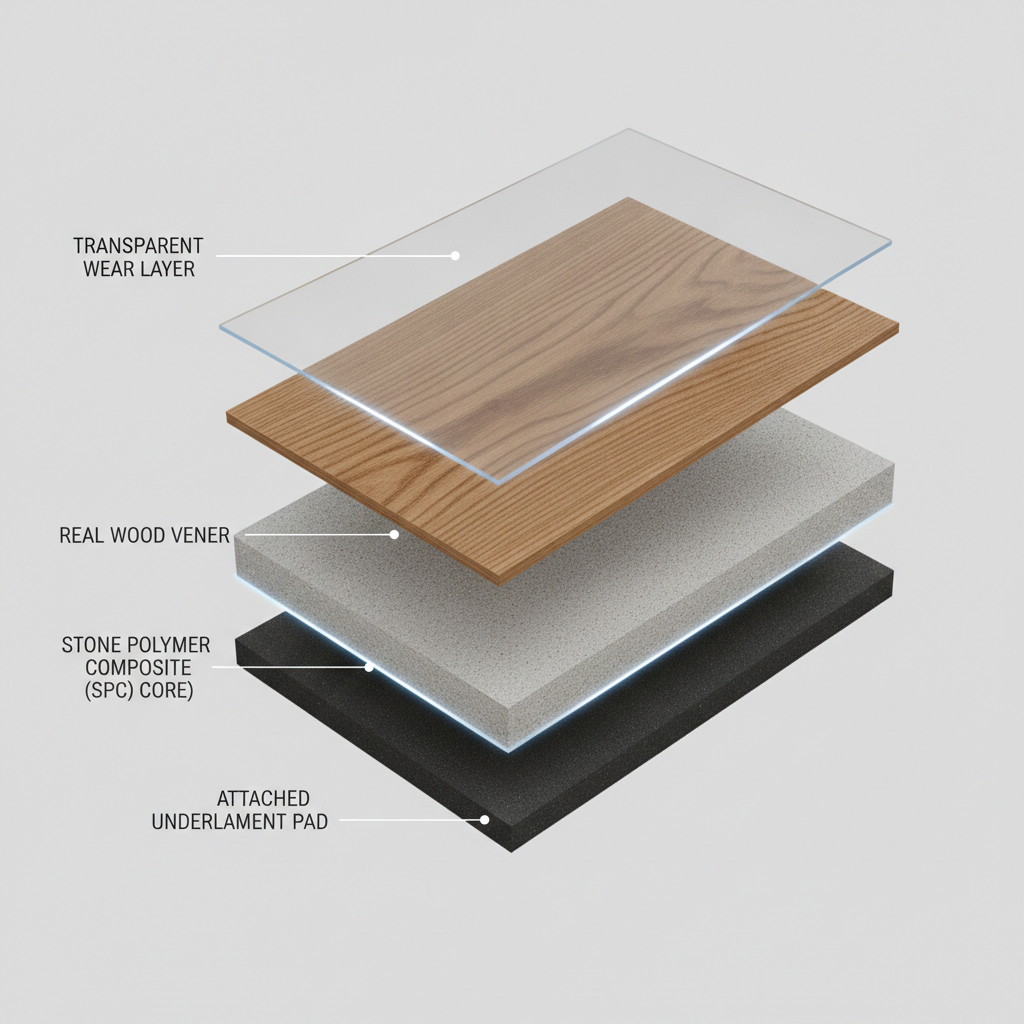
- Protective Wear Layer: A top coat, often an acrylic or aluminum oxide finish, provides robust resistance to scratches, dents, and stains.
- Real Wood Veneer: This is the magic. A thin but authentic layer of hardwood (like oak, hickory, or maple) gives the floor its genuine grain, texture, and visual warmth.
- Waterproof Core: The heart of the plank is a rigid, 100% waterproof composite material. Most commonly, this is a Stone Polymer Composite (SPC) core, made from a mixture of limestone and stabilizers. This core does not swell, warp, or buckle when exposed to water.
- Attached Underlayment: Many hybrid products come with a pre-attached pad that provides sound insulation, cushioning underfoot, and a moisture barrier from the subfloor.
This multi-layer construction, detailed in technical sheets from leading manufacturers, is what allows hybrid flooring to deliver on its promise of a “wood floor for any room” [5].
| Pros of Hybrid Hardwood | Cons of Hybrid Hardwood |
|---|---|
| 100% Waterproof Core Resists spills, splashes, and humidity without warping or swelling. |
Cannot Be Refinished The thin wood veneer cannot be sanded down like solid hardwood. |
| Authentic Wood Beauty Features a genuine hardwood veneer, not a printed image. |
Higher Initial Cost Generally more expensive than LVP or laminate flooring. |
| Highly Durable The rigid core and strong wear layer resist dents and scratches. |
Quality Varies by Brand Core composition and veneer thickness can differ significantly. |
| DIY-Friendly Installation Most products use a simple click-lock installation system. |
Requires a Level Subfloor Imperfections in the subfloor can compromise the locking system. |
The Critical Question: Can You Really Use Hybrid Hardwood in a Full Bathroom?
This is the most important question, and the answer is a nuanced: Yes, but only if you choose the right product and install it meticulously.
While the core of hybrid flooring is waterproof, the complete system must be watertight to prevent moisture from getting underneath the floor and damaging the subfloor. This is where manufacturer warranties and installation guidelines become non-negotiable. Many warranties will be voided if the flooring is not installed precisely according to instructions, especially regarding perimeter sealing in a full bathroom with a tub or shower.
According to the National Wood Flooring Association (NWFA), proper acclimation of any wood or composite flooring is crucial before installation in an area with potential moisture swings [6]. This allows the planks to adjust to the home’s temperature and humidity.
Before you commit, ask yourself these five critical questions:
Is Hybrid Hardwood Right for Your Bathroom? 5 Questions to Ask Before You Buy
- Is this a full bath with a shower/tub? If yes, you absolutely must follow the manufacturer’s specific instructions for sealing the perimeter.
- What does the warranty say? Read the fine print. Does it explicitly cover installation in a full bathroom?
- Is my subfloor level? Hybrid flooring requires a flat, stable subfloor. Any dips or peaks must be corrected before installation.
- Is my bathroom well-ventilated? A high-quality exhaust fan is essential to manage ambient humidity, protecting not just your floor but your entire bathroom.
- Am I prepared for the installation requirements? A successful installation requires careful attention to detail, especially when cutting around toilets and sealing edges.
Data-Driven Comparison: Hybrid Hardwood vs. Other Wood-Look Options
To make a confident decision, it’s essential to compare hybrid hardwood against the other leading contenders for wood-look bathroom flooring: Luxury Vinyl Plank (LVP) and Wood-Look Porcelain Tile.
| Feature | Hybrid Hardwood | Luxury Vinyl Plank (LVP) | Wood-Look Porcelain Tile |
|---|---|---|---|
| Core Material | Waterproof SPC/WPC Core | Waterproof Vinyl Core | Impervious Porcelain Clay |
| Top Surface | Real Wood Veneer | Printed Image Layer | High-Definition Glaze |
| Water Resistance | Excellent (Waterproof Core) | Excellent (100% Waterproof) | Superior (Waterproof Body) |
| Realism | Superior (Real Wood) | Very Good (Embossed Texture) | Very Good (HD Printing) |
| Durability | Very Good (Dent Resistant) | Good (Scratch Resistant) | Superior (Scratch/Chip Proof) |
| DIY-Friendliness | High (Click-Lock) | High (Click-Lock) | Low (Requires Mortar/Grout) |
| Underfoot Feel | Comfortable, Moderate Temp | Comfortable, Warmest | Hard, Cold (unless heated) |
| Cost (Material) | $$$ (High) | $$ (Moderate) | $$ (Moderate) |
A Deeper Dive into the Data:
- Porcelain Tile: Its incredible durability comes from its density. According to ASTM C373 international standards, porcelain tile must have a water absorption rate of 0.5% or less, making it virtually impervious to water [7]. Its surface hardness is measured by a PEI rating from the Porcelain Enamel Institute; a rating of 3 or 4 is more than sufficient for any residential bathroom [8]. The Tile Council of North America (TCNA) sets the standards for installation, ensuring a durable, waterproof assembly when followed correctly [10].
- Luxury Vinyl Plank (LVP): This 100% synthetic option is also completely waterproof. Its durability is primarily determined by the thickness of its top wear layer, measured in mils. A 12-mil wear layer is suitable for residential use, but a 20-mil layer offers significantly more protection against scratches and scuffs in a high-traffic bathroom.
- Hybrid Hardwood: Its unique advantage is aesthetics. While LVP and tile have become incredibly realistic, nothing can perfectly replicate the unique grain and depth of a real wood veneer. Its rigid core provides dent resistance superior to many LVP products.
Realism & Aesthetics: Which Floor Looks Most Like Real Wood?
For the purist, hybrid hardwood is the undeniable winner. It is real wood on the surface. However, high-end LVP with in-register embossing (where the surface texture aligns with the printed grain) can be remarkably convincing. Wood-look porcelain tile achieves its realism through high-definition printing, but a key detail often overlooked is the grout. Using a very thin grout line (1/16″ or 1/8″) and choosing a color that closely matches the tile helps to minimize the grid pattern and enhance the illusion of real planks.
Cost, Comfort, and DIY-Friendliness
- Cost: LVP is often the most budget-friendly option. Hybrid hardwood and porcelain tile (material cost) are often comparable, but the professional installation cost for tile is significantly higher due to the labor-intensive nature of setting and grouting.
- Comfort: Tile is notoriously hard and cold underfoot, though this can be mitigated with radiant in-floor heating. LVP and hybrid flooring are much warmer and more comfortable to stand on, especially those with an attached underlayment, which also helps to dampen sound. Tile, by contrast, is acoustically louder.
- DIY-Friendliness: Both LVP and hybrid hardwood are excellent DIY projects thanks to their click-lock floating floor systems. Tile installation is a far more complex job that typically requires professional expertise to ensure a level, waterproof result.
The Bulletproof Installation Guide: Ensuring a Waterproof Finish
A waterproof floor is only as good as its installation. The goal is to create a sealed, monolithic surface that prevents water from ever reaching the subfloor. While you should always follow your specific product’s manual, these steps represent the professional best practices for a watertight bathroom.
Step 1: The Critical Subfloor Preparation
This is the most important step. Most installation failures trace back to an inadequate subfloor. According to the Certified Flooring Installers Association (CFI), a proper subfloor is the foundation of a long-lasting floor [9].
- Clean and Dry: The subfloor must be completely free of debris, dust, and moisture.
- Level: For most floating floors, the subfloor must be flat to within 3/16 of an inch over a 10-foot span. Use a long, straight edge to check for high and low spots. Use a self-leveling compound to fill dips and sand down high spots.
- Inspect for Damage: Check for any signs of previous water damage, rot, or mold. According to inspection guidelines from InterNACHI, any compromised subfloor sections must be cut out and replaced before proceeding [4].
Step 2: Acclimation, Underlayment, and Layout
- Acclimate the Planks: Bring the unopened boxes of flooring into the bathroom for at least 48-72 hours, as per most manufacturer guidelines. This allows the planks to stabilize to the room’s conditions.
- Plan Your Layout: Dry-lay the first few rows to ensure you won’t end up with a very thin sliver of a plank on the last row. Stagger the seams between planks for a more natural look.
- Underlayment: If your flooring does not have a pre-attached underlayment, you may need to roll one out. Check the manufacturer’s requirements; some warranties require a specific type of underlayment.
Step 3: The Finishing Touches – Sealing for a Watertight Barrier
This is the final step that makes the floor “bulletproof.”
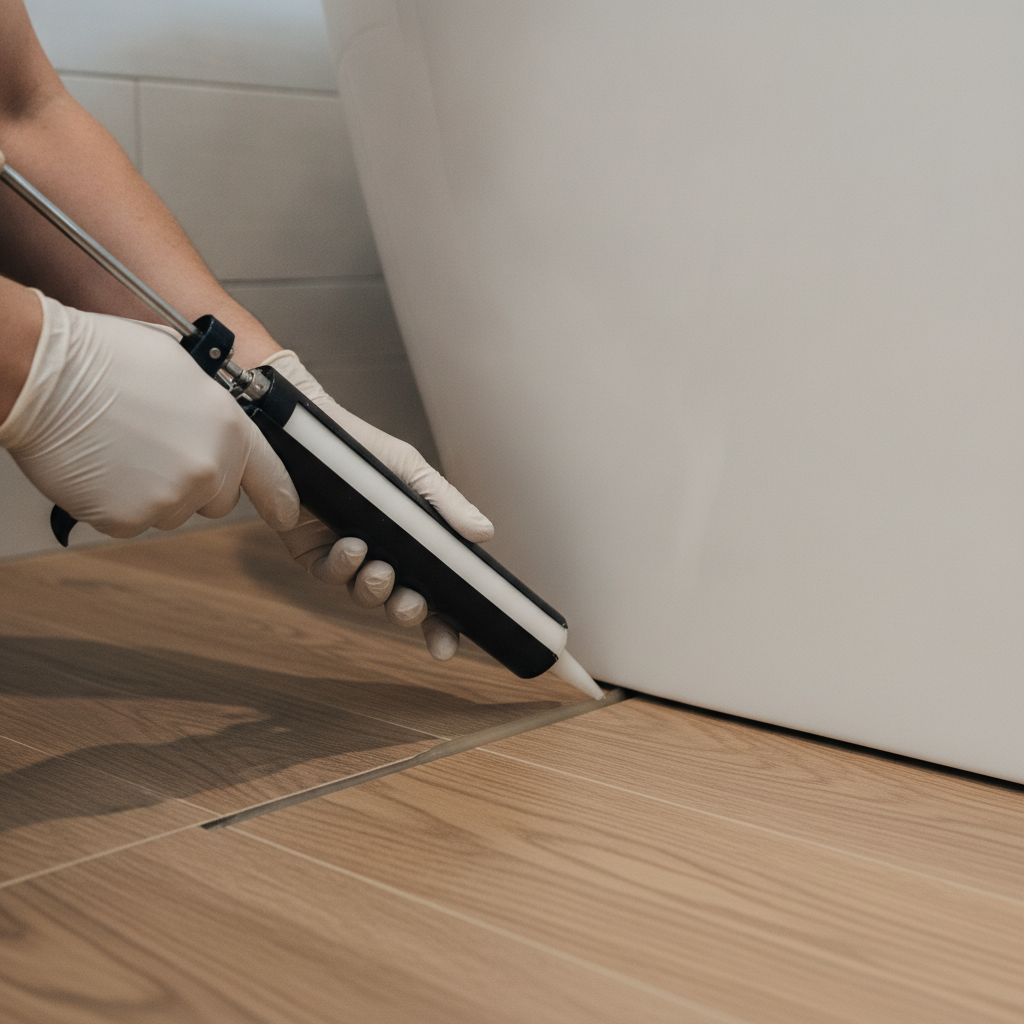
- Maintain an Expansion Gap: As you install the floor, use 1/4-inch spacers along all walls and permanent fixtures (like the tub, vanity, and toilet flange). This gap is crucial as it allows the floor to expand and contract slightly with temperature changes.
- Seal the Perimeter: After the floor is laid and the baseboards are installed, you must seal this expansion gap. Use 100% silicone sealant, not acrylic caulk. Silicone is permanently waterproof and flexible. Apply a neat bead of silicone in the gap between the flooring and the tub, shower, and toilet. Also apply it under the baseboards or between the baseboard and the floor. This creates a final barrier, preventing any surface water from getting to the edges of the floor and the subfloor below.
Frequently Asked Questions (FAQ)
How long does hybrid wood flooring last?
With proper installation and care, a quality hybrid wood floor can easily last 15-25 years or more. Its lifespan is directly tied to the quality of its core, the thickness of its wear layer, and how well it was installed.
Can hybrid hardwood flooring be refinished?
No. This is one of the most significant differences from solid or engineered hardwood. The real wood veneer on hybrid flooring is too thin to be sanded and refinished. Deep scratches or gouges that penetrate the wear layer cannot be repaired in this way.
Is hybrid flooring scratch-proof?
It is highly scratch-resistant, but not scratch-proof. The advanced acrylic and aluminum oxide finishes used by major manufacturers provide excellent protection against everyday wear from pets, shoes, and furniture. It is generally more scratch-resistant than traditional polyurethane-finished hardwood and many entry-level LVP products.
Will steam from a shower damage hybrid hardwood?
If the floor is installed correctly with the perimeter fully sealed with silicone and the bathroom has adequate ventilation, normal amounts of steam will not damage the floor. The waterproof core is unaffected by humidity, and proper sealing prevents moisture from getting underneath. As recommended by HVI, using your exhaust fan during and after every shower is the best defense [3].
Your Floor, Your Fortress
Hybrid hardwood flooring represents a remarkable leap forward, finally making the dream of a warm, beautiful wood floor in the bathroom a safe and durable reality. It successfully solves the age-old problem of water damage that plagues traditional wood, offering an elegant solution that doesn’t compromise on performance.
However, its success is not automatic. It is a system that depends on choosing a quality product, understanding its limitations, and committing to a meticulous, waterproof installation. By focusing on subfloor preparation and proper perimeter sealing, you transform a collection of planks into a seamless, watertight surface. You empower yourself to make a confident choice that will not only elevate the beauty of your bathroom but will provide peace of mind for decades to come.
This article provides general guidance. Always consult with a professional flooring installer and follow the specific installation instructions and warranty requirements provided by the flooring manufacturer. Information on building codes and safety standards may vary by location.
References & Authoritative Sources
- United States Environmental Protection Agency. (N.D.). A Brief Guide to Mold, Moisture, and Your Home. Retrieved from https://www.epa.gov/mold/brief-guide-mold-moisture-and-your-home
- Building Science Corporation. (N.D.). Resource Library. Retrieved from https://www.buildingscience.com/document-library
- Home Ventilating Institute. (N.D.). HVI-Certified Products Directory and Resources. Retrieved from https://www.hvi.org/
- International Association of Certified Home Inspectors (InterNACHI). (N.D.). Moisture Intrusion Inspection. Retrieved from https://www.nachi.org/moisture-intrusion.htm
- Manufacturer Installation & Technical Guidelines. (N.D.). Product-specific documentation from flooring manufacturers such as Shaw Floors, Mohawk, and Cali Bamboo are the ultimate authority for their respective products.
- National Wood Flooring Association (NWFA). (N.D.). Installation Guidelines. Retrieved from https://www.nwfa.org/installation-guidelines/
- ASTM International. (N.D.). Standard Test Methods for Water Absorption, Bulk Density, Apparent Porosity, and Apparent Specific Gravity of Fired Whiteware Products (ASTM C373). Retrieved from https://www.astm.org/
- Porcelain Enamel Institute. (N.D.). PEI Rating System for Ceramic Tile. The PEI rating system is an industry standard for measuring abrasion resistance.
- Certified Flooring Installers Association (CFI). (N.D.). Installation Standards and Resources. Retrieved from https://cfiinstallers.org/
- Tile Council of North America (TCNA). (N.D.). TCNA Handbook for Ceramic, Glass, and Stone Tile Installation. Retrieved from https://www.tcnatile.com/products-and-services/publications.html