
Tackling a flooring project yourself can feel like a monumental task. You’re excited by the thought of a beautiful new floor and the satisfaction of a job well done, but you’re also anxious about making a costly, irreversible mistake. What if the planks don’t lock together? What if the floor buckles? Where do you even begin?
Take a deep breath. You’ve chosen waterproof hybrid hardwood, a fantastic, DIY-friendly product that combines the timeless beauty of real wood with a rugged, waterproof core. And you’ve found the right guide. This is not just another list of steps; this is a DIY Visual Masterclass. We’ve designed this comprehensive guide to eliminate guesswork, share pro-level secrets, and empower you to go from anxious beginner to confident installer.
We will walk you through understanding the material you’ve chosen, planning your project like a pro, executing a flawless subfloor preparation, and following a detailed, step-by-step installation process. By the end, you’ll have the skills and confidence to achieve a stunning, professional-quality result you can be proud of for years to come.
- First, What Exactly is Waterproof Hybrid Hardwood?
- Phase 1: Planning for a Flawless Installation
- Phase 2: The Critical 72-Hour Subfloor Prep Countdown
- Phase 3: The Step-by-Step Visual Installation Guide
- The 5 Costliest DIY Installation Mistakes (And How to Avoid Them)
- Frequently Asked Questions (FAQ)
- Your Flooring Masterpiece Awaits
- Authoritative Sources & References
First, What Exactly is Waterproof Hybrid Hardwood?
Before you lay the first plank, it’s crucial to understand the innovative material you’re working with. Waterproof hybrid hardwood isn’t just another flooring option; it’s an engineering marvel designed to solve the age-old dilemma of wanting real wood in areas where moisture is a concern.
At its core, hybrid hardwood is a multi-layered flooring plank. While construction can vary slightly by brand, it generally consists of:
- A Protective Wear Layer: A top coat that resists scratches, stains, and fading.
- A Real Wood Veneer: This is the magic layer. A thin slice of genuine hardwood (like oak, hickory, or maple) gives the plank its authentic look and feel.
- A Waterproof Core: The rigid backbone of the plank, typically made from Stone Plastic Composite (SPC) or Wood Plastic Composite (WPC). This core is 100% waterproof, meaning it won’t swell, warp, or buckle when exposed to water.
- An Attached Underlayment: Most hybrid flooring comes with a pre-attached pad that provides sound absorption, cushioning, and a moisture barrier, often eliminating the need for a separate underlayment.
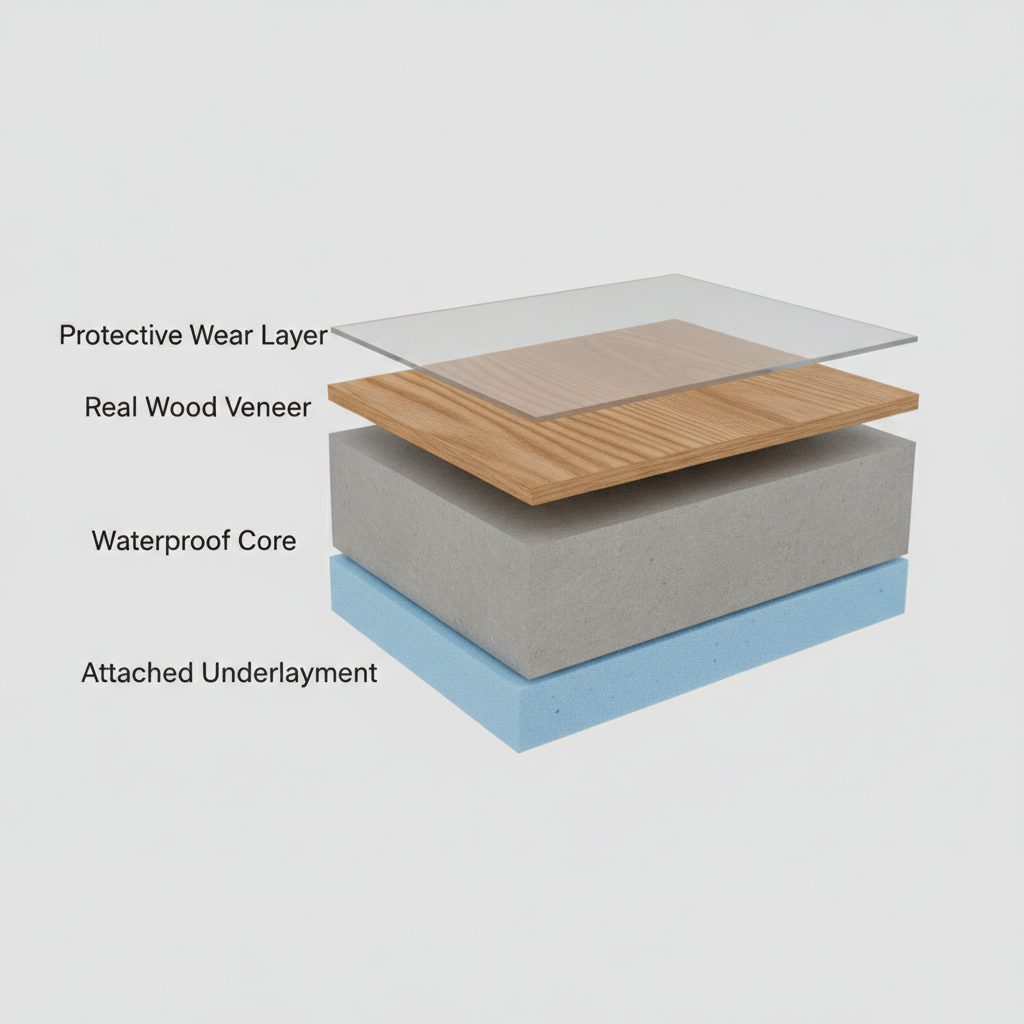
To put it in perspective, here’s how hybrid hardwood stacks up against other popular choices:
| Feature | Waterproof Hybrid Hardwood | Laminate Flooring | Luxury Vinyl Plank (LVP) |
|---|---|---|---|
| Waterproof Level | 100% Waterproof Core | Water-Resistant (at best) | 100% Waterproof |
| Real Wood Feel | Yes (Real Wood Veneer) | No (Photographic Layer) | No (Embossed Plastic) |
| Durability | Very High (Dent-Resistant Core) | High (Scratch-Resistant) | Very High (Resilient) |
| DIY Friendliness | High (Click-Lock System) | High (Click-Lock System) | High (Click-Lock System) |
Is Hybrid Hardwood Real Wood? The Best of Both Worlds
This is one of the most common questions, and the answer is a definitive yes—and no. The top surface you see and walk on is real wood. This is what separates it from laminate, which uses a high-resolution photograph of wood under its wear layer.
The real wood veneer on hybrid hardwood is typically between 0.6mm and 2mm thick. While this layer isn’t thick enough to be sanded and refinished like solid hardwood, it provides the unique grain patterns, knots, and natural beauty that can only come from genuine wood. You get the authentic aesthetic of hardwood with the “life-proof” durability of a composite core, making it the perfect blend for active households.
Phase 1: Planning for a Flawless Installation
A professional-looking floor is born from meticulous planning, not just skillful installation. In fact, proper planning and preparation account for the vast majority of a project’s success. This phase is about gathering your tools, measuring your space, and ordering the right amount of material to ensure you have everything you need before the first box is even opened.
To help you manage costs, we’ve created a downloadable DIY Flooring Budget Spreadsheet to compare the expense of a DIY project against hiring a professional. You’ll also find our Tool Shopping/Rental List invaluable for organizing your trip to the hardware store.
Remember the golden rule of ordering materials: always account for cutting waste. The industry standard is to order 5% to 10% more flooring than your room’s actual square footage. This “cutting allowance” ensures you have enough material for angled cuts, mistakes, and a few extra planks for any future repairs.
Your Essential Toolkit: What to Buy, Rent, and Skip
Having the right tools makes the job smoother, safer, and more precise. Here’s a breakdown of what you’ll need, categorized to help you prioritize.
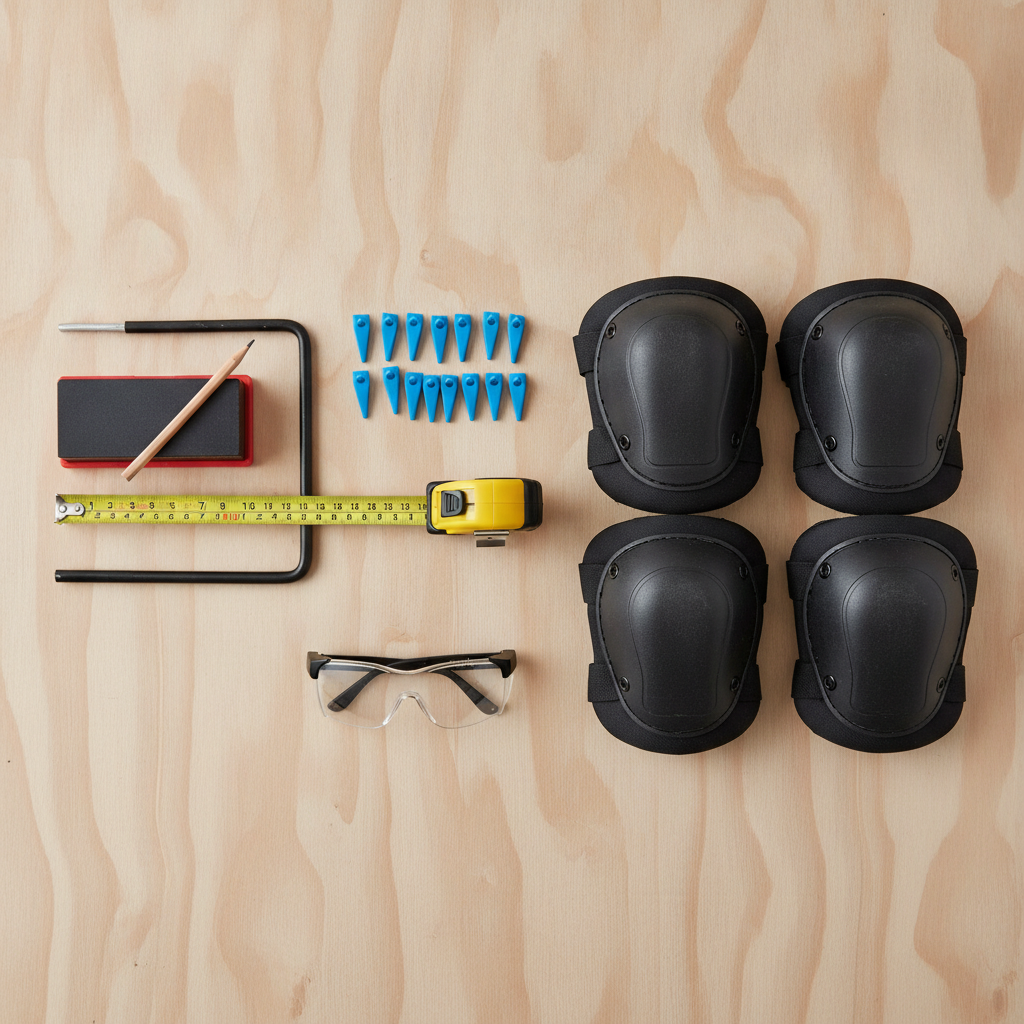
The Bare Essentials (Must-Haves)
- Tape Measure: For all measurements.
- Flooring Installation Kit: This usually includes a tapping block (to gently tap planks together without damaging them), a pull bar (to tighten the last plank in a row), and spacers (to maintain the expansion gap).
- Saw: A miter saw will give you the cleanest, most accurate crosscuts. A table saw is excellent for rip cuts (cutting planks lengthwise), and a jigsaw can be used for intricate cuts around vents or pipes.
- Pencil & Square: For marking your cuts.
Tools That Make it Easier
- Jamb Saw: A specialty tool for undercutting door jambs. You can also use a handsaw or an oscillating multi-tool.
- Knee Pads: Your knees will thank you after a few hours of work.
- Contour Gauge: A fantastic tool for perfectly tracing irregular shapes like door casings or pipes.
Essential Safety Gear
- Safety Glasses: Protect your eyes from dust and debris, especially when cutting.
- Gloves: To protect your hands from splinters and cuts.
- Dust Mask: Critical when sanding, grinding, or creating sawdust.
Expert Tip: For the cleanest cuts on hybrid flooring planks, use a fine-toothed carbide blade on your saw. A blade with 60-80 teeth will minimize chipping on the real wood veneer, giving you a factory-perfect edge every time.
How to Measure Your Room and Calculate Materials Accurately
Incorrectly measuring your room is a rookie mistake that can bring your project to a halt. Follow this simple process to get it right.
- Measure Length and Width: Use your tape measure to find the length and width of the room at its longest points. Multiply these two numbers to get the main square footage. (e.g., 10 feet wide x 12 feet long = 120 sq. ft.).
- Account for Closets and Alcoves: Measure any closets or alcoves separately and add their square footage to your main total.
- Calculate Your Waste Factor: Once you have your total square footage, multiply it by 1.10 (for a 10% waste factor). This is the total amount of flooring you need to order.
The Formula: (Room Length x Room Width) + 10% = Total Square Feet to Order
Why is the waste factor so important? It covers the material lost during cuts to fit planks at the end of rows and around obstacles. It also provides a crucial buffer for any cutting mistakes and leaves you with a few extra planks for “attic stock”—planks you can store for future repairs if a board gets damaged.
Phase 2: The Critical 72-Hour Subfloor Prep Countdown
If your flooring is the star of the show, the subfloor is the stage it performs on. A poorly prepared subfloor is the number one cause of flooring failures like squeaks, bouncy spots, and gapping seams. We’ve framed this critical phase as a 72-hour countdown to make it feel manageable and ensure you don’t miss a single step. Use our downloadable Pre-Installation Checklist to track your progress.
The goal is a subfloor that is clean, dry, and, most importantly, flat. According to the National Wood Flooring Association (NWFA) and most flooring manufacturers, the subfloor must be flat to within 3/16 of an inch over a 10-foot span[1]. Anything more, and you risk compromising the locking system of your floating floor.
72 Hours Out: Clearing the Room & Initial Subfloor Assessment
Your first step is to create a blank canvas.
- Empty the Room: Remove all furniture, rugs, and décor.
- Remove Baseboards: Carefully pry off baseboards and trim using a pry bar. Number them on the back so you know where they go during re-installation.
- Remove Old Flooring (If Necessary): While some hybrid floors can be installed over existing hard surfaces like sheet vinyl or tile, you must remove soft flooring like carpet. Always check your specific manufacturer’s installation guide[3]. If installing over an existing floor, ensure it is clean, well-adhered, and flat.
- Clean Thoroughly: Scrape up any old adhesive, pull staples, and sweep and vacuum the subfloor until it is completely free of dust and debris.
- Check for Flatness: Lay a long, straight edge (like a 10-foot 2×4 or a level) on the subfloor in various spots and directions. If you can slide a 3/16-inch drill bit under the edge at any point, that’s a low spot. If the edge rocks, that’s a high spot. Mark these areas with a pencil.
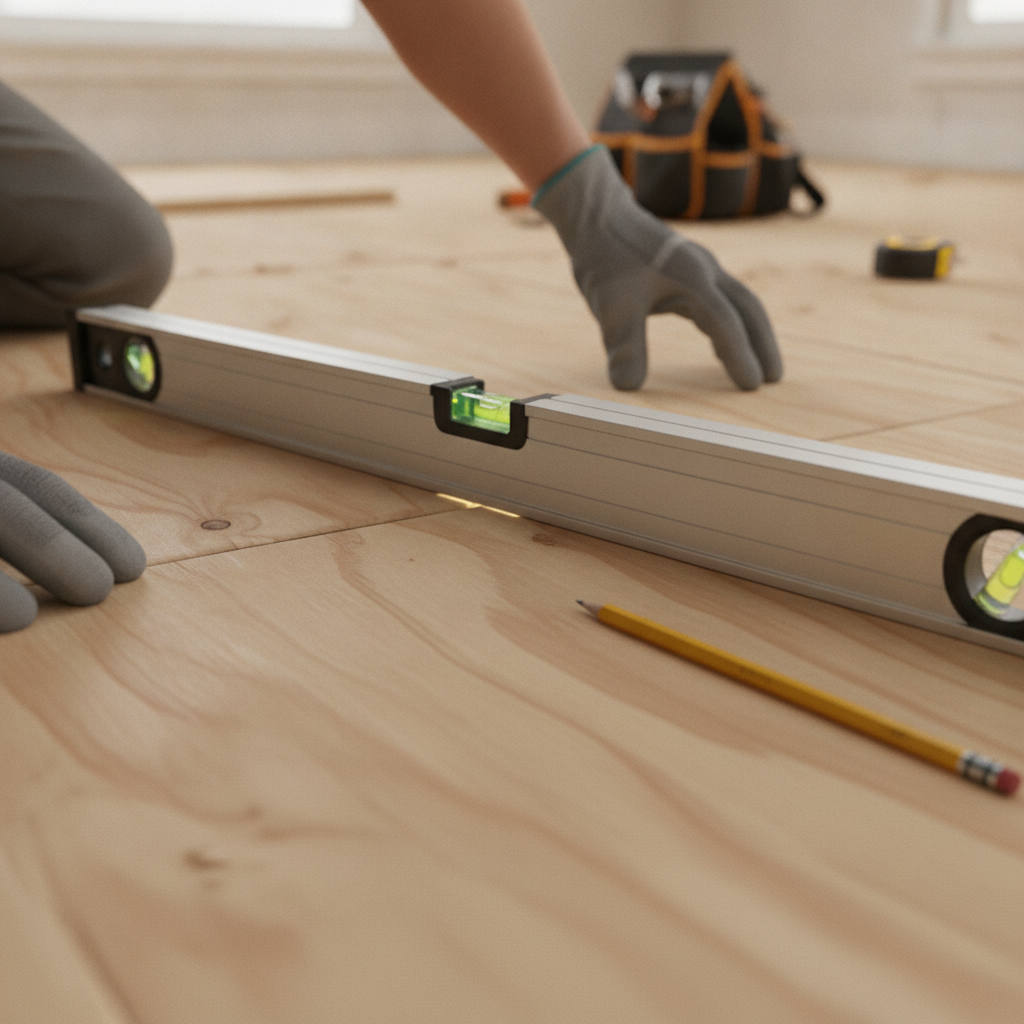
How to Fix an Uneven Subfloor: A DIY Guide
Discovering your subfloor isn’t perfectly flat can be intimidating, but fixing it is well within a DIYer’s reach.
Pro Panel Insight: “For high spots on a wood subfloor, a belt sander is your best friend. For concrete, you may need to rent a concrete grinder. For low spots, don’t try to fill them with layers of roofing felt. A high-quality, cement-based self-leveling compound is the only professional solution. It does the hard work for you.” – Quote attributed to the Certified Flooring Installers Association (CFI)[4].
Fixing Low Spots:
Use a self-leveling compound. This product is mixed with water to a pancake-batter consistency, poured into the low spot, and it naturally flows to create a perfectly level patch. Always wear a dust mask when mixing and follow the product’s technical data sheet from the manufacturer (like Mapei or Ardex) for precise instructions[5].
Fixing High Spots:
- Wood Subfloors: Use a belt sander or a power hand planer to gradually sand down the high area until it’s level with the surrounding floor.
- Concrete Subfloors: For minor bumps, a masonry chisel and hammer may work. For larger areas, you’ll need to rent a concrete grinder.
48 Hours Out: Acclimation and Undercutting Door Jambs
With your subfloor perfectly prepped, it’s time for two final, crucial steps.
1. Acclimate Your Flooring:
Move the unopened boxes of hybrid flooring into the room where they will be installed. Let them sit for a minimum of 48-72 hours. This isn’t an optional step. Allowing the SPC/WPC core and wood veneer to stabilize to your home’s unique temperature and humidity is critical to prevent the floor from expanding or contracting excessively after installation, which can lead to buckling or gapping.
2. Undercut Your Door Jambs:
For a truly professional finish, the flooring should slide under the door jambs and casing, not be cut around them. This can seem daunting, but it’s simple.
- Take a scrap piece of your new flooring and lay it on the subfloor next to the door jamb.
- Place a handsaw flat on top of the scrap flooring.
- Carefully cut through the bottom of the jamb and casing, using the flooring as your height guide.
- Remove the cut piece of wood. You’ve now created a perfect-sized slot for your new flooring to slide into.
Phase 3: The Step-by-Step Visual Installation Guide
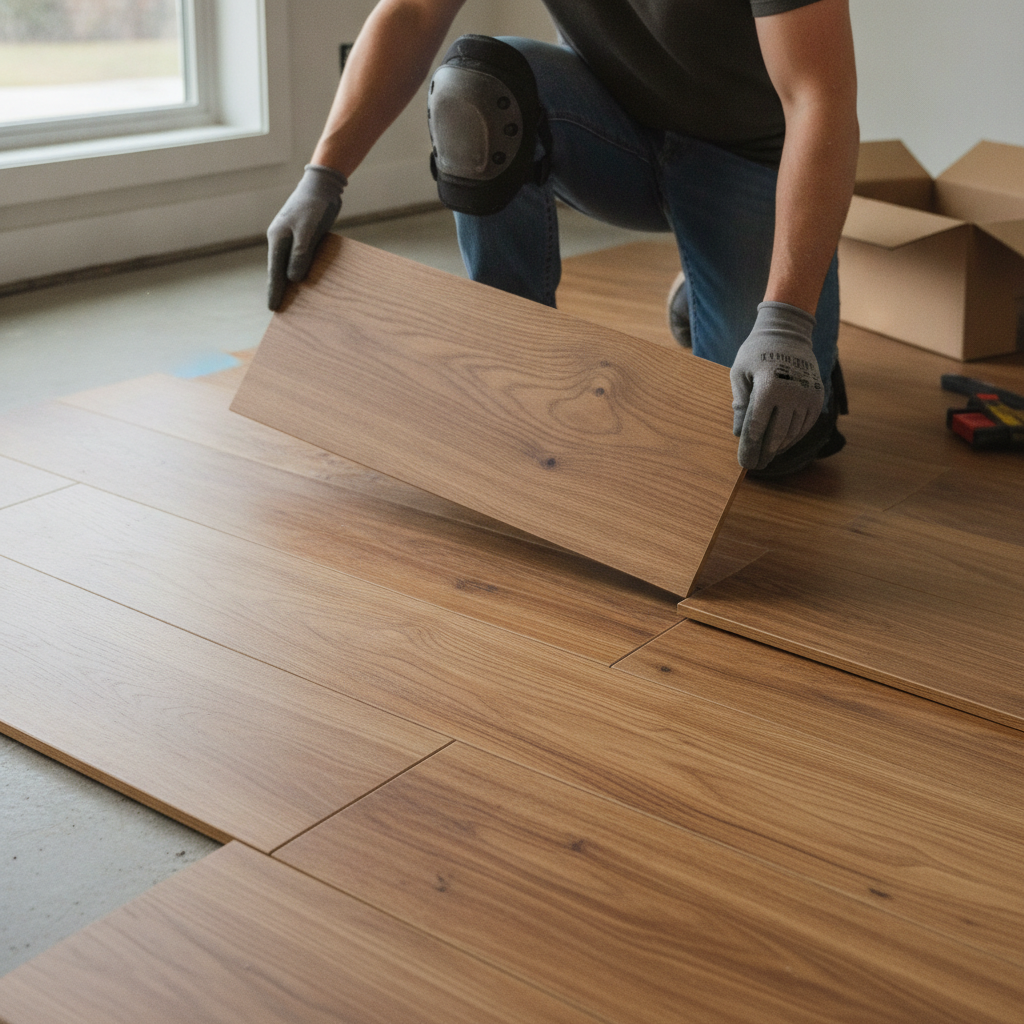
The moment has arrived. Your room is prepped, your tools are ready, and your flooring is acclimated. This is where your planning pays off. As you work, always remember to double-check your specific product’s installation manual, as locking mechanisms can vary slightly between brands[3].
Step 1: Planning Your Layout & Installing the First Row
A straight first row is the foundation for the entire room.
- Plan Your Layout: Measure the width of your room and divide it by the width of one plank. This helps you determine how wide your last row will be. If it looks like the last row will be less than 1/3 of a plank’s width, you should cut your first row down lengthwise (a “rip cut”) to make both the first and last rows a more uniform size.
- Set Your Spacers: Most manufacturers require a 1/4-inch (6-8mm) expansion gap around the entire perimeter of the room. Place your spacers against the starting wall to create this gap.
- Install the First Plank: Lay your first plank in a corner (typically left to right), ensuring the tongue side faces the wall.
- Complete the First Row: Click the next plank into the short end of the first plank. Continue this process until you reach the end of the wall. You will need to cut the last plank to fit, leaving the 1/4-inch expansion gap.
Mistake-Proofing Tip: The piece you cut off from the last plank of the first row can often be used to start the second row, as long as it’s at least 6-8 inches long. This minimizes waste and helps create a natural stagger.
Step 2: Laying the Main Field & Staggering Planks
Now you’ll find your rhythm.
- Start the Second Row: Begin the second row with the plank you cut from the end of the first row (or a new plank cut to at least 6-8 inches).
- Engage the Long Side: Hold the new plank at a slight angle and insert its long-side tongue into the groove of the plank in the first row. Lower it flat to the floor to lock it in.
- Connect the Short Side: Slide the plank until its short end is close to the previous plank in the same row. Use your tapping block and a mallet to gently tap the short ends together for a tight, seamless fit. Do not hit the plank directly with the hammer.
- Continue and Stagger: Continue across the floor, row by row.
Expert Tip: “Properly staggering your planks is crucial for two reasons: strength and beauty. Stagger the end seams by at least 6-8 inches between adjacent rows. This distributes stress across the floor and prevents weak points. Visually, avoid creating ‘H-patterns’ (where seams line up every other row) or ‘step patterns’ for a more random, natural wood look.” – Quote attributed to the Certified Flooring Installers Association (CFI)[4].
Step 3: Cutting Around Obstacles and Fitting the Last Row
Patience is key for the finishing rows.
- Cutting Around Obstacles: For floor vents or pipes, measure and mark the location on your plank. Use a jigsaw to carefully cut out the required shape. A contour gauge is a lifesaver for tracing around irregular door casings or stonework.
- Fitting the Last Row: The last row is often the trickiest. You will likely need to cut the planks lengthwise to fit the remaining space (remembering to leave the 1/4-inch expansion gap). To lock this final row in place, you won’t have room for a tapping block. This is where the pull bar is essential. Hook it over the edge of the plank against the wall and tap it with your mallet to pull the plank tight against the previous row.
Certified Installer Insight: “The last row separates the amateurs from the pros. Take your time, measure twice, and cut once. A clean, straight cut on that final row makes all the difference when you install your baseboards.”
Step 4: Finishing Touches – Installing Transitions and Baseboards
The final details complete the transformation.
- Remove Spacers: Carefully remove all the spacers from around the perimeter of the room.
- Install Transitions: Use transition strips to create a smooth and finished look between your new floor and adjacent flooring types (like carpet or tile) or in doorways. Common types include T-molding (for same-height floors), reducers (for stepping down to a lower floor), and end caps. Follow the manufacturer’s guide for your specific transitions, as they often use a metal track that is screwed to the subfloor[6].
- Re-install Trim: Nail your baseboards back into place. The baseboard and/or an additional piece of quarter-round molding will cover the expansion gap, giving your project a clean, professional edge. An expert tip for perfect inside corners is to “cope” the joint on your quarter-round instead of just mitering it.
The 5 Costliest DIY Installation Mistakes (And How to Avoid Them)
Knowing what not to do is just as important as knowing what to do. Avoid these common pitfalls that can lead to flooring failure and instantly void your warranty.
Mistake #1: Skipping Subfloor Prep
The Consequence: An uneven, dirty, or wet subfloor will cause the floor to feel bouncy, make clicking noises, and can eventually lead to the locking mechanisms breaking.
How to Avoid It: Do not rush the preparation phase. Adhere strictly to the flatness standard of 3/16 of an inch over 10 feet[1]. As one certified flooring inspector noted, “Nearly every flooring ‘failure’ I investigate is actually a subfloor failure in disguise.”[7].
Mistake #2: Forgetting the Expansion Gap
The Consequence: As temperature and humidity change, your entire floor expands and contracts as a single unit. Without a gap around the perimeter for it to move, it will press against the walls, causing the floor to buckle and “peak” in the middle of the room.
How to Avoid It: Consistently use your 1/4-inch spacers on all walls and fixed objects (like kitchen islands or cabinets) during the entire installation.
Mistake #3: Incorrect or No Plank Staggering
The Consequence: Lining up the short seams on your planks creates a grid-like, unnatural appearance. More importantly, it creates significant structural weak points, which can reduce the floor’s integrity and lead to planks separating over time.
How to Avoid It: Follow the 6-8 inch stagger rule. Consciously check your layout every few rows to ensure you are creating a random, staggered pattern and avoiding H-patterns.
Frequently Asked Questions (FAQ)
Do I need an underlayment for waterproof hybrid flooring?
Most likely, no. The vast majority of waterproof hybrid hardwood products come with a high-quality underlayment already attached to the back of each plank. Adding a second layer of underlayment can make the floor feel too spongy and may compromise the locking system. Always refer to your specific product’s manual, as it is the ultimate authority[3].
Can I install hybrid flooring in a bathroom or basement?
Absolutely. This is where hybrid flooring truly shines. Because its core is 100% waterproof, it is an excellent choice for high-moisture areas where traditional hardwood would be a disaster. Just ensure your subfloor is dry and properly prepared. For full bathrooms, it’s a good practice to apply a bead of 100% silicone sealant in the expansion gap around the perimeter before installing your trim to create a watertight seal.
How do I clean and maintain my new hybrid hardwood floor?
To protect your investment, avoid harsh chemicals. Regularly sweep or vacuum (using a hard floor setting without a beater bar). For deeper cleaning, use a damp mop with a pH-neutral flooring cleaner. Never use a steam mop, wax, oil-based soaps, or abrasive cleaners, as these can damage the protective wear layer and may void your warranty.
Your Flooring Masterpiece Awaits
Congratulations! You now have the knowledge, techniques, and pro-level secrets to install your waterproof hybrid hardwood flooring with confidence. You understand the material, you know how to plan your project, you can conquer subfloor prep, and you have a step-by-step guide to a flawless installation. You are no longer an anxious beginner; you are an empowered and prepared DIYer.
The satisfaction of looking at a beautiful new floor and knowing you did it yourself is unmatched. It’s time to turn that vision into a reality.
Feeling confident? Download your complete Pre-Installation Checklist and Tool Guide now and turn your flooring dream into a reality this weekend!
Disclaimer: This article provides a comprehensive guide for DIY installation. Always prioritize safety by using appropriate personal protective equipment (PPE). Refer to your specific flooring manufacturer’s installation manual, as it is the ultimate authority and failure to do so may void your warranty. If you are unsure about any step, especially subfloor preparation, consult a certified flooring professional.
Authoritative Sources & References
- National Wood Flooring Association (NWFA). (N.D.). Installation Guidelines. The NWFA provides industry-standard guidelines for subfloor flatness and moisture content, which are widely adopted by flooring manufacturers.
- ASTM International. (N.D.). ASTM F1869 – Standard Test Method for Measuring Moisture Vapor Emission Rate of Concrete Subfloor Slabs Using Anhydrous Calcium Chloride. This is an industry-standard test for assessing moisture in concrete subfloors.
- Flooring Manufacturer Installation Guidelines. (N.D.). Documents provided by manufacturers such as Shaw, Mohawk, and Pergo. These guides are the primary authority for specific product installation requirements, locking systems, and warranty conditions.
- Certified Flooring Installers Association (CFI). (N.D.). Training and Certification Resources. The CFI provides best practices and professional standards for flooring installation, which inform expert techniques and tips.
- Mapei / Ardex. (N.D.). Technical Data Sheets for Self-Leveling Underlayments. These documents provide authoritative instructions on the proper mixing, application, and curing of cementitious self-leveling compounds.
- Zamma Corporation. (N.D.). Installation Instructions for Flooring Transitions. As a leading manufacturer of flooring molding and transitions, their guidelines represent best practices for finishing an installation.
- Certified Flooring Inspectors University (CFIU). (N.D.). Training Materials on Flooring Failures. Resources from flooring inspection bodies provide authoritative insight into the common causes of flooring issues, primarily linking them to subfloor and installation errors.
