
There’s a unique kind of dread that comes with finishing a basement. You invest time, money, and vision into creating a beautiful new living space, only to live with the nagging fear that a single damp spot or hidden leak could undo it all. Warped planks, buckled tiles, and the musty smell of mold are the nightmares of every homeowner. What if you could eliminate that fear? What if you had a system that guaranteed you’d choose the right floor and install it for lasting success?
Welcome to the Fail-Proof Basement Flooring Playbook. This is not just another list of flooring options. This is a complete, step-by-step guide designed to empower you to make confident decisions. We will walk you through the entire process, from becoming a moisture detective in your own home to understanding the science behind a perfect installation. Together, we will diagnose your basement’s unique environment, compare the best waterproof materials like revolutionary hybrid hardwood, master the non-negotiable steps of subfloor preparation, and learn the expert tips that prevent flooring failures before they start.
- Step 1: Diagnose Your Basement’s Environment (Before You Shop)
- Step 2: Compare Your Waterproof Basement Flooring Options
- Brand Spotlight: Bravewood Waterproof Hybrid Hardwood Reviews
- Step 3: The Non-Negotiable Guide to Subfloor Preparation
- Step 4: Installation Best Practices to Prevent Warping
- Inspiring & Practical: Basement Flooring Ideas by Room Function
- Conclusion: Build Your Basement Floor with Confidence
- References & Authoritative Sources
Step 1: Diagnose Your Basement’s Environment (Before You Shop)
Before you even look at a single flooring sample, you must first understand the unique environment of your basement. Covering a damp concrete slab with beautiful new flooring without addressing the root cause of the moisture is the single most expensive mistake a homeowner can make. It traps moisture, creating a perfect breeding ground for mold and guaranteeing your investment will fail.
According to the standards upheld by the American Society of Home Inspectors (ASHI), diagnosing moisture sources is the critical first step in any below-grade project. As one certified inspector notes, “Flooring is the last step, not the first. The slab is a story, and you have to read it. Is it sweating? Is water pushing through? Or is the problem coming from outside? Answering these questions first saves you thousands in the long run.” The U.S. Environmental Protection Agency (EPA) also warns that unchecked moisture can lead to mold growth, which can cause a variety of health problems.
Identifying the Source: Condensation, Leaks, or Vapor Transmission?
Moisture in your basement generally comes from one of three sources. Identifying which one is affecting your space is key to finding the right solution.
- Leaks (Liquid Water): This is the most obvious source. Look for water stains on walls, puddles on the floor after heavy rain, or visible drips from cracks in the foundation. Leaks are often tied to exterior issues and must be repaired before any flooring project begins.
- Condensation: This occurs when warm, humid air comes into contact with cool surfaces like your concrete floor or foundation walls, causing water droplets to form—just like on a cold glass of water in the summer. If your basement feels dampest during humid summer months, condensation is a likely culprit.
- Vapor Transmission (Hydrostatic Pressure): This is moisture from the soil being forced up through the microscopic pores in your concrete slab. A key sign of this is efflorescence—a white, chalky, crystalline powder left on the surface of the concrete as water evaporates. The Basement Health Association (BHA) defines this movement of water vapor as a result of hydrostatic pressure, where groundwater pushes against your foundation.
The Simple Plastic Sheet Test
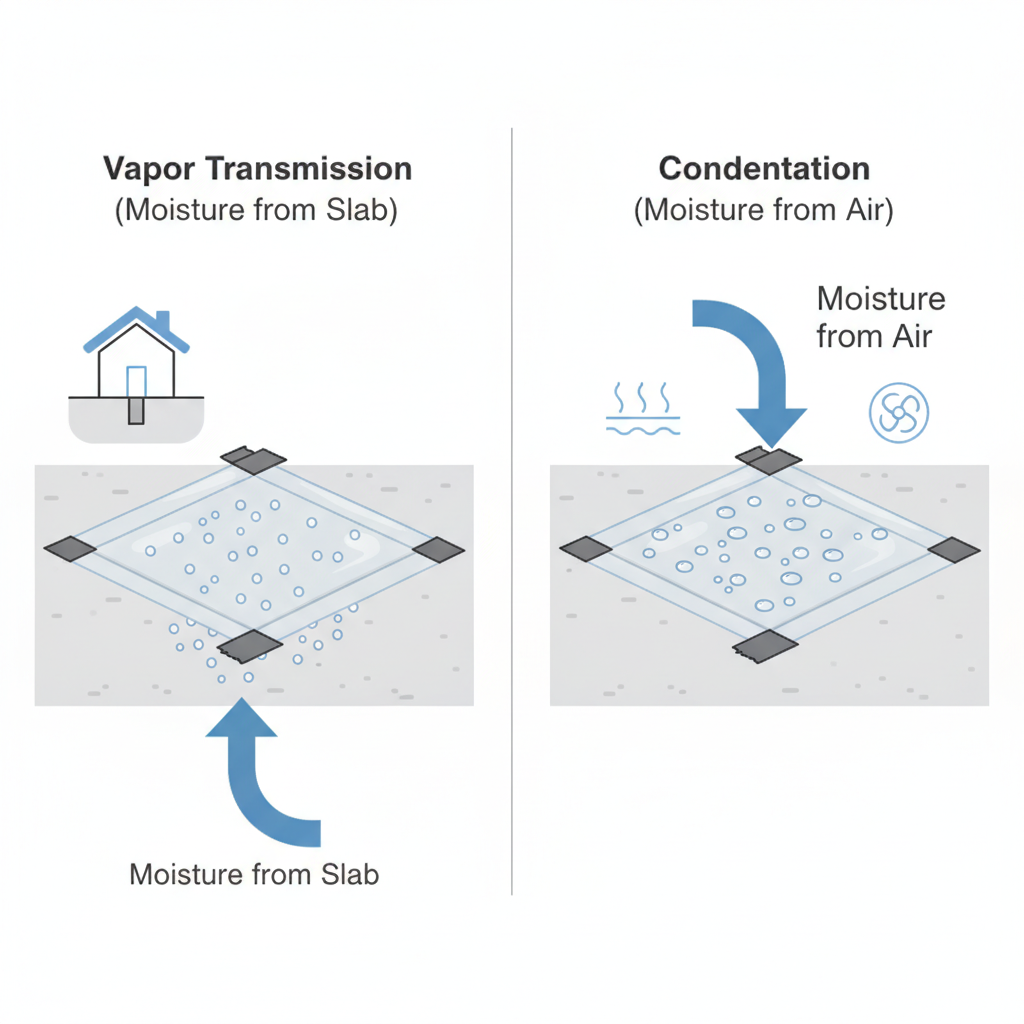
To help differentiate between condensation and vapor transmission, you can perform this easy test:
- Securely tape a 2’x2′ square of clear plastic sheeting to a clean, dry section of your concrete floor. Use heavy-duty tape (like duct tape) on all four sides to create an airtight seal.
- Leave the plastic in place for 24-48 hours.
- After the time has passed, examine the plastic.
- Droplets on the underside of the plastic: This indicates moisture is coming up through the slab (vapor transmission).
- Droplets on the top surface of the plastic: This indicates the air in your basement is humid and condensing on the cooler surface (condensation).
Your 3 Lines of Defense Against Basement Moisture
Solving basement moisture requires a holistic approach. True waterproofing isn’t just about one product; it’s about creating a system that manages water from the outside in. Experts at the Building Science Corporation emphasize that controlling water on the exterior is the most effective long-term strategy.
- Defense Line 1: Manage Surface Water (Exterior – Top): The easiest water to control is the water that never reaches your foundation. This involves ensuring your gutters are clean and functioning, and that downspouts discharge water at least 6-10 feet away from your house. The ground around your foundation should also have a positive grade, sloping away from the house to direct rainwater away.
- Defense Line 2: Exterior Waterproofing (Exterior – Subsurface): For more serious water intrusion, the best defense is an exterior waterproof membrane applied to the foundation walls, often paired with a French drain system at the base of the foundation to carry groundwater away. This is an extensive project but provides the highest level of protection.
- Defense Line 3: Interior Water Management: When exterior solutions aren’t feasible, an interior water management system can be effective. This typically involves an interior French drain installed along the perimeter of the basement floor to capture any water that seeps in and direct it to a sump pump, which then pumps the water out and away from the house.
Step 2: Compare Your Waterproof Basement Flooring Options
Once you’ve addressed any underlying moisture issues, it’s time to choose your flooring. The basement environment demands materials that are 100% waterproof, durable, and mold-resistant. To simplify your decision, we’ve created the Basement Durability Scorecard, rating the top options against the metrics that matter most below grade.
Basement Durability Scorecard
| Flooring Type | Waterproof Rating | Scratch Resistance | Mold Resistance | Avg. Cost (Material) | DIY-Friendliness |
|---|---|---|---|---|---|
| Hybrid Hardwood (SPC Core) | 10/10 (Core is waterproof) | 8/10 (Varies by finish) | 9/10 (Inorganic core) | $5 – $10 /sq. ft. | 8/10 (Click-lock) |
| Luxury Vinyl Plank (SPC) | 10/10 (100% waterproof) | 9/10 (Depends on wear layer) | 10/10 (Inorganic) | $3 – $7 /sq. ft. | 9/10 (Click-lock) |
| Porcelain Tile | 10/10 (Impervious to water) | 10/10 (PEI Rating 4-5) | 10/10 (Inorganic) | $4 – $15 /sq. ft. | 4/10 (Requires skill) |
| Epoxy Coating | 10/10 (Seamless barrier) | 9/10 (High-solids epoxy) | 10/10 (Non-porous) | $3 – $8 /sq. ft. | 5/10 (Prep is critical) |
| Sealed Concrete | 8/10 (Water resistant, not proof) | 7/10 (Depends on sealer) | 8/10 (If sealed properly) | $2 – $6 /sq. ft. | 6/10 (Can be complex) |
The Champion of Realism & Warmth: Waterproof Hybrid Hardwood
For years, the idea of putting real hardwood in a basement was unthinkable. That has changed with the advent of waterproof hybrid hardwood. This revolutionary product category solves the ultimate basement dilemma: how to get the authentic beauty and warmth of real wood without the risk of water damage.
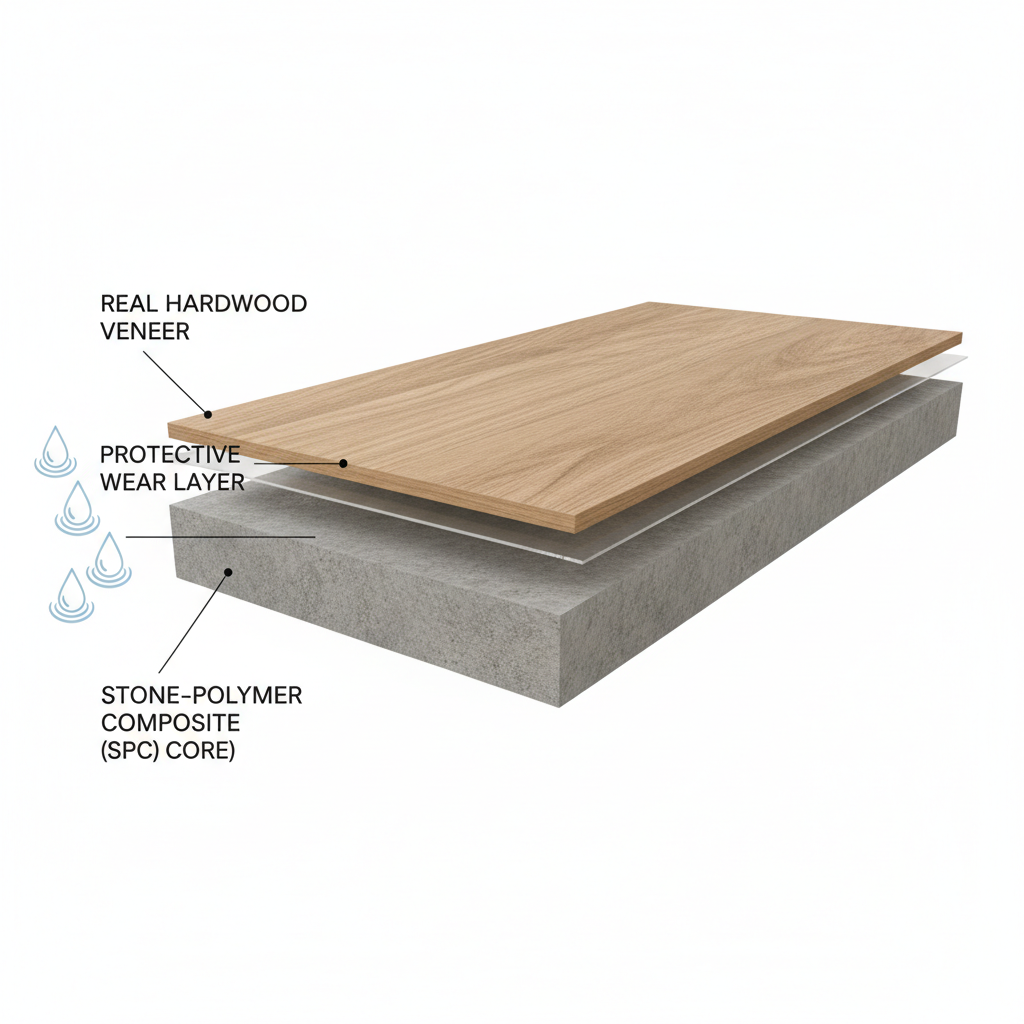
So, what is hybrid hardwood? It’s an engineered product constructed with a thin layer of genuine hardwood veneer on top of a 100% waterproof stone-polymer composite (SPC) core. This construction means the core will not swell, buckle, or warp when exposed to moisture, making it perfectly suited for below-grade installation. Brands like Bravewood showcase this technology, offering the unmistakable grain and texture of oak or hickory on a dimensionally stable, waterproof foundation. When considering this option, always consult the manufacturer’s technical data sheets, which are the ultimate authority on whether a specific product is warrantied for basement use.
The All-Around Performer: Luxury Vinyl Plank (LVP/SPC)
Luxury Vinyl Plank is arguably the most popular choice for basements, and for good reason. It’s 100% waterproof, highly durable, relatively inexpensive, and comes in an endless variety of convincing wood and stone looks. Most modern LVP features an SPC (Stone-Polymer Composite) core, which is extremely rigid and dense, helping it hide minor subfloor imperfections.
When shopping for LVP, the most important specification to look for is the wear layer thickness. This transparent top layer protects the printed design from scratches and scuffs. The Resilient Floor Covering Institute (RFCI) notes that a thicker wear layer provides greater durability. For a basement, look for a wear layer of at least 12 mil, with 20 mil or higher being ideal for high-traffic areas or homes with pets and kids. Additionally, look for products with FloorScore certification, which ensures the flooring has been tested and meets strict standards for low volatile organic compound (VOC) emissions, contributing to healthier indoor air quality.
The Indestructible Choice: Porcelain Tile & Epoxy/Sealed Concrete
For areas that demand the absolute highest level of durability, like a home gym, workshop, or laundry area, you can’t beat porcelain tile or resinous coatings.
- Porcelain Tile: Porcelain is a type of ceramic that is fired at extremely high temperatures, making it denser and less porous than standard ceramic. It is completely impervious to water. When choosing tile, look for its PEI rating, a scale developed by the Tile Council of North America (TCNA) that measures abrasion resistance. A PEI rating of 4 or 5 is suitable for any residential application, including heavy-traffic basements.
- Epoxy/Sealed Concrete: For a modern, industrial look, treating the concrete slab itself is a fantastic option. An epoxy coating creates a seamless, non-porous, and incredibly durable surface that is resistant to chemicals and impacts. According to ASTM International standards, high-quality epoxy systems offer exceptional abrasion resistance. Polished and sealed concrete offers a more organic look and, as noted by experts at Concrete Network, can be stained in a variety of colors for a custom finish.
Brand Spotlight: Bravewood Waterproof Hybrid Hardwood Reviews
With the rise of hybrid hardwood, many homeowners are asking, “Is Bravewood a good brand?” As a prominent name in this category, it warrants a closer look. Based on aggregated customer testimonials and product specifications, here is a balanced review.
Bravewood Flooring: At a Glance
| Rating Metric | Score | Summary |
|---|---|---|
| Durability | 8.5/10 | The SPC core is exceptionally stable and waterproof. The real wood veneer is protected by a multi-layer aluminum oxide finish, offering good scratch resistance, though it’s not as indestructible as the wear layer on a high-end LVP. |
| Appearance | 9.5/10 | This is Bravewood’s main selling point. Because it uses a real wood veneer, the grain, texture, and color variation are authentic in a way that printed vinyl cannot fully replicate. |
| Value | 7.5/10 | It is a premium product with a price point to match, often higher than LVP. However, for those who prioritize the look of real wood, it offers excellent value compared to traditional engineered or solid hardwood. |
| Ease of Installation | 8/10 | It uses a standard click-lock floating floor system, making it very DIY-friendly. The rigid core is forgiving over minor subfloor imperfections. |
Pros:
- Unmatched aesthetic realism of genuine wood.
- 100% waterproof core is ideal for basements.
- Feels more substantial and warmer underfoot than LVP.
Cons:
- Higher price point than most LVP options.
- While durable, the real wood veneer can still be dented by heavy impacts, unlike solid vinyl.
The brand maintains a satisfactory profile with the Better Business Bureau (BBB), indicating a commitment to addressing customer service issues. Overall, Bravewood is an excellent choice for homeowners who want the beauty of real hardwood in their basement without compromising on waterproof performance.
Step 3: The Non-Negotiable Guide to Subfloor Preparation
You can buy the best flooring in the world, but if you install it over an improperly prepared subfloor, it will fail. This step is where many DIY projects go wrong. A concrete subfloor must be clean, flat, and—most importantly—dry.
The National Wood Flooring Association (NWFA) states that subfloor preparation is the most critical factor for a successful flooring installation. Before proceeding, your concrete slab must be:
- Clean: Scrape or grind away any old adhesive, paint, or drywall compound. Sweep and vacuum the entire surface thoroughly.
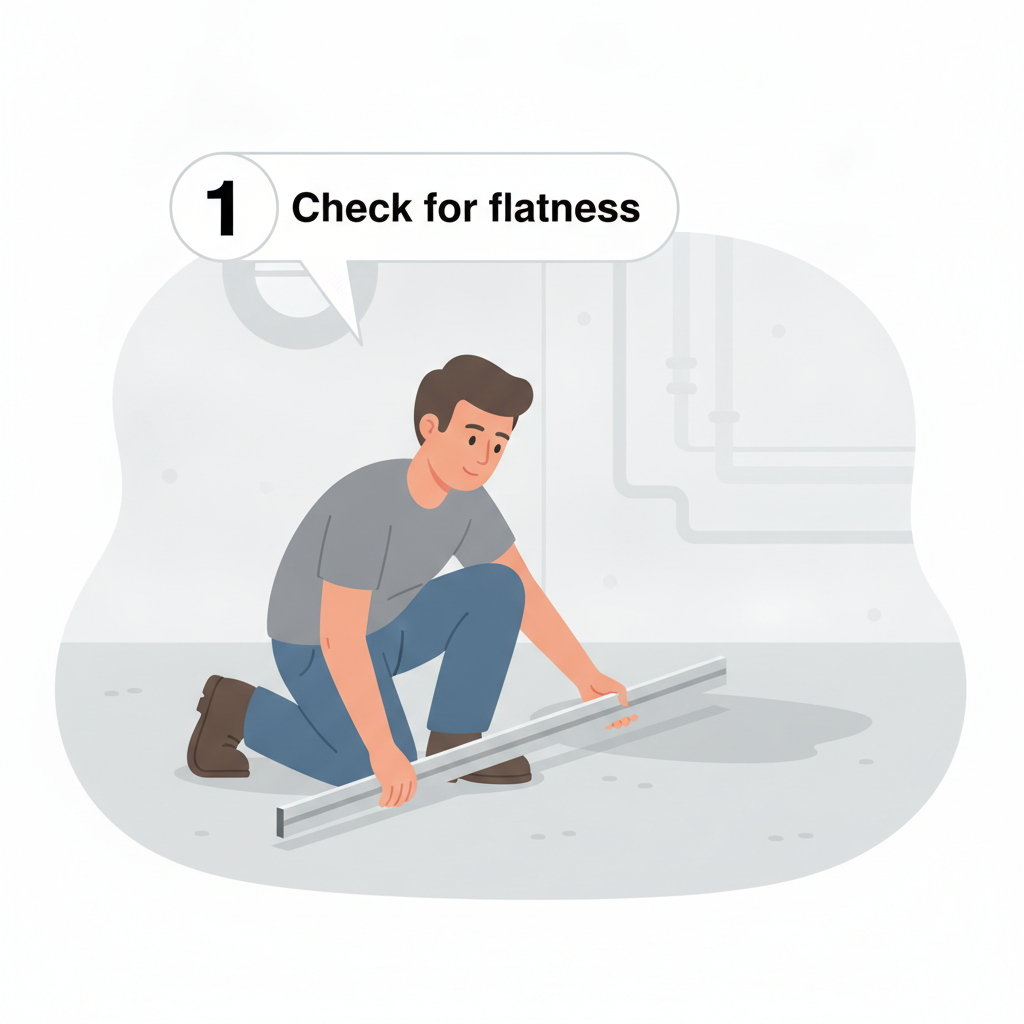
- Flat: Check the floor for high and low spots using a long, straight edge (like an 8-foot level). Most flooring manufacturers require the floor to be flat within 3/16 of an inch over a 10-foot span. Low spots can be filled with a self-leveling compound, and high spots can be ground down.
- Dry: This is the most crucial part. Even if you’ve addressed leaks, the slab itself can still hold and transmit moisture. Professional installers use moisture meters or conduct a Calcium Chloride test to get a quantitative reading. The International Concrete Repair Institute (ICRI) provides technical guidelines for these tests, which measure the amount of water vapor emitting from the slab over a period of time. For any floating floor installation (like LVP or hybrid hardwood), it is essential to install a 6-mil polyethylene vapor barrier over the concrete first. This plastic sheeting acts as a final line of defense, preventing any moisture vapor from reaching your new floor.
Step 4: Installation Best Practices to Prevent Warping
Warping, buckling, and gapping are almost always caused by improper installation, not faulty materials. Two key concepts will protect your investment: acclimatization and expansion gaps.
The Certified Flooring Installers Association (CFI) emphasizes that following manufacturer-specific instructions is paramount for a lasting floor.
- Acclimatization: Every flooring material needs to adjust to the temperature and humidity of the space where it will be installed. This process is called acclimatization. Bring the unopened boxes of flooring into the basement and let them sit for at least 48-72 hours before you begin the installation. This allows the planks to expand or contract to match the room’s environment, preventing them from buckling or gapping after they’ve been installed.
- Expansion Gaps: All hard-surface floating floors expand and contract with changes in temperature and humidity. To allow for this movement, you must leave a small gap (typically 1/4″ to 3/8″) between the edge of the flooring and all walls and vertical obstructions (like pipes or support columns). This gap will be covered by baseboards or quarter-round molding. Without this “breathing room,” the floor will have nowhere to go when it expands, causing it to buckle and warp in the middle of the room.
Inspiring & Practical: Basement Flooring Ideas by Room Function
Now for the fun part. With the technical challenges solved, you can focus on creating a space you love. The best flooring choice often depends on how you plan to use your basement.
For the Cozy Home Theater or Family Room
Here, comfort and aesthetics are key. You want a floor that feels warm underfoot and helps create an inviting atmosphere.
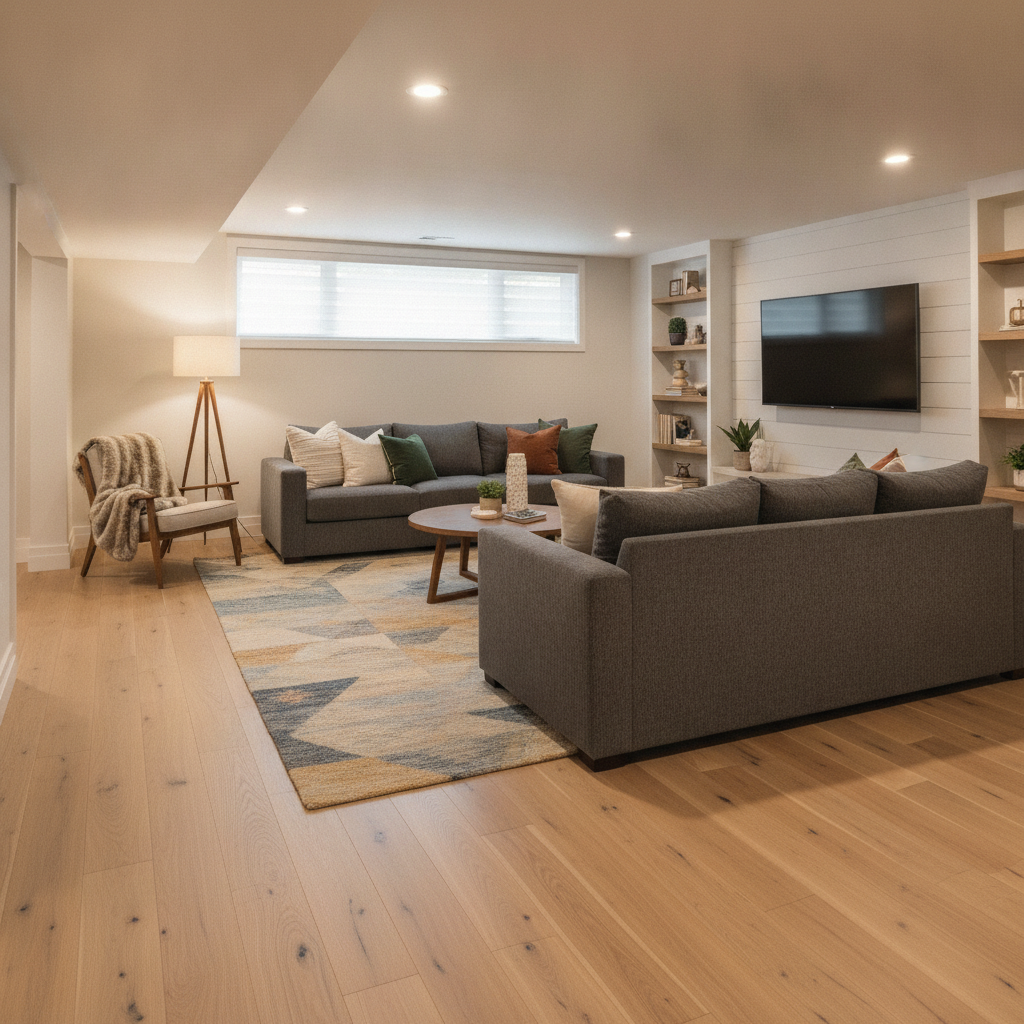
- Best Flooring Choices: Waterproof hybrid hardwood like Bravewood is a top contender, offering the authentic look of wood. High-quality LVP with an attached pad or a separate underlayment is also excellent, as the extra layer provides a thermal break from the cold concrete and dampens sound for better movie-night acoustics.
- Designer Tip: “Choose a floor with a textured, low-sheen finish. It mimics the look of a natural oil-finished hardwood and does a fantastic job of hiding dust and footprints, which is perfect for a relaxed living space.”
For the High-Impact Home Gym or Workshop
This space demands ultimate durability. The floor needs to withstand dropped weights, heavy equipment, and potential spills.
- Best Flooring Choices: Thick (20 mil+) wear layer LVP is a good option, but interlocking rubber tiles are the gold standard for home gyms. They provide excellent shock absorption and are incredibly tough. For a workshop, a professionally installed epoxy coating is nearly indestructible and very easy to clean.
- Designer Tip: “Don’t be afraid of color. A bold epoxy floor or rubber tiles with color flecks can turn a utilitarian space into a high-energy, motivating environment.”
For the Kid-Proof Playroom
A playroom floor needs to be a triple threat: resistant to scratches, immune to stains, and easy to clean.
- Best Flooring Choices: SPC vinyl is the clear winner here. Its dense core makes it highly resistant to dents from dropped toys, and the protective wear layer can handle endless foot traffic and spills. Choose a product with a strong warranty against staining and wear for total peace of mind.
- Designer Tip: “Look for LVP in lighter, more neutral wood tones. It creates a bright and airy feel and acts as a perfect, versatile backdrop that will grow with your children’s changing tastes and activities.”
Conclusion: Build Your Basement Floor with Confidence
Finishing a basement is a significant investment, and the flooring you choose is its foundation. By throwing out the old guesswork and adopting the Fail-Proof Playbook, you can transform a source of anxiety into a point of pride. The methodology is simple but powerful: Diagnose your environment first, Choose the right waterproof material for your needs, Prepare your subfloor meticulously, and Install it using industry best practices. By following this system, you are not just installing a floor; you are engineering a successful outcome, guaranteeing a beautiful, durable, and worry-free space for years to come.
Ready to transform your basement with confidence? Explore our collection of Bravewood Waterproof Hybrid Hardwood and find the perfect style for your fail-proof floor today.
This article provides informational guidance. Basement moisture issues can be complex. We strongly recommend consulting with certified waterproofing professionals and flooring installers before making any final decisions or beginning work.
References & Authoritative Sources
- American Society of Home Inspectors (ASHI). (N.D.). Standards of Practice. Retrieved from ashi.org.
- U.S. Environmental Protection Agency (EPA). (2023). A Brief Guide to Mold, Moisture, and Your Home. Retrieved from epa.gov/mold.
- Basement Health Association (BHA). (N.D.). Industry Standards & Terminology. Retrieved from basements.org.
- Building Science Corporation. (N.D.). Building Science Insights and Publications. Retrieved from buildingscience.com.
- Tile Council of North America (TCNA). (N.D.). Understanding the PEI Rating. Retrieved from tcnatile.com.
- Resilient Floor Covering Institute (RFCI). (N.D.). Technical Resources for Resilient Flooring. Retrieved from rfci.com.
- FloorScore. (N.D.). FloorScore Certified Products Directory. Retrieved from scsglobalservices.com/services/floorscore.
- ASTM International. (N.D.). Standards for Resinous Flooring and Coatings. Retrieved from astm.org.
- Concrete Network. (N.D.). Guides to Polished and Sealed Concrete Floors. Retrieved from concretenetwork.com.
- Better Business Bureau (BBB). (N.D.). Business Profiles. Retrieved from bbb.org.
- International Concrete Repair Institute (ICRI). (N.D.). Technical Guidelines for Concrete Surface Preparation and Moisture Testing. Retrieved from icri.org.
- National Wood Flooring Association (NWFA). (N.D.). Installation Guidelines. Retrieved from nwfa.org.
- Certified Flooring Installers Association (CFI). (N.D.). Installation Best Practices & Standards. Retrieved from cfiinstallers.org.
